Raspberry kiosk mode configuration on Pandora FMS
About the Raspberry kiosk mode
If you’ve been shopping recently, you may or may not have seen stores and shops with screens, promotional videos, product images, statistics, etc.
Normally, for this purpose the computers are hidden. These computers have immense power consumption, being on all day just to show something on the screen.
This is where our friend Raspberry kiosk mode comes in automatically when you turn it on. The big advantage is that the consumption will be infinitely lower, with 2W per hour at full capacity, which a year would be… simply a gigantic saving. Let’s take a look at the installation.
What do you need?
For Raspberry kiosk mode and to display a web page on screen all you need is an HDMI cable, a Raspberry (obviously), an Internet connection and a web server that hosts the page to display (This is up to you).
In Pandora FMS offices we use Raspberry every day to show statistics of our services, availability of our websites and the tickets of our support system.
You will also be able to perfectly integrate Pandora FMS dashboards and customized public visual consoles.
How to connect the Raspberry kiosk mode: step by step
First, you’ll need to connect the Raspberry to a monitor with an HDMI cable, which will display any web page in full screen. If you don’t have keyboards, on your own machine, that is, 100% autonomous, you will have to configure a remote access, either by SSH or by eHorus (Pandora FMS’s brother!).
This guide uses a very light Raspbian image, as it does not have a desktop environment. It only installs the minimum to be able to see the browser in full screen.
1. Flashing image on sd card
First, download the Pandora FMS image with the preinstalled kiosk mode from the official Pandora FMS download page. Then flash it on the SD card:
You can find the flashing process in the SD card in Pandora FMS Documentation.
2. Hardware Connection
The next thing would be to connect all the components to turn on the Raspberry with the operating system:
- Insert the SD card into the compartment at the bottom of the box.
- Connect the keyboard to any of the USB ports.
- Connect the HDMI cable to the Raspberry monitor and HDMI port.
- Finally, connect the power cord to the appliance and to the electrical current.
3. Network Configuration
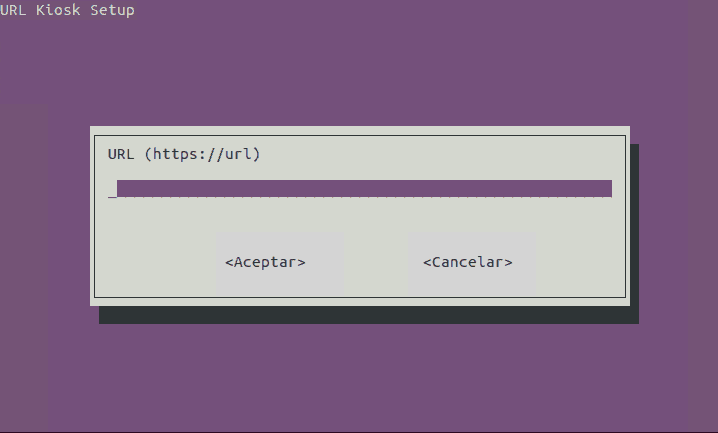
To perform the network configuration you will need to start the device; this will display an installer where you can easily configure the interface. If you get lost in any moment of the installation you can always go to Pandora FMS Documentation, where it is explained step by step.
4. Url Configuration to Display
In the installer you must indicate the URL you need to display.
Remember that it is very important to use the complete route: https://…

If you later need to change the URL you will have to edit the last line of the file:
/etc/xdg/openbox/autostart
![]()
To exit the kiosk mode press the keys CTRL+ALT+DEL
To start kiosk mode again without rebooting enter in the Pandora user terminal:
startx — -nocursor
5. Configuration Pandora FMS Agent
The next step would be to configure the Pandora FMS agent that already comes preinstalled. The process is very easy, you would only have to access the configuration file and fill in the corresponding parameters. If, once configured, you enable remote configuration, all the changes in the configuration file can be made directly from the console without the need to access the computer. To know the available parameters you can check the Pandora FMS Documentation.
6. eHorus Configuration
Last but not least, there comes the step of configuring eHorus, the completely free remote desktop software for up to 5 devices. You can consult the guide in Pandora FMS Wiki.
In short, by using Raspberry kiosk mode with Pandora FMS you will be able to analyse at a glance the health of your monitored computers, as long as our visual consoles and dashboards contain the correct information.
All this will be done for an infinitely lower price than a desktop, since the Raspberry has a very competitive price and its consumption is the lowest in the market for hardware of these characteristics.
You will also have a platform on which you can develop many complements to monitoring, such as agents in strategic sites, NetFlow collectors to analyze the traffic that passes through the network in real time, voice assistants to reproduce Pandora FMS alerts, and so on.
In short, this is a first article of many that shows the functionalities, the easy installation and the great potential of this small hardware, at a price accessible to anyone and for any environment.
If you are lost in any of these steps or simply prefer to see first-hand how to set up a Raspberry kiosk mode, you can see the following tutorial:
If you don’t want to miss any video of our Youtube channel, subscribe to the Pandora FMS channel! Find more videos, tutorials, and guides of the most flexible monitoring software in the world.
You can also ask us any question you may have about Pandora FMS, through the contact form that can be found at the following address:
https://pandorafms.com/contact/
And don’t forget to have a look at the other articles that we have published in this blog, we are pretty sure that you will like them.
What did you think of this article about Raspberry kiosk mode?
Leave us your opinion about Raspberry kiosk mode in the comments section below.
We will be happy to answer all your questions.
Pandora FMS’s editorial team is made up of a group of writers and IT professionals with one thing in common: their passion for computer system monitoring. Pandora FMS’s editorial team is made up of a group of writers and IT professionals with one thing in common: their passion for computer system monitoring.


