How to create Docker containers in order to deploy applications
If you are a developer, a systems administrator, you work in the information technology sector or you are simply a technology enthusiast who has ever deployed some type of application, surely you will have faced the same problem we all ran into. If you are thinking of dependencies, bingo!
When programming an application, the developer has a very specific environment, with lots of libraries, a specific kernel version, specific programming language versions with which he works, etc. Therefore, when sharing this application with other programmers, collaborators or even with an end customer, this application needs a series of dependencies, specific software that the application requires in order to work properly. Fortunately, the code can be compiled for the end customer in many cases, packaging it in a self-contained file that does not need external dependencies. Flatpak or Snap are good examples. Someday we will talk about these formats that are quite trendy nowadays.
Unfortunately, compiling is not always a viable solution, especially in the web world where we use pages developed, for example, in PHP, which rely on a web server.
It is quite common for a development team to be working on the same application, on different computers, and a Q/A team to be testing that same application. In those cases, dependency management can be very burdensome if we want to use that application on different machines, operating systems, etc., since we would have to define a long list of dependencies, which in many cases are not available on all systems.
In these cases, we would have to look for alternatives, compile libraries or test the application with different versions of the library with which it was designed. All of this requires a lot of time and effort when working in teams or deploying in production.
Fortunately, these headaches are a thing of the past. Today, we can develop and deploy Docker containers that are prepared with the libraries we need. Regardless of the machine they run on, they will always have the same libraries, the same configuration and will run exactly the same as on the developer’s machine. Wonderful, right? You might think: “Yes, but I could do that before with a virtual machine.” And that is true, but managing and maintaining virtual machines is much more difficult than maintaining a container. Not to mention the deployment time, in the case of a container, just a few seconds in most cases.
That is why we will teach you to create your own Docker containers to test and deploy your applications. You can also watch the video we’ve uploaded to our Youtube channel:
Why use Docker containers?
For this tutorial, we will use Docker as our container manager. Why?
The answer is quite simple: it is a very widespread tool, well documented, with great compatibility and, above all, it is very easy to use.
To install Docker, depending on which operating system you use, just go to its official documentation website and follow the instructions:
https://docs.docker.com/install/#supported-platforms
Once installed, you can follow the steps exactly the same regardless of what platform (OS) you use.
To check whether Docker works, open a terminal in your system and execute this simple command:
docker run hello-world
You should get a result similar to:

In case you see a screen similar to ours, you may start.
Dockerfiles
For the purposes of this tutorial, I will use an application that I know very well, so it will be very easy to identify the necessary dependencies and the dynamics of the application. And yes, you hit the spot, we will use Pandora FMS in its Community version so that all of us can follow the steps, since the code of this application is fully open source.
You may get all the files that will be used in this tutorial in my GitHub repository: https://github.com/rafaelameijeiras/PandoraFMS. And in case you do not want to go through the creation process and you just want to simply try the Docker images we created, you can download them from my DockerHub repository: https://hub.docker.com/u/rameijeiras
To start off, I will divide my application into 2 different Docker images, one for the dependencies – which is not too different, but it is slower to build – and another for the application itself, in this case Pandora FMS, which will start from the base dependencies image and will add some extra packages. Particularly here, we will only apply the code installation packages, so it will be a much faster process. So if I need to create an image with another version of the application or with any modification, we will simply start from the base image that is not altered and we will add the package or altered code to this second image, without adding all the dependencies again in each generated image.
Base image
For the base image, we will start from the following Dockerfile file that we will analyze next. If you have cloned or downloaded the GitHub repository, you will find this file in the path PandoraFMS/pandorafms_community/base_image/
#docker build -t rameijeiras/pandorafms-base

FROM centos:7

RUN { \
echo '[artica_pandorafms]'; \
echo 'name=CentOS7 - PandoraFMS official repo'; \
echo 'baseurl=http://firefly.artica.es/centos7'; \
echo 'gpgcheck=0'; \
echo 'enabled=1'; \
} > /etc/yum.repos.d/pandorafms.repo

RUN yum install -y --setopt=tsflags=nodocs \
https://dl.fedoraproject.org/pub/epel/epel-release-latest-7.noarch.rpm \
http://rpms.remirepo.net/enterprise/remi-release-7.rpm \
yum-utils

RUN yum-config-manager --enable remi-php72

# Install console
RUN yum install -y --setopt=tsflags=nodocs \
php \
php-mcrypt \php-cli \
php-gd \
php-curl \
php-mysqli \
php-ldap \
php-zip \
php-fileinfo \
php-snmp \
php-mbstring \
php-pecl-zip \
php-xmlrpc \
libxslt \
wget \
php-xml \
httpd \
mod_php \
atk \
avahi-libs \
cairo \
cups-libs \
fribidi \
gd \
gdk-pixbuf2 \
ghostscript \
ghostscript-fonts \
graphite2 \
graphviz \
gtk-update-icon-cach \
gtk2 \
harfbuzz \
hicolor-icon-theme \
hwdata \
jasper-libs \
lcms2 \
libICE \
libSM \
libXaw \
libXcomposite \
libXcursor \
libXdamage \
libXext \
libXfixes \
libXft \
libXi \
libXinerama \
libXmu \
libXrandr \
libXrender \
libXt \
libXxf86vm \
libcroco \
libdrm \
libfontenc \
libglvnd \
libglvnd-egl \
libglvnd-glx \
libpciaccess \
librsvg2 \
libthai \
libtool-ltdl \
libwayland-client \
libwayland-server \
libxshmfence \
mesa-libEGL \
mesa-libGL \
mesa-libgbm \
mesa-libglapi \
pango \
perl-Net-Telnet \
pixman \
xorg-x11-fonts-75dpi \
xorg-x11-fonts-misc \
poppler-data

# Install server

RUN yum install -y http://www6.atomicorp.com/channels/atomic/centos/7/x86_64/RPMS/wmi-1.3.14-4.el7.art.x86_64.rpm --setopt=tsflags=nodocs

RUN yum install -y --setopt=tsflags=nodocs \
vim \
fping \
nmap \
perl-IO-Compress \
nmap \
sudo \
mysql \
net-snmp-utils; yum clean all

EXPOSE 80 443 41121 162/udp
As you can see, we have started with a commented line. This line is not necessary of course, it is only a help so that when creating the image you may know which is the correct command. We will see it later, so our first effective line will always be FROM.
Docker images always start from a prior image. In this case, we start from CentOS version 7 with the line:
FROM centos:7
CentOS is the name of the image and what is after the colon (:) is the tag. In general, the tag is usually associated with the version, as it is the case with CentOS, but as it is not always the case, you have to pay attention to the image we use as base.
A good practice is always defining a version of the base image, since if we do not define anything, it will use the latest available version and we may have image inconsistency problems in the future. Remember that the idea is that in all devices where we use our container it must be identical.
The following line is a RUN. Running a run tells the Docker the commands to execute to configure the image. In this case we have 6 RUN definitions, to create the artica_pandorafms repository and install the corresponding packages.
For example, the line:
RUN yum-config-manager --enable remi-php72
It executes the “yum-config-manager –enable remi-php72” command that enables the remi repository for installing PHP7 on CentOS.
Each of the executions will create a layer in the Docker image, so it is a good practice to first execute the commands that will change the least over time.
Finally, we see the line:
EXPOSE 80 443 41121 162/udp
It shows the ports that we defined in the container. In this case, 80 for HTTP, 443 for HTTPS, 41121 for Pandora FMS Tentacle protocol and finally 162 UDP for receiving SNMP traps.
All right, now we have a Dockerfile to create our base image that contains all the necessary dependencies. We only need to execute the docker build command to start creating the Docker image.
The docker build command has several optional parameters, but for the purposes of this tutorial, we will execute it in a very simple way. To do this, we have to go to the same directory as that of our Dockerfile file and execute:
docker build -t rameijeiras/pandorafms-base .
This will start an execution process where, if everything goes well, the image we have declared will be created. In my case with the name rameijeiras/pandorafms-base but you can set the label you wish. Remember it because with this label we reference this image when creating the following image, that will be that of the Pandora FMS application. Remember that this first image will serve as a dependency base to avoid following these steps all over again with the different tests or versions of the final application.
Pandora FMS Image
To define the Dockerfile of the Pandora FMS image, the first thing to do is create a directory from which to work. If you have made a clone of my git repository, that directory will be: PandoraFMS/pandorafms_community/pandorafms
Once you are in this directory, create the Dockerfile file, which will contain:
FROM rameijeiras/pandorafms-base

ENV DBNAME=pandora
ENV DBUSER=pandora
ENV DBPASS=pandora
ENV DBHOST=pandora
ENV DBPORT=3306
ENV PASSPAN=P@ndora_2018
ENV SLEEP=5
ENV RETRIES=1

workdir /tmp
# Install the Pandora server
RUN rm -rf /etc/localtime ; ln -s /usr/share/zoneinfo/Europe/Madrid /etc/localtime

RUN wget https://downloads.sourceforge.net/project/pandora/Tools%20and%20dependencies%20%28All%20versions%29/DEB%20Debian%2C%20Ubuntu/phantomjs ; \
chmod +x phantomjs; \
ln -s phantomjs /usr/bin/

COPY sources/ /tmp
# Install phantomjs
RUN chmod +x /tmp/run_pandora.sh

RUN yum install -y https://downloads.sourceforge.net/project/pandora/Pandora%20FMS%207.0NG/740/RHEL_CentOS/pandorafms_console-7.0NG.740-1.noarch.rpm?r=https%3A%2F%2Fsourceforge.net%2Fprojects%2Fpandora%2Ffiles%2FPandora%2520FMS%25207.0NG%2F740%2FRHEL_CentOS%2Fpandorafms_console-7.0NG.740-1.noarch.rpm; \
yum install -y https://downloads.sourceforge.net/project/pandora/Pandora%20FMS%207.0NG/740/RHEL_CentOS/pandorafms_server-7.0NG.740-1.noarch.rpm; \
yum clean all

EXPOSE 80 443 41121 162/udp

CMD sh /tmp/run_pandora.sh
As you can see, this file is slightly different from that of the creation of the base image. We will analyze this file in more depth, since it is the one that will generate the image of our application in a Docker container.
To start off, as always, a Dockerfile must start as basis of another image. In this case, the one we created earlier, which I have called rameijeiras/pandorafms-base
FROM rameijeiras/pandorafms-base
Following the FROM statement we have several sentences of the ENV type, which assign environment variables that will be available in the image to be created and therefore in the Docker container that we activate from this image. An advantage of the environment variables is that they can be overwritten at the time of the container execution, which will allow us to modify its performance (we will see it in depth when activating our Docker container).
But, what good are these variables? Well, in general, Docker containers have an entrypoint or cmd, which is what is executed by default when activating the container. In this case, and quite usually, this entrypont or cmd is an script that makes use of the environment variables to configure certain aspects of the application. We will use environment variables to define which database our container will connect to and other self-provisioning aspects. We will see it in detail when we reach the CMD sentence.
The following sentence is WORKDIR. This sentence is closely related to the RUN statement and it works very simply. Basically, everything we execute from defining a workdir will be executed in this directory. It is similar to Docker making a cd to this directory and from there continuing with the execution of all the following steps.
Next, we declare a RUN that we already know and that executes a wget command to download the binary of the phantomjs (an application that needs the Pandora FMS console to generate reports) and assigns the corresponding permissions with the command chmod. Then it creates a symbolic link of the file in the current directory to /usr/bin/ which is where the console expects to find it by default, and so we do not have to worry about changing the configuration once the console is accessible.
The following statement is a COPY which, as the name implies, will copy the files we declare from our directory defined on the computer into the image. In this case, you will copy the contents of the source folder to the /tmp directory of the generated image. In this folder you may put the resources that the container will need to start. For this image, you can find the resources in my GitHub repository, in the sources directory, which contains the Pandora FMS startup and self-provisioning script (run_pandora.sh) and the script that will be activated by the Apache web server (run-httpd.sh).
Continue with another RUN statement for the installation of pandora_console and pandora_server packages, in this case version 740, from our sourceforge repository: https://sourceforge.net/projects/pandora/
And almost finally, the EXPOSE statement, which, like the previous image, declares the necessary ports for Pandora FMS.
To conclude the file, we have the CMD statement, that defines what the Docker container will execute by default when we start it. Note that the previous image does not have this sentence and it is correct, since that image was designed as a starting image and we had no interest in executing anything upon initialization. However, the CMD statement can be overwritten when starting the Docker container if required.
In this case, the execution of the CMD is a script that uses the environment variables that we defined at the beginning of the Dockerfile with the tag ENV to connect to the database server, create the database in case it does not exist and auto configure to connect to it. If on the contrary, the defined database already exists and has a valid schema for Pandora FMS, it will be connected to this database automatically using it.
At this point, we can see how useful overwriting environment variables is, since by using the image that we will build, we can enable infinite instances connected to different databases, without needing to modify anything or regenerate the image, only by declaring it in the execution.
Now that you have our Dockerfile full and your source directory that contains the scripts in the same directory as that of our Dockerfile, go to that one. In case of cloning the github repository, the directory would be, PandoraFMS/pandorafms_community/pandorafms, and execute:
docker build -t rameijeiras/pandorafms-community:740 .
In my case, I called my image rameijeiras/pandorafms-community and assigned the tag (tag) 740 with the colon symbol (:) after the name, since I am using version 740 of the application. In the future, when I generate images of new versions, I will label them with the corresponding version.
If everything went well, you will have your Pandora FMS Community Edition version 740 Docker image and you can run it on any computer that has Docker, exactly the same, without dependency problems, packaged in a container that will always run the same. But how do we execute it? Well, with a not so simple command.
For this Pandora FMS image, the first thing we need is a database to connect to, either Docker or physical, and then run:
docker run --name pandora_community --rm \
-p 8085:80 \
-p 41121:41121 \
-p 162:162 \
-e DBHOST=mysqlhost.local \
-e DBNAME=pandora \
-e DBUSER=pandora \
-e DBPASS=pandora \
-e DBPORT=3306 \
-e SLEEP=5 \
-e RETRIES=3 \
-e INSTANCE_NAME=pandora_community \
-ti rameijeiras/pandorafms-community:740
With the execution of this command you will enable a Docker container called pandora_community, where it will connect to my database server mysqlhost.local on port 3306 and to the database pandora (which I have created but empty), with the user pandora and password pandora. We will call the instance pandora_community and define the RETRIES and SLEEP options, which will be the number of times it tries to connect to the database in case of failure and how long it will wait before each retry.
You will see an output similar to this:
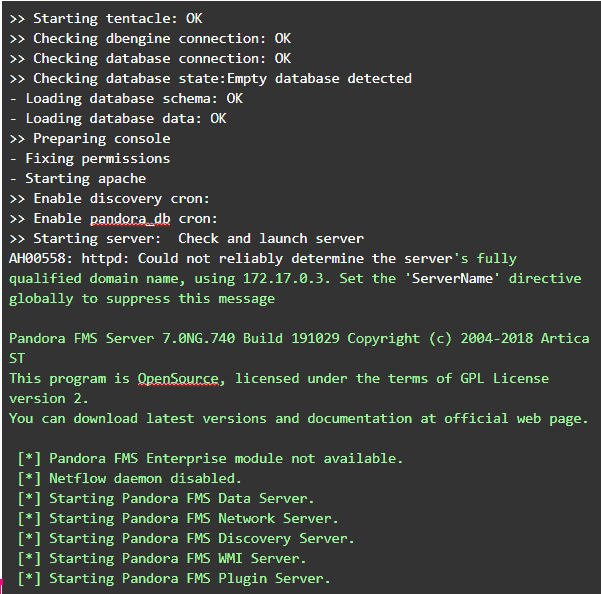
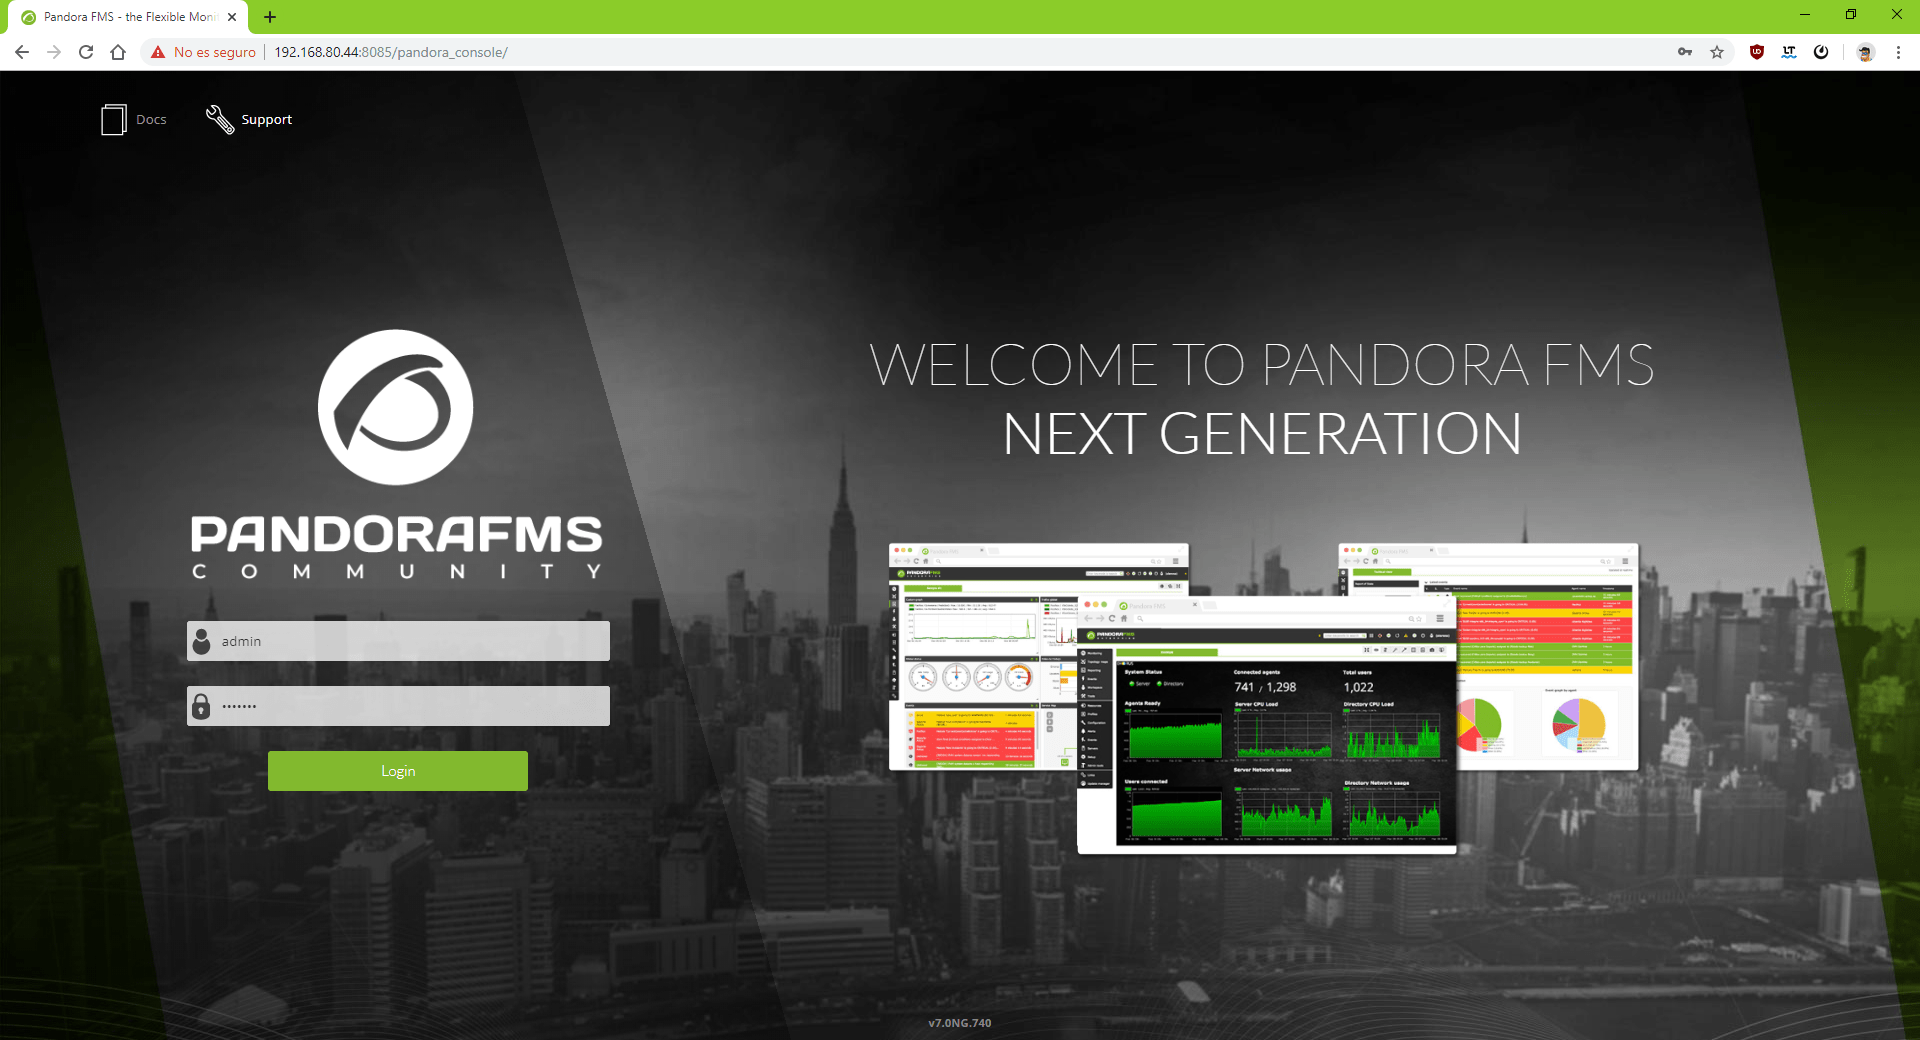
In this command, we have declared with parameter -p the redirection of port 8085 of our computer or Docker server to port 80 of the container, and ports 41121 and 162 of our computer directly to the homonymous ones in the container, so if you access the url (no space before ip): < ip_host>:8085/pandora_console you will see the Pandora FMS login screen, which you can access with the credentials admin:pandora
So here we have created our image to run Docker containers with Pandora FMS quickly and evenly in any environment. The concepts you learned may also be applied to create containers of any own or third-party application.
The execution of the docker run command can be a bit complex to understand if it is the first time you use it, especially if you add more parameters and environment variables.
In future entries, I will teach you how to manage your Docker containers easily using Docker Compose to create a Pandora FMS + Database stack in a single command that will start the entire environment in a few seconds. So stay tuned for the coming posts, to learn how to get the most out of your Docker container applications.
Finally, remember that if you have more than 100 devices to monitor you can contact us through the following form.
Also, if your monitoring needs are more limited you have at your disposal the OpenSource version of Pandora FMS. Find more information here.
Don’t hesitate to send your questions. Pandora FMS team will be delighted to help you!

Traductora a francés e inglés. Me encantan las lenguas. Amante de la ropa oversize, la tarta de queso y el chocolate caliente en invierno. Me gusta leer, escuchar música, viajar y explorar cosas nuevas. Mi frase más temida por aquellos que me conocen es “he estado pensando…”
Translator into French and English. I love languages. Lover of oversized clothes, cheesecake and hot chocolate in winter. I like reading, listening to music, travelling and exploring new things. My most feared phrase by those who know me is “I’ve been thinking…”


