As you may already know, Docker is an amazing tool for collaborative programming work, allowing us to work in a virtually identical environment, regardless of the operating system we are on.
In a previous article we learned how to create our own Docker images to test and distribute our applications without worrying about their dependencies.
Docker run to run Docker containers: discover how to do it in a simple way
After creating an example image in the previous article, we finished by executing this command:
docker run --name pandora_community --rm \
-p 8085:80 \
-p 41121:41121 \
-p 162:162 \
-e DBHOST=mysqlhost.local \
-e DBNAME=pandora \
-e DBUSER=pandora \
-e DBPASS=pandora \
-e DBPORT=3306 \
-e SLEEP=5 \
-e RETRIES=3 \
-e INSTANCE_NAME=pandora_community \
-ti rameijeiras/pandorafms-community:740
With this command, the Docker container is started using the previously-created image. But, what is exactly executed? What do all these parameters mean? To find out the answer, today we will see how to execute the docker run command and its most used parameters.
We will start from the basics. We can execute the docker run command without any parameters, for example using this command:
docker run hello-worldWhich will return an output like this one:
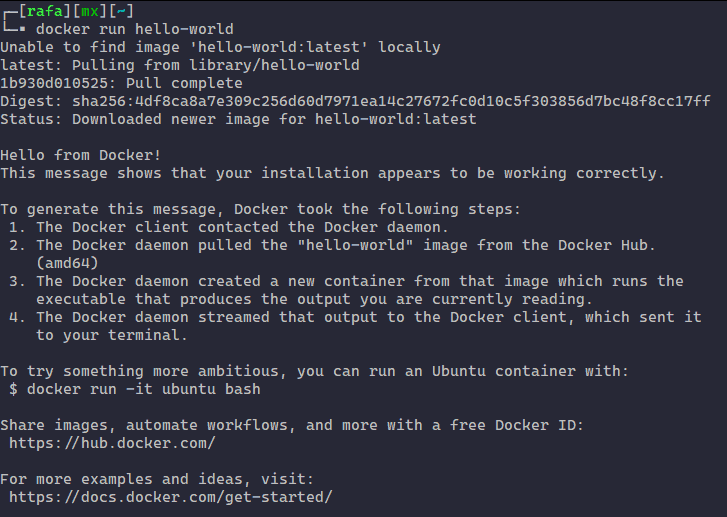
In this case, it will activate a container with the hello-world image. If we do not have it downloaded, it will connect to the DockerHub repository, download and execute it.
As you can see, it simply executes the entrypoint or CMD by default (as the case may be) and at the end of the execution the container will exit, staying stored in our computer.
If you’re interested in Docker, you’ll be interested in knowing the state of your systems, right?
If so, we have something to tell you. A free monitoring program for you to try wherever you need: home, office, office, company… This software monitors everything:
The docker ps command
If you execute the command:
docker ps -aYou may see all the containers you have executed in your system. The -a parameter shows them all, both those that are running and those that are not. Without this parameter, it will only show the running containers by default. If it is run on my system, this will be the output:

Let’s analyze this output to understand the fields it shows. The first thing we can see is that there are 3 containers (3 lines) in this system. The first line refers to our “hello-world” execution. The other two containers were already running within the system, but I left them to compare the returned information.
As you can see, the docker ps command returns information related to our containers. The information showed is the following:
- Container id: It is the unique identifier or ID of each container. This id is automatically assigned by Docker.
- Image: This column indicates the image used to activate the container. If you take a look at the last line, you may see that the hello-world image has been used in the first docker run.
- Command: It is the command to start the container. It is defined in the dockerfile by the CMD statement and it is what is executed by default when starting the container. This command can be modified when executing a container.
- Created: It tells you how long ago the container was executed.
- Status: It indicates the current state of your container. As you can see, hello-world was executed and died, so it shows the exit state and its error code between brackets, in this case 0. This will be very useful to debug the application in case something fails and the container is closed unexpectedly.
- Ports: This section is very important, since it contains information about which ports are exposed from our container. In the case of hello-world, there is no exposed port. As you know, a container is isolated from the system, so to have access to the running application, the corresponding port must be exposed. Not only it is possible to expose the ports, you may also forward them indicating that the X port on your host system is redirected to the Y port inside the container. That way, you may give external access to your network applications. There are other ways to grant these accesses, but they are more advanced. Usually port redirection is used, which you will learn to do in this article.
- Name: It is the name assigned to our container. Docker assigns a name to our containers automatically by default, but it is possible to indicate the name you wish in the docker run execution.
Running docker run
Now that we know how to retrieve the status and features of our containers, let’s see what we can do with the docker run command. Let’s review the most useful parameters. For more detailed information on the docker run command, you may take a look at the official Docker documentation: https://docs.docker.com/engine/reference/run/
First let’s see the structure of the docker run command:
docker run [OPTIONS] IMAGE[:TAG|@DIGEST] [COMMAND] [ARG...]As you can see, the parameters or options are placed before the name of the image you want to use. Then you may type in a command with its own arguments that would overwrite the default image CMD. Let’s see an example by running:
docker run alpineWith this statement, we tell Docker to execute a container with the image called alpine with the default options. Alpine is a very small Linux distribution used in the container world. If there is no tag assigned to the image, it will use “latest” by default.
The result of this command will be similar to:

Where the image:tag will be downloaded in case it is not available, and will execute a container with this image. Since the default command of this image is sh, it is run, it does not give back any output and it is closed, as we can see if we execute a docker ps -a

There are modifiers to keep the container running with the sh command but we will see that later. For example, we will overwrite the default command using ifconfig to get the container internal ip address. So we will execute:
docker run alpine ifconfigThat will return the output of the ifconfig command inside the alpine container:
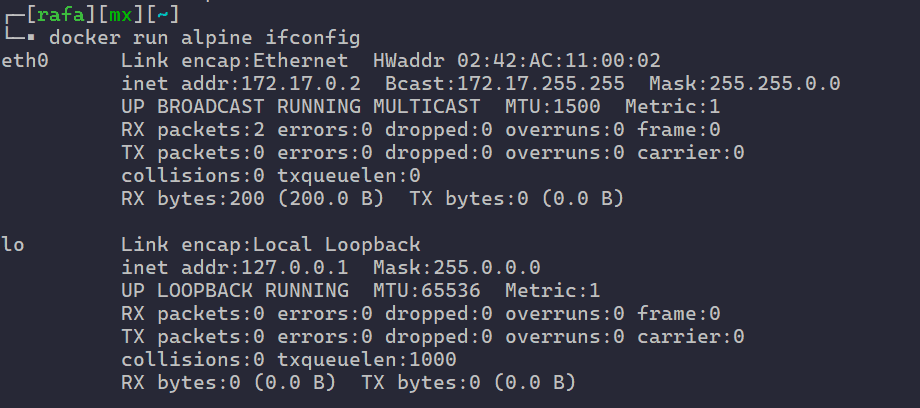
Now we will execute the same docker run, but transferring a parameter with the name of the interface to the ifconfig command, so that it only returns the information of the eth0 interface, and we will obtain:

As you can see, we can add any parameter to the command that we define to our container.
Let’s take a look at our container list with a docker ps -a

All of our executions are there with the commands we have defined. There is an option to order Docker to delete the container once it is executed.
Docker run parameters
We have already learned to execute a container and overwrite the default command. Now we will see the options or parameters that allow us to modify or add features to our containers.
Deatached (-d)
It is an operator that allows to instruct Docker to run the container in the background, leaving the prompt free while the container is still active. For example, we can execute:
docker run -d hello-worldYou will not see the execution of the container, since it will run in the background. It is useful for long services or tasks that we don’t want to keep the prompt busy.
Foreground/interactive (-it)
If you want to keep the container running instead and even interact with it, use the -it parameter. Since we know that the default alpine command is sh (a shell lighter than bash), we can use the -it parameter to interact with it and launch different commands inside the container.
docker run -it alpineThis will allow us to interact with alpine directly from the shell.

Name (–name)
This parameter will allow us to assign a name to our container. As I said before, Docker will assign a random name to your containers, but you can assign it directly from the docker run execution.
Be careful with this option, since the name is exclusive and only one container can have that name. So if we have a container (running or stopped) with a name that we want to use in the docker run command, Docker will not allow it. So we will have to choose another name or remove the old container with the assigned name.
To assign the name “test” to an alpine image container, you may execute:
docker run --name test alpine
Clean up (–rm)
The –rm parameter makes Docker remove the container at the end of the execution. That way, you will not have all container executions stored. To use the –rm parameter in an alpine container that displays the message “hello world” and then auto-deletes itself, use:
docker run --rm alpine echo “hola mundo”
EXPOSE (incoming ports)
You may expose ports of our computer that are redirected to another port in our container.
For example, if you want to run a container with a web server and you want for the container to be accessed from outside, expose a port.
To expose a port, use the format: [ip]:host_port:container_port
The [ip] field is used to filter the sources. If not defined, it means all (0.0.0.0).
To redirect, for example, port 8080 of my computer, from any source, to port 80 of a container that uses the nginx:alpine image, I just have to run:
docker run -d -p 8080:80 nginx:alpineI have used the -d parameter so that the container is running in the background, since Nginx is a web server that will continue to run until stopped, and if we do not use -d, it will keep the prompt busy.
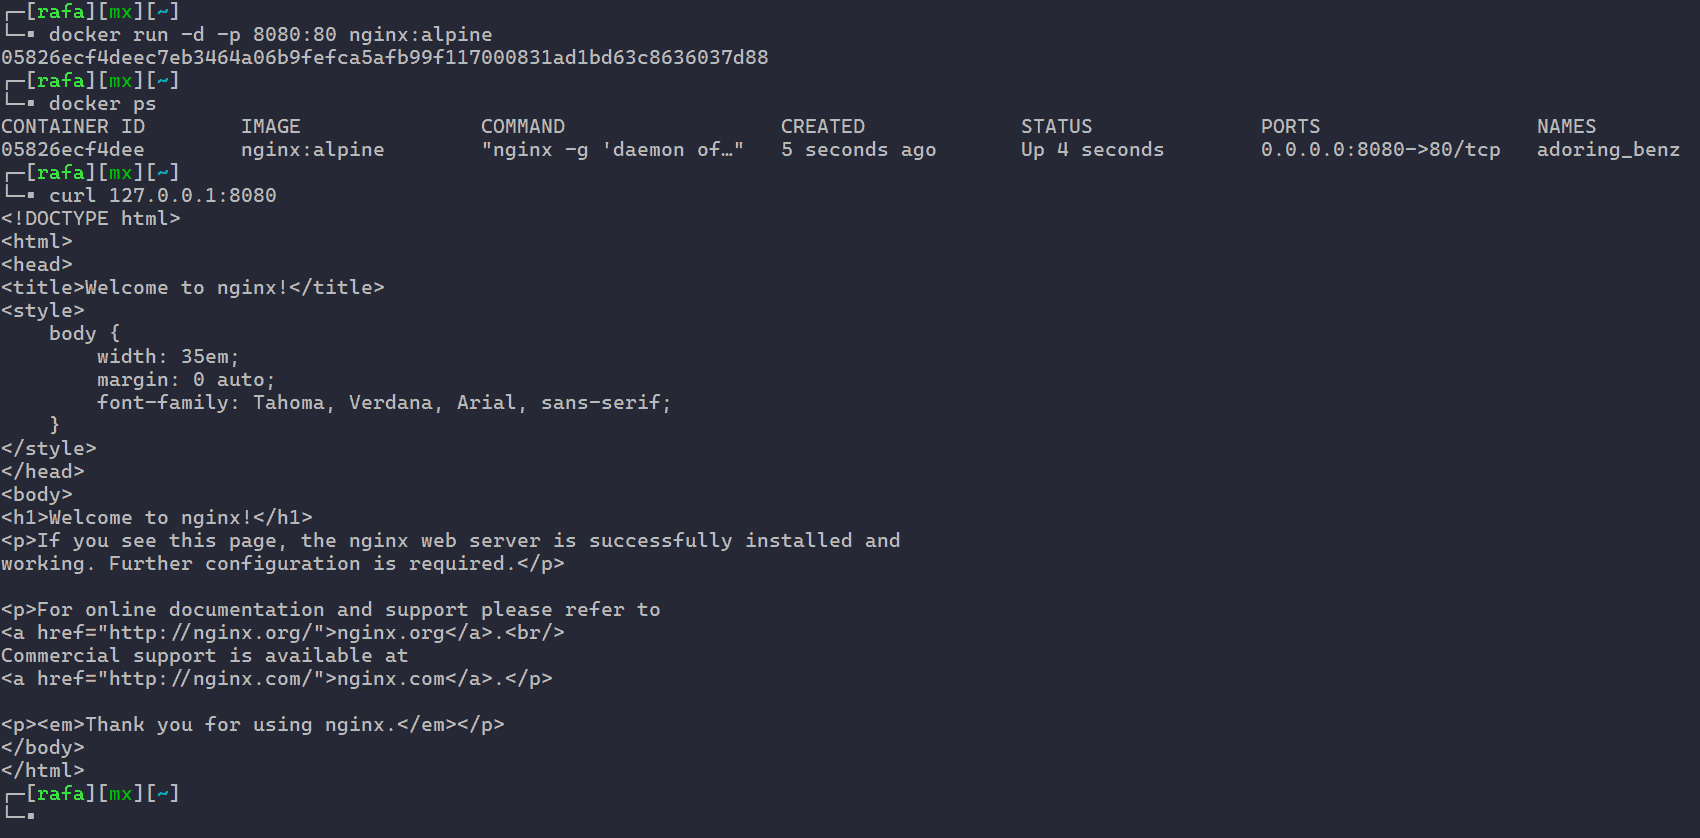
As seen in the image, the container keeps being in the background in a running state. If I curl my own machine on port 8080, it redirects me to the Nginx server running on the Docker, which has port 80 exposed.
If we do a docker ps, in the PORTS column we can see the redirection of port 8080 to 80 from all sources.
It is possible to use parameter -P (uppercase), which will redirect all exposed ports of a container. We cannot choose on which port we want to redirect, but it can be useful for quick tests.
For example, if we execute the base image that we created in the previous article that exposed several ports, we can see how Docker will redirect them all by assigning random ports.
docker run -P -d rameijeiras/pandorafms-base sleep 100In this case, the sleep 100 command is used to keep the container alive for 100 seconds. In addition, I have used the -d parameter to keep it in the background and I have used the -P parameter to redirect all ports shown in the image.

ENV environment variables (-e)
With the -e parameter, we can define environment variables for the started container. This is especially useful when the container is configured to use these environment variables and modify their performance. As we saw in the previous article, our Pandora FMS container used the environment variables to define the database to which it would connect and its connection credentials. To define environment variables, we can execute:
docker run -e "APP=PandoraFMS" -e "VER=740" alpine echo "$APP $VER"
As seen, the environment variables that we defined in docker run command execution were assigned within the container.
VOLUME shared filesystems (-v)
The -v parameter is used to manage volumes in Docker. As we know, the data modified within Docker is volatile, but by using -v, we can configure data persistence. This is especially useful for activating a database container or web servers.
With the -v parameter, you can do 2 different things. If you execute it followed by a volume name, you will create a persistent volume that will handle Docker, for example:
docker run --rm -v myvolume:/app alpine sh -c "echo persistent > /app/file"
docker run --rm myvolume:/app alpine cat /app/file
As you can see, we have executed two containers that self-destruct, pointing to myvolume, but although the first container was destroyed when the file was created, the second one is able to access the data, since the app directory is linked to a persistent volume on our host machine.
You can see the volumes created on your machine by executing the command docker volume ls. The issue of volumes in Docker containers will be seen in another entry in this blog.
The second method is the bind method. What it basically does is “transfer” a directory from our host machine to the container. This will allow us to configure and modify files on our local machine and for these to directly affect the container. If for example, we want to show our website, which we have placed in our local directory /tmp/web/index.html, in an Nginx container, we would have to execute the docker run command referencing the source and target directories with this format: -v host_path:container_path:[rw/ro], where you may optionally define the read and write permissions of this directory. In this case, we keep the default one. The command would be:
docker run -d -p 8080:80 -v /tmp/web/:/usr/share/nginx/html nginx:alpine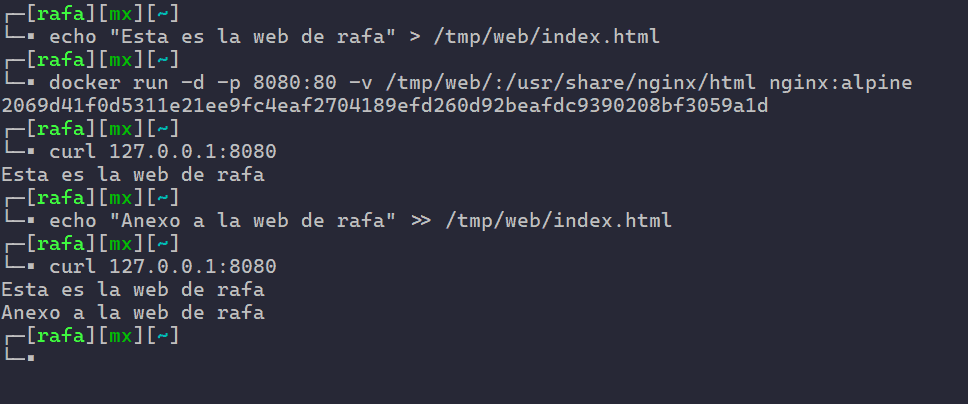
As you can see, if I bind my container and then edit the files locally, the changes are immediate on my Nginx server.
Docker y Pandora FMS
You already know all of the docker run basic options, so at this point, you are already a Docker ninja. So, test your skills by using everything you have learned to activate a complete Pandora FMS stack.
We will use two containers, one for the application and one for the database. Not only that, we will give the database server persistence so that in case of failure the stored information is not lost.
We will only need 2 docker run commands. And that’s it.
In the first one, we will start a container for the database. We will use a Percona Sql modified image. You can see the dockerfile in my of GitHub repo (by now you will be a whole expert reading dockerfiles).
docker run --name Pandora_DB \
-p 3306:3306 \
-e MYSQL_ROOT_PASSWORD=pandora \
-e MYSQL_DATABASE=pandora \
-e MYSQL_USER=pandora \
-e MYSQL_PASSWORD=pandora \
-v mysqlvol:/var/lib/mysql \
-d rameijeiras/pandorafms-percona-base
We wait a couple of seconds and we already have our database running.

Now we run the Pandora FMS container that points to the database container. We can point to both the internal and external IP. Since we have done port redirection for port 3306, we will use the external IP which, in this case, will be my host IP.
docker run --name Pandora_new --rm \
-p 8081:80 \
-p 41121:41121 \
-e DBHOST=192.168.85.128 \
-e DBNAME=pandora \
-e DBUSER=pandora \
-e DBPASS=pandora \
-e DBPORT=3306 \
-e SLEEP=5 \
-e RETRIES=3 \
-e INSTANCE_NAME=pandora \
-ti rameijeiras/pandorafms-community:740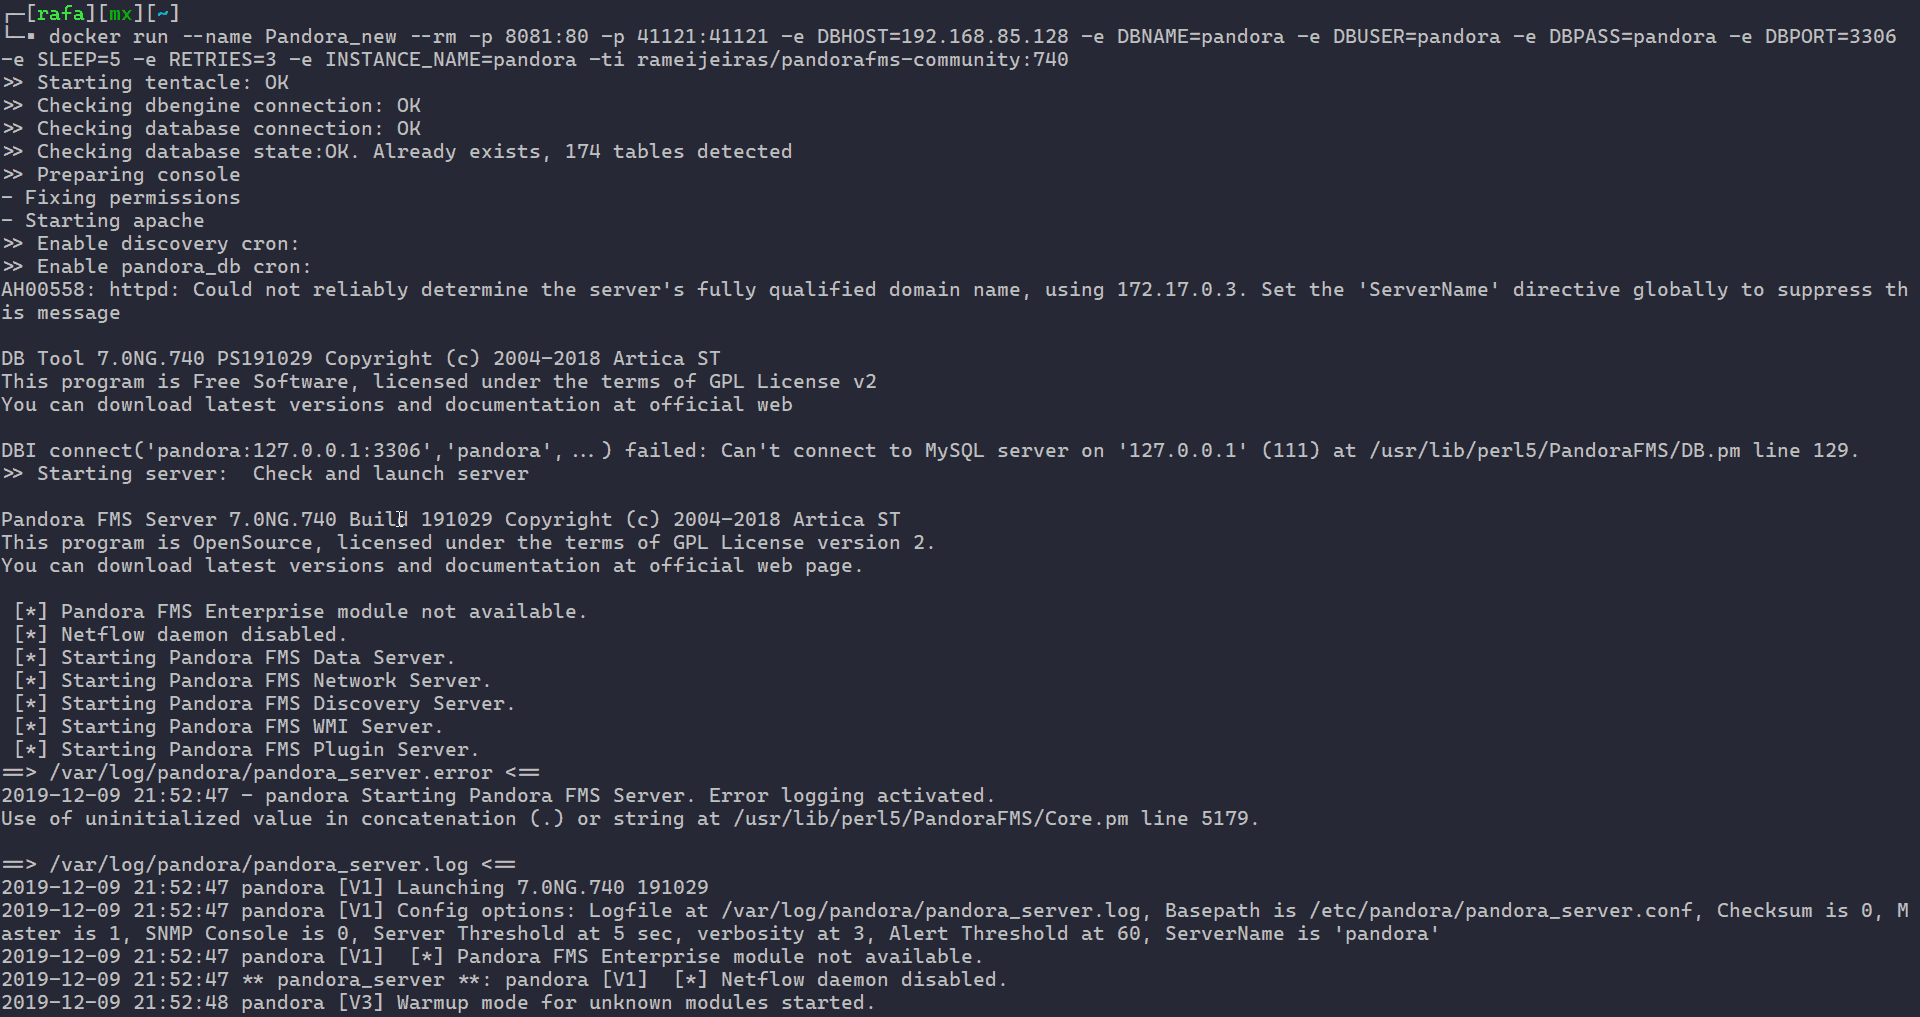
And there we have our Pandora FMS Community instance version 740 with only two commands. Impressive.
Let’s check that everything works properly. From the browser, we go to the address http://<host_ip>:8081/pandora_console.

Now we simply log in with the credentials admin:pandora and we will have access to the Pandora FMS web console.

In the following articles, we will learn how to use the docker-compose orchestrator to manage Docker containers in a fast, simple and easy way. So, stay tuned for the coming posts, to learn how to get the most out of your Docker container applications.
Also, if you want to know how to create docker containers to deploy applications you can take a look at this video:
Finally, remember that you can learn much more about Pandora FMS by visiting our home page.
Or if you have to monitor more than 100 devices you can also enjoy a 30 days FREE DEMO of Pandora FMS Enterprise. Get it here.
Pandora FMS’s editorial team is made up of a group of writers and IT professionals with one thing in common: their passion for computer system monitoring. Pandora FMS’s editorial team is made up of a group of writers and IT professionals with one thing in common: their passion for computer system monitoring.


