


Vagrant File: Working with virtual IDE’s
An Integrated Development Environment is like the personal office of every software programmer, because we have all the components in order to focus on the task. Today everything is oriented towards web applications and in a previous article we mentioned how large companies have taken advantage to offer such services quickly, in what have become known as “Architecture without server”, euphemistically. For these cases we tell you that a Vagrant File could be developed to simulate this environment without a server to perform tests, saving time and money before hiring these services and creating our web application.
In this article we will show you how the field of programming has evolved, always with concise narratives and additional links.
In the 20th century…
Computers were expensive, even more than today; so many of us didn’t have computers at home. Those were simpler times, and mobile phones were only used by our bosses, so when we left the office we were really disconnected and could get by without Internet. But when we turned on our computer to program we had already placed all the variables -and programs- necessary to begin our work. We had to have the whole programming environment set up and ready.
In those days, going to the office physically was common, but now, it’s not.
In this 21st century
Now programmers can work remotely and for several clients or companies from anywhere, but such flexibility brings the dreaded thing of “it works on my machine”, but not on that of other developers who work with us. Virtual machines have solved, in part, this problem and even its complexity has increased exponentially with the networks defined by software.
As we said, each application is unique and its components can become very unique or specific. All of the above may not fully meet our needs, but it is not yet time to say goodbye to our personal computers, at least not in our profession.
Vagrant File

vagrant file logo
Continuous Software Release and Continuous Integration have taken the demands much further to meet deadlines and goals: we must copy from the repositories the algorithms we are working on, to make very specific modifications and then return them to the common cause. Whether we are in America or Europe we must always be ready for any work, and this is where the Vagrant File comes in.
A Vagrant File describes both an operating system and the provisioning and also configuration of a development environment. For the programmers it is a complete and rather tedious work: it takes away our energy to program. With a Vagrant File created and adapted by all the members of the team, not only will we have a development environment, we will also have an environment identical to the one used in production, a task that we will do in a single opportunity in the device where we usually work.
Installing Vagrant
To install any Vagrant File we will first need to have VirtualBox installed, and in our case we use Debian/Ubuntu. Once we have installed this hypervisor we can proceed to install Vagrant. In a GNU/Linux environment it is common to use apt-get install vagrant or for CentOS and related yum install vagrant, but if you have a problem it is better to download the installation packages directly from the official site rather than the default repositories of your operating system. At the time of writing this post the supported platforms are as follows:
- Linux (64 bits, package in AppImage format, which is very appreciated by Linus Torvalds, creator of Linux, who explains how it works)
- Debian (32-bit and 64-bit, package in .deb format)
- Microsoft Windows® (32-bit and 64-bit)
- CentOS® (32-bit and 64-bit, .rpm package)
- macOS® (32-bit and 64-bit, .dmg package)
- ArchLinux (64 bits, package in .tar.xz format)
First steps
The first thing we run is the vagrant -v command in a terminal window, to see which version we have installed (2.1.2, to date). Then we will be able to choose the operating system we are going to use; in Pandora FMS the selected one is CentOS 7, so we will create in our user documents a folder called vagrant-home:
# mkdir ~/vagrant-home
# cd ~/vagrant-home
# vagrant init centos/7
This is where we need to be patient: we proceed to download an image of the desired provider, in this case a Content Delivery Network (CDN) from vagrantcloud.com:

“vagrant init centos/7” and “vagrant up”
It is fair to say at this time that many companies have collaborated by publishing each by their own means an image file for different hypervisors. In the case of CentOS we have for Microsoft Hyper-V®, Libvirt, VMWare Fusion® and, of course, for VirtualBox.
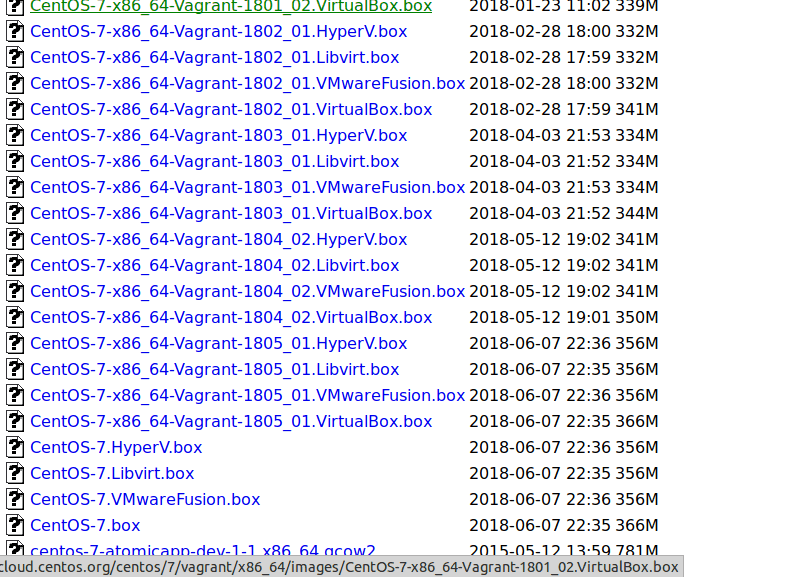
Vagrant images supported by CentOS for different hypervisors
Do we need a Percona database? We can search VagrantUp for a Vagrant Archive that suits our needs, or we can create our own Vagrant Archives and share them!
Finally using a Vagrant File
Now we will do all our work of server configuration management with a Vagrant File and we will start by reviewing the one we just created… When? Well, when we issued the vagrant up order in our vagrant-home folder:
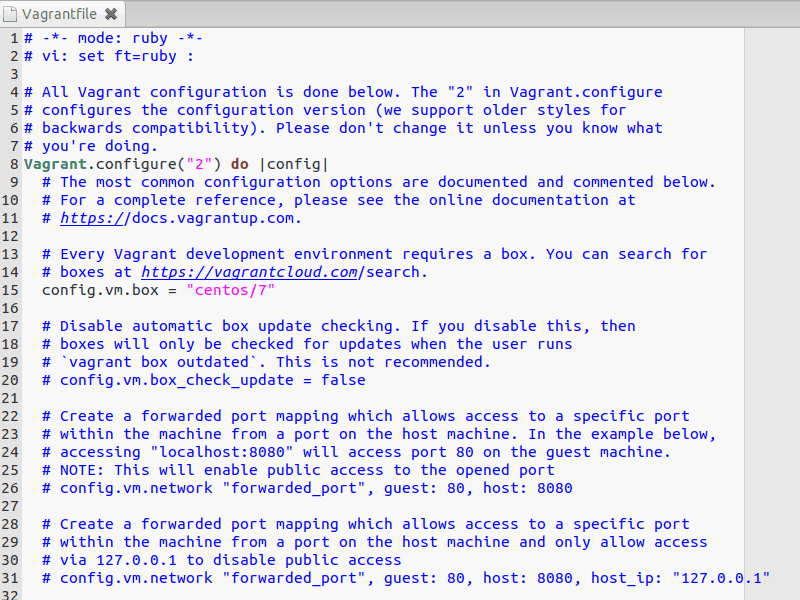
The famous Vagrant File, file in plain text
All the lines are commented, except the one that describes the virtual machine; there we can quickly change anything we need (IP address, listening ports to connect via SSH, etc.). For now we’ll use the vagrant halt order to shut down our machine.
The “mantra” of Vagrant
The idea is, by means of a Vagrant File that we get to download a virtual machine and, in addition, with additional instructions to carry out the provisioning and configuration of a development environment (or of production). This way we will have our own machine, we will turn on and off, and if at a certain moment we want to restart and start again we will use vagrant destroy.
Remember to save OUTSIDE the virtual machine all your work, or if you use Git apply the command git push; in Pandora FMS we use GitHub to store the source code since 2014.
Working with Vagrant
How do we connect to our Vagrant File (as we saw, this file is the core of the matter)? Because always located in our folder to that effect created, we introduce vagrant ssh and we will be connected to begin our work.
Do we want to connect in a “normal” way, as we have always done? The only change human beings like is the diaper change; if we want to connect with the command, ssh, first we must run vagrant ssh-config to know the configuration we will use.
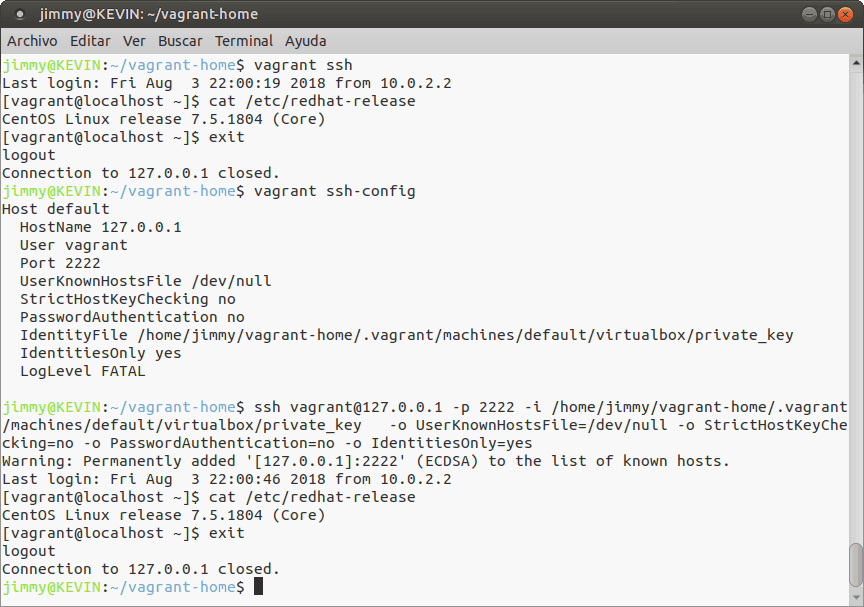
“vagrant ssh” and “vagrant ssh-config”
Monitoring Vagrant
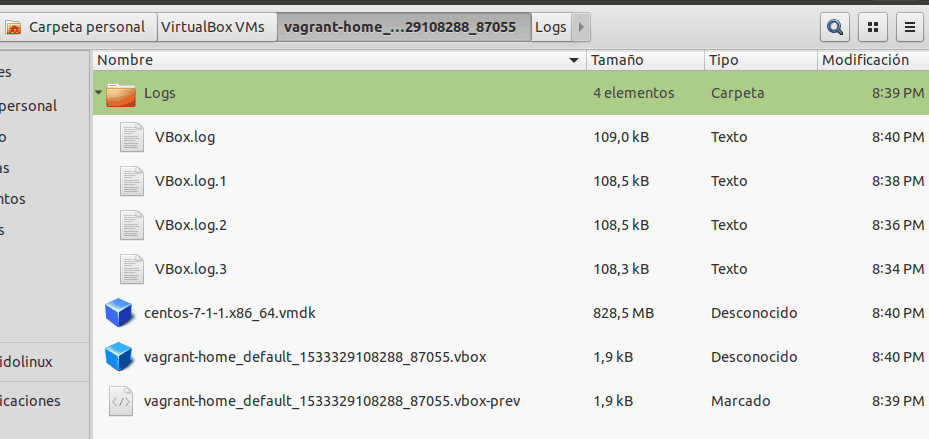
From the SSH connection we can add the parameter “-o LogLevel=VERBOSE” to know what happens with our connection (by default it is configured to “FATAL”, the other possible values are QUIET, FATAL, ERROR, INFO, VERBOSE, DEBUG, DEBUG1, DEBUG2 and DEBUG3). Also for logs, if we use VirtualBox, they are located at
“~/VirtualBox VMs/vagrant-nombre_de_nuestra_carpeta_default_XXX/Logs/VBox.log” in a very particular format… But before going deeper into that, we tell you that it is just the tip of the iceberg, because it only shows us the record of SSH connections and perhaps we should aim higher.
To keep track of the boot of our virtual machines we must use the parameter “–debug”to be able to get all the details of each boot and shutdown:
Result of the command “vagrant up –debug”
Note: always “VBox.log” will contain the last record, the previous ones will be listed and kept and if we want to monitor we must automate so that it always reads the record after a “vagrant halt” or “vagrant destroy”. The other possible values are: info, warn and error. If we want to save absolutely all the startup record we must send all the output to a file in the same folder where we run: “vagrant up –debug &> nuestro_registro.log” (the debug parameter has two dashes as prefix).
Any information we send you to register may contain personal information and/or sensitive data of the device where you are running Vagrant. Be careful.
Using Pandora FMS as a monitoring tool
We saw that Vagrant has a very particular way of keeping records. Therefore, the default option we have to monitor with Pandora FMS is like any other device, either installing a Software Agent or performing a Remote Monitoring, having the foresight to provide an IP address to the Vagrant virtual machine to communicate with the Pandora FMS server, central or satellite.
A few steps beyond
Once we have experienced working with third party Vagrant Files, it will be time to create our own well-customized virtual machines to share with our colleagues. To do this, we must use Packer, a tool specially designed for such tasks.
When we are very experienced we can even review the logs without having to connect via SSH through a very elaborate artifice called codeyourinfra, which consists of an Apache web server with Jenkins, which will allow us reading access.
Don’t hesitate to contact us in Pandora FMS to start working in your company or office. We have years of experience and a well-qualified team at an international level.

Programmer since 1993 at KS7000.net.ve (since 2014 free software solutions for commercial pharmacies in Venezuela). He writes regularly for Pandora FMS and offers advice on the forum . He is also an enthusiastic contributor to Wikipedia and Wikidata. He crushes iron in gyms and when he can, he also exercises cycling. Science fiction fan. Programmer since 1993 in KS7000.net.ve (since 2014 free software solutions for commercial pharmacies in Venezuela). He writes regularly for Pandora FMS and offers advice in the forum. Also an enthusiastic contributor to Wikipedia and Wikidata. He crusher of irons in gyms and when he can he exercises in cycling as well. Science fiction fan.