Project Management
Pandora ITSM allows dynamic project management including planning, monitoring and reporting. So it is possible to plan times (and costs) and also to see project evolution over time thanks to the allocation of hours of the people collaborating in projects. This hour allocation may be done in detail, in the form of Workunits specifically assigned to each task (and task incidents, if there is one or some) of the project.
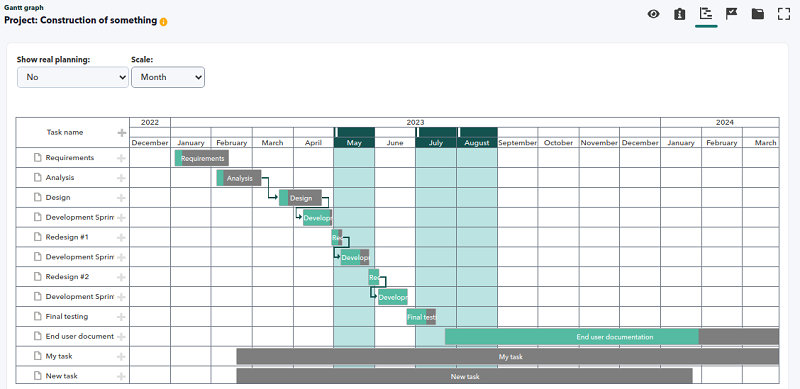
Pandora ITSM allows some automatic actions such as cost calculation, notifications about changes in tasks and milestones. It also includes a Gantt chart that makes it easy to see task distribution over time.
Projects and tasks
Project management in Pandora ITSM combines projects, tasks, roles and people. The tasks created within each project may have, in turn, subtasks, thus establishing hierarchical structures.
Tasks may have tickets associated with the incidences that arise or work units, where the work performed by each person may be tracked with a time breakdown.
New project
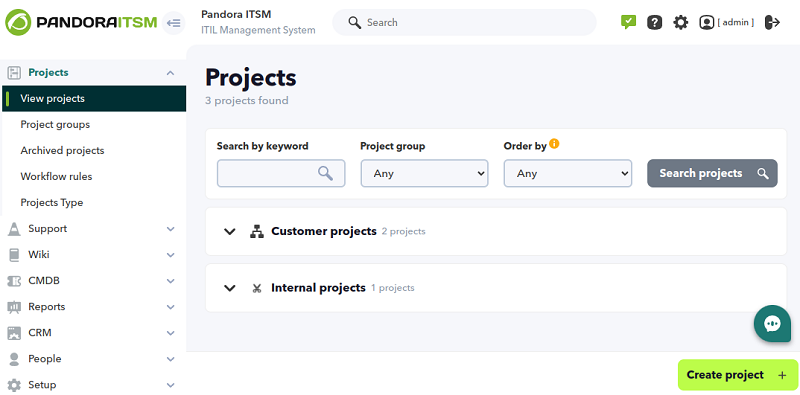
Menu Projects → View projects → Create project.
In this view you may set a user in charge of the project (by default the user creating the project), a project group and an e-mail address (CC field), which will be used to send notifications related to the project, among other data (start date, Project types, etc.). It is also possible to replicate tasks already created in another project.
If the option to replicate tasks is chosen, these will be configured with their original dates, so each of them must then be reconfigured.
Project overview
Project editing
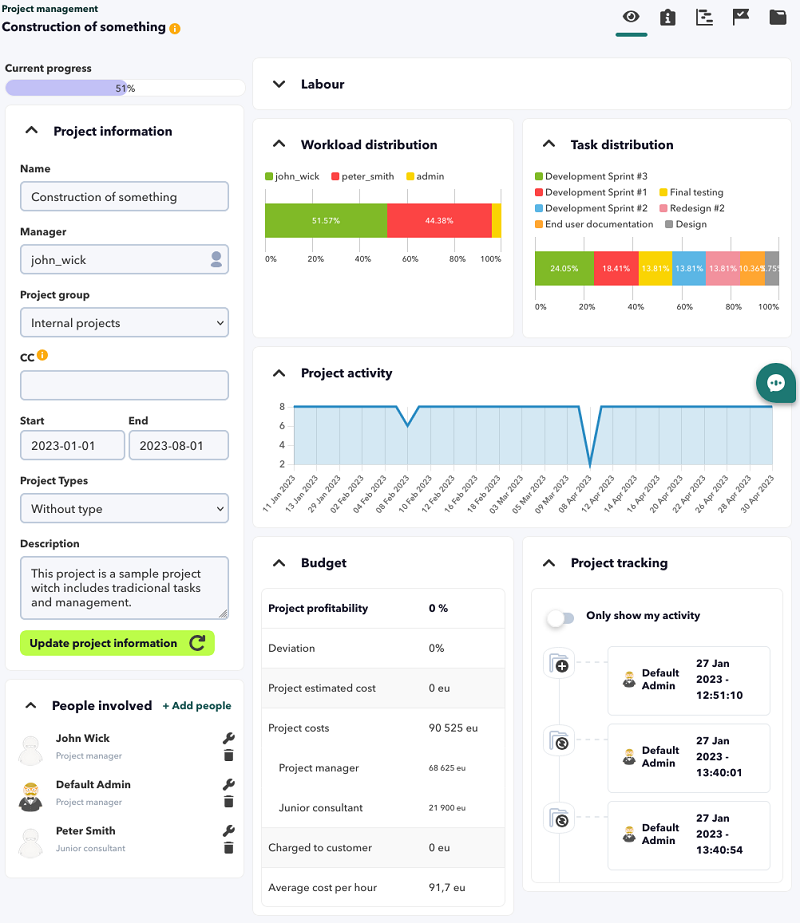
In the project view, clicking on a project name will take you to the project editing form, Projects → View projects → Project overview menu.
The sections that may be edited are:
Project information with the main fields of each project.
People involved, where you may add or remove users globally to the project (list of users available for tasks and other work).
Other sections present important information in brief. This project editing window also has the following tabs:
People management
Menu Projects → View projects → Project overview
Project editing → People involved
The People involved section presents the people involved in the project and from which you may add new users with different roles or manage existing ones.
Within projects, different tasks in which people will participate will be created. These people can participate both in the project, globally, and in the tasks themselves with a specific role in each case. Individually, at the task level, these roles can be readjusted.
Depending on their assigned role, users participating in projects and tasks will have different privileges, from full modification to simple work reporting.
Project view
Section Workforce with relevant data on the project:
Sections Work distribution and Task distribution with graphs in percentages:
Project activity section:
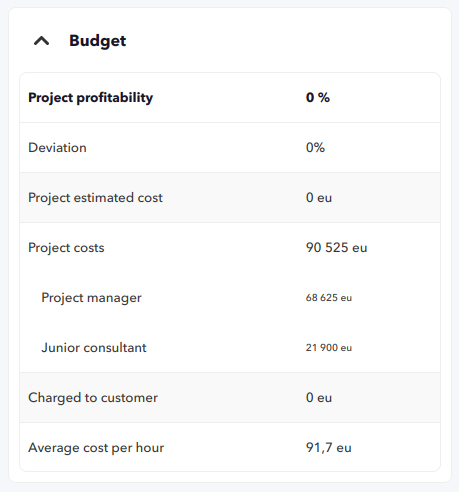
Budget section with percentage of project profitability and other important values:
Project follow-up section:
Tasks
Menu Projects → View projects → Project overview . Project editing, Task planning tab
In this view, the list of created tasks will appear and may be sorted by name, start date or end date. The column by which it is sorted will have a triangle icon pointing up or down (ascending or descending).
Tasks can be edited quickly, one by one:
- In the Owner column you may add
 or delete
  people who participate in the project. When adding a person be aware of the role with which they were added to the project.
 - The Status column is updated to the next step of the task and then all tasks are updated by clicking Update (even unchanged tasks will be saved). The task summary according to their status at the top of the list will be updated as well.
In the Hours worked column , you may access a pop-up window with summary information on the work units carried out in that task, such as cost, hours worked, etc., and with the option to filter by dates and/or milestones and/or people. In the case of having incidents associated with the project and its comments (Work Units), it should be filtered by the complete user identifier in Task people involved and start date. All this information, once filtered again, may be exported in CSV format and imported into a spreadsheet.
In the column labeled Op. you may:
 Add an incident (ticket). In order for the cost of the work units (expressed as comments) to be posted at the task (and thus at the project), a role must be assigned and the Add to project`s cost option checked on each of them at the time of creation. See also “Creating new work units from the task scheduler”.
 Add one or multiple Work Units to the task.
 Delete the task definitely.
To create a task use the button Create located to the right side of the button Update.
New task
Initially a task is created with its basic data, such as the start and end dates (with the option to send e-mails at that time to the people who become part of the task), the task owner and the estimated number of hours.
A useful option is to define whether the task will be done on a regular basis in a period (weekly, monthly, etc.) to keep an hour counter that will be reset at the end of each period and always keeping a total count of hours of the task.
Once created, the next logical step is to edit the task to assign resources (people) to it.
Editing tasks
After a task is created, it is immediately edited in order to assign resources (people, Add users to task section) and time-based target costs, tags, as well as a criticality or priority for it.
From here, and based on the hour allocation to that task by the users assigned to it, it will be possible to find out the deviations in time, deviations in costs and deviations in the planning on the resources hours/person. Pandora ITSM automatically generates these indexes that can be checked in real time.
The task progress may also be automatically tracked according to the hours that people are working and recorded in work units, for that, the token Progression based on hours must be enabled.
Finally, in the task (Tasks links section you will be able to chronologically relate the rest of the tasks with the task you are editing:
- Star to start: All tasks added in this section cannot start before the task being edited starts.
- Finish to start: All tasks added in this section cannot start before the task being edited is finished.
- Finish to finish: All tasks added in this section cannot finish before the task being edited finishes, although it may finish later on.
Roles and costs
Menu People → Role management.
- Project manager.
- System engineer.
- Junior consultant.
- Junior programmer.
- Senior programmer.
- Analyst.
- Senior consultant.
- Support engineer.
Roles to be used by different people may be created in this section. To edit each one, click on the name of the role in the list that appears.
When installing Pandora ITSM, there are roles created which can be edited or deleted (the Project Manager role can only be edited). By using the Reset all data option of the configuration in “Maintaining old data”, these roles are maintained.
The costs of each task are calculated based on the costs of each role (person hours) and the additional costs charged (in the form of expense invoices, additional expenses or any other formula) that are directly attributed to the task (and therefore to the project).
Task follow-up
Pandora ITSM keeps track of virtually all those sections or items of information that are susceptible to change. In the case of the task, it records all operations of opening, closing, changing and adding information, either as a work unit or as an attached file.
Moving tasks
The task's Work Units will remain linked to the task even if it is moved to a new project or parent task.
Creating new work units from the task scheduler
By manually creating work units, you may allocate time to a project and task.
These manual work units are different from ticket comments (also called work units).
- In the case of ticket work units, they will automatically impute the total time of the ticket when it is assigned to a task, has a role assigned and the option Add to project`s cost.
- For these individual work units, which will be added manually by the user, time will be allocated directly as entered when creating the work unit. The creation form has a number of basic fields (description, number of hours spent on the work unit, cost, role, etc.).
It also offers controls that allow you to “split” the work unit into blocks of an equal number of hours (4 by default) and distribute that time into different Work Units (WU) over time (forward or backward, as you choose) with the same content as the original, except for the date.
The work units of a project may be created from the task scheduler by clicking on the corresponding button ![]() } or from the user section, People → Work unit → Add work unit menu.
} or from the user section, People → Work unit → Add work unit menu.
There are two special cases covered by Pandora ITSM:
- Remote work.
- Work units without assigned project/task.
These concepts correspond to special tasks within a special project that are computed differently.
There is also a special section (People → Work unit → Vacations and sick leave menu) to cover cases of absence due to illness or medical assistance and vacations.
Milestones
Menu Projects → View projects → Project overview . Project editing, Milestones tab
A milestone is a task of zero duration that represents an important date or point in time in a project, such as the completion of a project stage, or the delivery date of a particular report. Milestones may be used to filter information in reports or in searches related to a project.
The milestones support the creation of custom fields with the Milestone fields button. Fields can be defined when creating fields:
Name: It is mandatory, names may be repeated.
Visibility: To display the custom fields in the milestone list.
Type:
- Text: Single-line text type.
- Text area: Text type, multiline.
- Combo: To display a list of options to choose from, its elements must be separated by commas.
- Checkbox: To select values of true and false.
Files
Menu Projects → View projects → Project overview . Project editing, Files tab
Files attached to a project may be uploaded, downloaded or deleted. Optionally, a description may be added, which is useful for keyword searches. The search may also be performed by location (project, incidents or work units) of the files and/or by storage date.
Files in source code format (.php, .pl, etc.) cannot be uploaded and it is recommended to compress the files before uploading.
Attachments can only be deleted by an administrator user or by the user who created the attachment and has project administration permissions.
Gantt graph
Menu Projects → View projects → Project overview . Project editing, Milestone tab
.
This utility allows to display all project tasks, as well as their chronological relationship as a series of steps, when finishing a task it links to the next one. It also allows to add new tasks (or sub tasks by clicking on + of each task), related or not. Relationships are set up by clicking on the end of a task (circle icon) and then dragging it to the start of its next corresponding task.
Existing tasks can be modified in their start and end date, as long as they are not related to other tasks. For tasks related to each other, there is a limitation between the end of one task and the start of the next one.
You may choose the actual view to compare the schedule with the tasks performed on a monthly, weekly or daily basis.
Archiving and deleting projects
When projects are completed, they go into an archived state, saving all the information they contain. An archived project may later be deleted, thus disappearing all its tasks, and the work units it contains become “orphaned” and are not assigned to any project or task, although they still exist.
To archive a project, just click on the archive button: menu Projects → View projects → Actions → Archive. This project will be automatically moved to the archived projects view. Such projects do not automatically notify neither task, project nor milestone closure.
Archived projects may be reactivated from the archived projects view: menu Projects → Archived projects → Unarchive or, conversely, deleted with the Delete action.
Board view
Version 105 or later:
Projects → View projects → Clic on project → Board view menu.
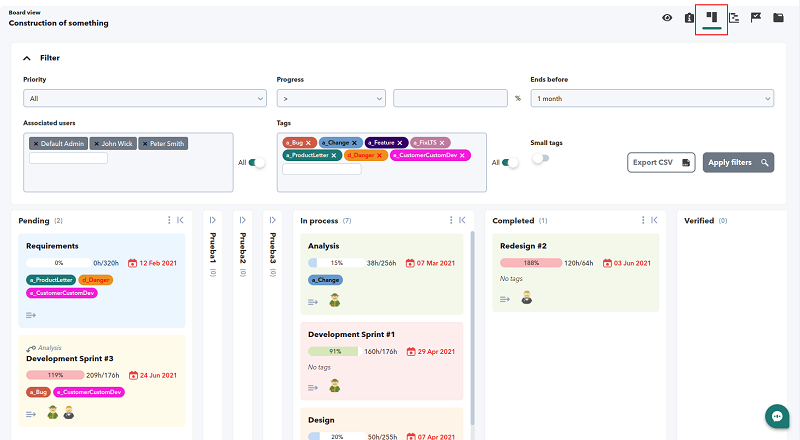
Board view allows you to visually manage the tickets and tasks belonging to a project.
It is important to note that there is a horizontal scroll bar at the end of the screen, in order to show all the columns (status) of a project.
The central mechanism of the Dashboard View is the filter section, which allows you to organize the task information in columns. Selecting the users involved and/or percentage of task performed and/or tags assigned to the tasks, among other values, can be filtered by clicking the Apply filters button.
Each column can be collapsed or expanded as needed and within each column the filtered tasks will have their own quick options for editing, creating Work Units, moving the task, copying it, deleting it or even leaving the Dashboard View to edit the task in a new screen.
In turn, by default, each task will appear collapsed with its own expand or collapse button.
In each column all tasks can be selected (or by pressing the CTRL key and clicking on each task to select or exclude from the selection) and then moved in bulk to another column.
With all these options you can monitor and/or reorganise an entire project in a short time: set dates, create new tasks and assign them, postpone or advance work, et cetera.
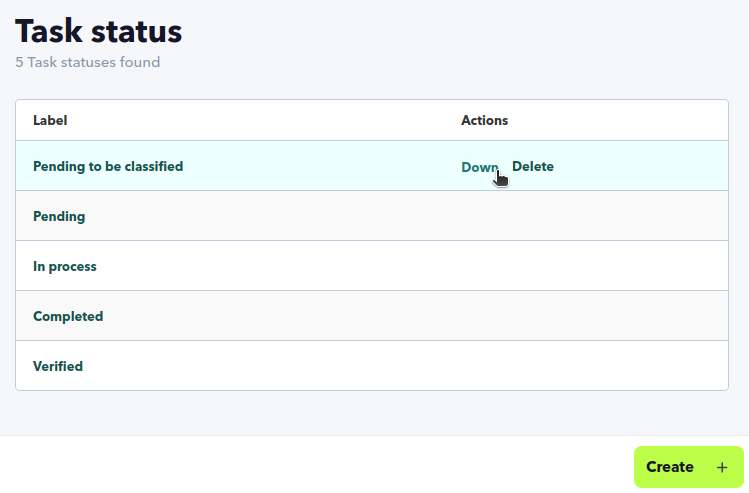
Task statuses
Project → Task status menu.
There are four statuses created by default which may only be modified (users with PM permission or superadmin):
- Pending.
- In process.
- Completed.
- Verified.
Further statuses may be added, reordered and/or deleted using the Up, Down, Delete buttons on each line:
Export to CSV
When exporting in CSV, projects are included, without statuses, tasks or tickets.
The file to download contains the following headers in the first line:
ID,Project,Parent Task,Task name,Description,Completion,Work units hours,Status,Priority,Start,End,Estimated hours,Cost,Periodicity,Start period,Interval hours,CC,Send email,Set hours,Involved people,Tags
If you connect via HTTPS to the Web Console the download will be automatic, if HTTP is used it may be necessary to enable an exception in the web browser to maintain the download.
Custom labels for project tasks
Projects → Project tags menu.
Since version 105, the use of labels in project tasks is available. Three labels are included by default ( Low, Medium, High ) in case you want to use them, but they may be modified as desired (or even deleted).
By clicking Create, new labels may be added, choosing the background colour and text colour for quick visual identification in the board view.
The label to be created must be given a name, otherwise it must be deleted and a new label created.
When creating or editing each task, at the end, right next to the description box, one or more (or all) tags may be added and will be included when saving the changes made.
Reports and views
A general description of the available project reports is provided for your advanced options: “Project reports”. Each of these reports has the option of full screen display and export in CSV and PDF format (“Project bundle of hours report” may only be exported in PDF).
General project report
Menu Reports → Project management → General project report → Select project.
After selecting a project, it shows by default the project view (Show project) which includes the basic data, total people and hours worked, total budget and broken down by role with average hourly cost, in a graph the percentage distribution of tasks and in another graph the work distribution among the people involved. Finally, it shows the activity graph and a summary of each of the tasks.
By activating Show task activity, you will have to select one or several tasks and at the end, it will show the activity of each task, as well as the hours worked, cost and distribution of the work to the people assigned to each task.
Select Show task work unit and the selected tasks will show in detail the work units performed for each task.
Finally by enabling Show in table, all tasks will be shown in tabular form with owners, priority, people involved and task status.
All projects report
Menu Reports → Project management → All projects report.
By default it shows projects from the last year (a different date may be specified) as well as archived projects. Projects with no start or end date should be requested with the date 0000-00-00. If the project types have custom fields, it will also be possible to filter by this criterion, always taking into account the project start date.
Project expense report
Menu Reports → Project management → Project bundle of hours report.
By default it shows the projects of the last month, with the option to show the amounts of each task with the Show task breakdown option.
When selecting a specific project, it is possible to filter by milestones.
Project bundle of hours report
Menu Reports → Project management → Project bundle of hours report.
It allows you to select a particular project and month. It displays basic project information, summary information of the tasks performed and related incidents. It ends with the totalization of hours used and remaining hours.
Project groups
Menu Projects → Project groups.
Pandora ITSM allows logical project grouping through this option in order to organize or classify projects that share development features. A name must be given, which may be repeated, and optionally an icon that differentiates it from other project groups.
Types of projects
Menu Projects → Projects Type.
Pandora ITSM with this feature allows differentiating projects. Unlike Project groups, you may add custom fields to project types: text type (single and multi-line), true and false option, numeric, date, list of options (Combo) and even linked two lists with hierarchically related options.
You may access custom field editing by using the option Actions → Add field.
To custom fields, in addition, that are always required (a value must be selected or set), that are common to all project types and that are displayed in the project list.


 Home
Home

