Customer Management CRM
Customer Management
The entire Customer relationship management or CRM part of Pandora ITSM is designed to support support support management by incorporating a database of contacts, companies and contracts. It is designed to keep an integrated follow-up of the management of support contracts, software licenses and their expiration dates. It can even be used to issue invoices more Pandora ITSM is not a CRM/ERP(Enterprise resource planning) and is not intended for it.
- Users of type superadmin can access all menus without any restriction.
- Version 104 and earlier versions: For the rest of the users you must first activate the CRM in the visibility options of the general configuration by deleting the CRM entry configured as hidden by default when installing Pandora ITSM. For the rest of the users their particular visibility will depend on the assigned profiles.
CRM
Companies
Menu CRM → Company → Companies.
The basic element of CRM and the first to be defined is the company. The basic file of a company looks like this:
The Manager is the owner of the company, and the main company (Parent company) is the company on which it depends. In order for another user to have access, he/she must be a user associated with that company:
A company that does not have a “main company” can only be viewed by the company administrator and users with superadmin permissions.
Generally the first step to work with a CRM is to create the “parent” company for all employees and make this the company they have in their user file. Then it will be the parent company for the rest of the companies (customers, suppliers, etc.).
The company role is a basic identification for filtering, in the menu CRM → Company → Company roles) you can edit, delete and add roles. Fields such as tax ID, country and address are used later to make invoices.
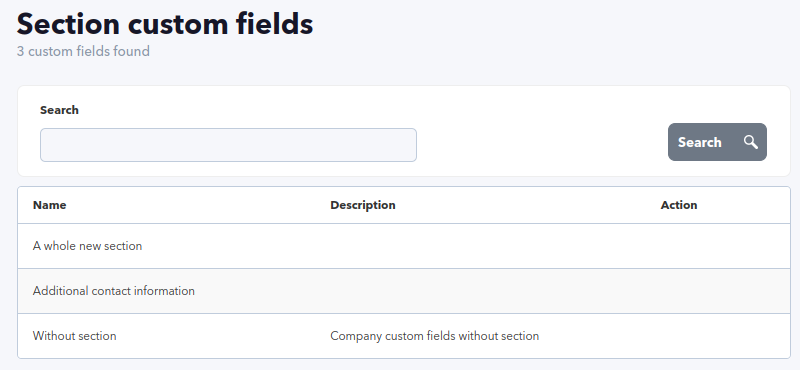
As in other elements of Pandora ITSM, it is possible to create custom fields for companies (menu CRM → Company → Company custom fields). Custom fields are grouped into “custom field sections” so that this information can be displayed and managed in blocks (menu CRM → Company → Company custom fields sections):
Once you have a list of created companies you can export them in CSV format (button Export to CSV) or obtain interesting statistics (button Search statistics) such as companies grouped by administrators or users or lists of top 10 places in activities, sales, et cetera.
CRM Permissions
Profile permissions that apply to the CRM:
CRM information access management is provided by the companies. The Manager of a company is the one who can modify information. Those who belong to the same company as the company owner can also view information. Only those with management permissions can modify data of peer companies (users of the same company). Case study:
- Company “father” or main: My Company.
- User #1 and Manager #1 both belong to My Company.
- Customer #A (managed by User #1) and Customer #B (managed by Manager #1) are two customers of My Company.
- User #2 is a user who has access to support and who belongs to the company Customer #A.
Permissions:
- User #1 has the CRM View and CRM Write.
- User #2, user without CRM permissions.
- Manager #1 has the CRM View, CRM Write and CRM Manage permissions.
Scenario:
- User #1 will be able to view and modify the data relating to the company Customer #A as its Manager. User #1 will also be able to view (can not change anything) of the company Customer #B data as its owner, Manager #1, belongs to the same company (My Company).
- Manager #1 can view and modify data of both companies since it belongs to My Company and also has management permissions.
- User #2 cannot see any data, as it does not have access to the CRM.
Import of companies
The import can be done by means of an export made in Pandora ITSM or by means of a CSV file created by hand. For the second case, a series of parameters must be entered in strict order, some mandatory and others not, being able to choose empty values for the latter. The fields will be the following, following the logical order established by the tool:
name,address,fiscal_id,country,website,comments,id_company_role,id_parent,manager,last_update,payment_conditions,billing,Office Phone,General email
- Name.
- Address.
- Tax ID.
- Country.
- Website.
- Comments.
- Company role identifier.
- Father's identifier (the company must be previously registered).
- Manager of the company (the user must be previously registered).
- Last update.
- Payment conditions.
- Office telephone number.
- General e-mail.
- Custom fields: they must previously exist in your Pandora ITSM system and must be indicated in order, being able to choose a value, or in case of not wanting to give them a value, blank space.
CRM configuration and customization
Menu Setup → Setup → CRM setup.
In the configuration section you can find a tab for CRM configuration:
- Invoice generation parameters.
- Methods of payment.
- Lead parameters.
Contracts
Menu CRM → Contract → Contracts.
Contracts contain multiple information such as application period, client company/companies and other useful information that may be used to Generate invoice and export documents as PDF files. Contracts may also be copied and then edited to save time when renewing them (same conditions with new start and end dates).
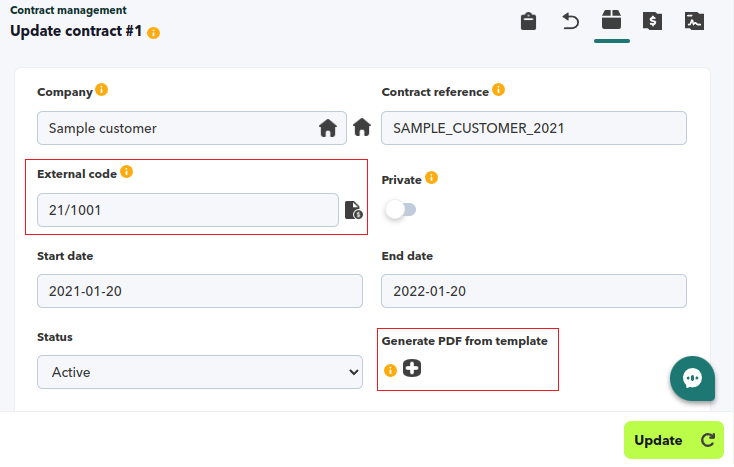
Contracts are associated to a company, so a company may have one or several contracts. In turn, contracts may be (or not) linked to one or several invoices by means of the External code field:
If you need to link the contract to several invoices, enter all of them separated by commas. These associated invoices will be displayed by clicking on Invoices in the invoice list:
When using the Generate invoice option from a particular contract, make sure to reselect the contract with the magnifying glass icon in the Contract number field.
There are contract highlight fields, such as the external code (the linked invoice), a short descriptive field (contract reference) used to identify the contract in the listings and where each company may apply its own nomenclature. Then there are the custom fields depending on the type of contract chosen.
Types of contract
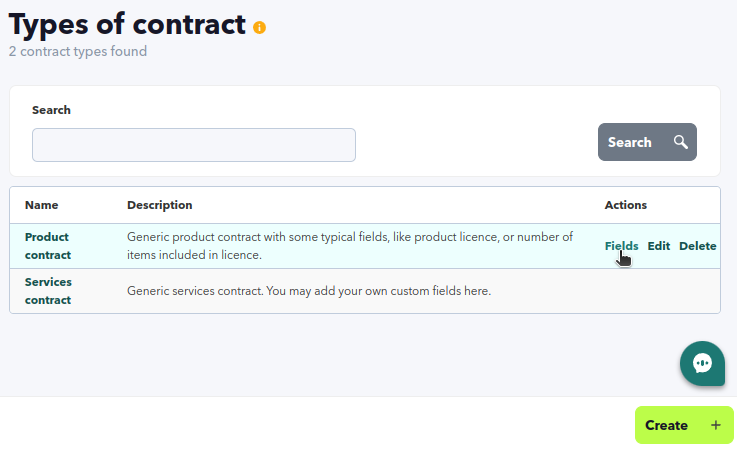
Menu CRM → Contract → Types of contract.
Several types of contracts may be defined, such as services, software licenses, etc. and each type may have its own custom fields.
Generation of contract documents
Using the contract data, a PDF file can be generated with the contract data. This can be used to generate “certificates” or “formal documents” bearing the contract identifier, customer name, contract validity dates, or custom field data.
To do this, when editing a contract, click on the Generate PDF from template button and choose the template to be used. When you generate a PDF document based on the contract, it is automatically attached to the contract as an attachment in the final file section ( Files section).
To edit or create templates you use the template editor located in the menu CRM → Contract → Contract templates. Templates are a code written in HTML that uses macros to replace contract data. Images and text can be used by simply copy/pasting the same from another source. You can also use native HTML by clicking the Source code option.
Macros for contract templates
_id_contract_: Contract identifier._name_contract_: Contract reference (the small descriptive field)._contract_number_: External number (invoice number)._contract_description_: Long description of the contract._date_begin_: Start date._date_end_: End date._id_company_: Company identifier._private_: Whether it is private._id_status_: Contract status identifier (0 inactive, 1 active)._name_status_: Name of the status._company_name_: Company name._company_address_: Company address._company_fiscal_id_: Fiscal identifier of the company._company_country_: Country of the company._company_website_: Company website._company_comments_: Company comments._company_manager_: Company manager._company_last_update_: Last company update._company_payment_conditions_: Payment terms of the company._contract_type_id_: Contract type identifier._contract_type_name_: Name of the contract type._contract_type_description_: Description of the contract type._custom_XX_: Custom macros are formed with the wordcustomtogether with the contract type field identifier and this “id” will be visible in the contract type field list._template_id_: Identifier of the template._template_name_: Name of the template._template_description_: Description of the template._format_long_time_Long current date format,11 Wed April 2024._format_short_time_: Short current date format,11/04/2024._format_annual_date_: Current date format only year,2024.
Contract Import
The import can be done by means of an export made in Pandora ITSM or it can be done by means of a CSV file created by hand.
In the second case, a series of parameters must be entered in order, some mandatory and others not, with the possibility of choosing empty values for the latter:
name,contract_number,description,date_begin,date_end,id_company,id_sla,id_group,private,status,id_contract_type,related_contract,manager,company,Licence type
- Name.
- Contract number.
- Description.
- Date start.
- Date end.
- Company ID.
- SLA ID.
- Group ID.
- Private.
- Status.
- Contract type.
- Custom fields: they must exist previously in Pandora ITSM and in order, being able to choose a value, or in case of not wanting to give them value, blank space.
SAMPLE_CUSTOMER__2021,21/1001,Sample contract. ,2021-01-20,2022-01-20,3,,,0,1,2,,admin,Sample customer,Beta
Invoices
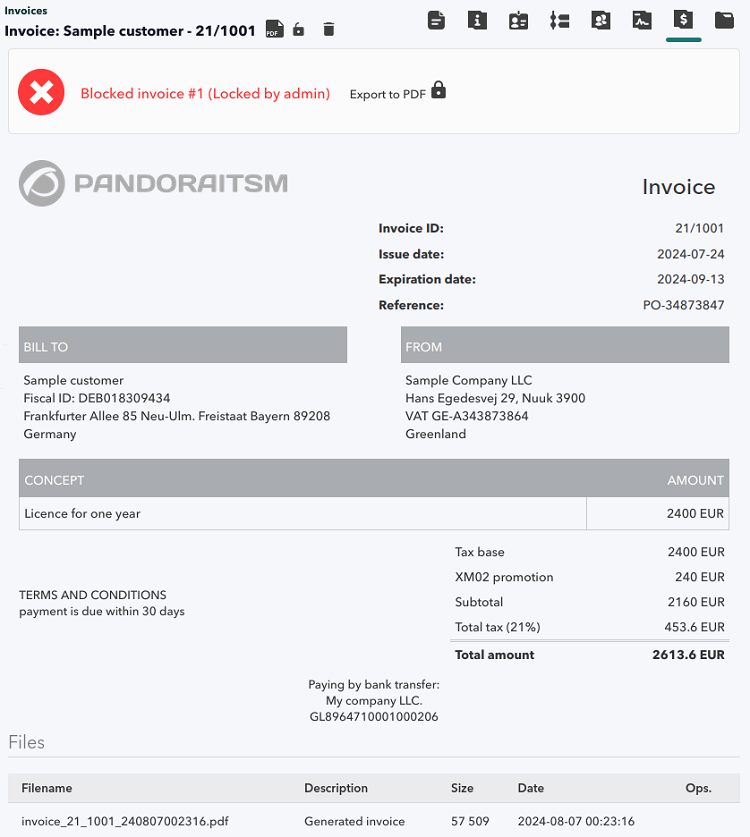
Similar to contracts, invoices are used to find out when there are uncollected invoices issued and when and how much has been invoiced to a given company.
The system is not an ERP for calculating cash cycles, payment management or other ERP features.
Menu CRM → Invoices.
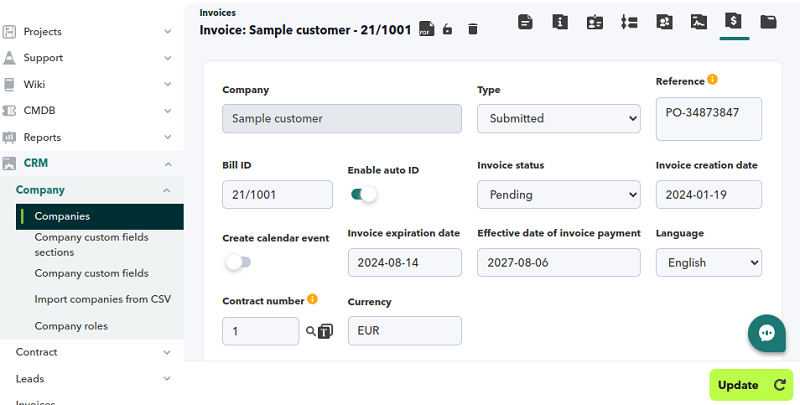
By clicking on an item in the first column of the list, the invoice will appear in the particular invoice section of the selected company:
Relevant fields:
- Bill ID: Invoice number. It must be the only one registered with this value. The system automatically calculates the next invoice number according to the global CRM settings. Exceptions may also be defined.
- The invoice header and its logo, tax name, payment methods and invoice footer are also configured globally in the section for CRM.
- Reference: Informative. Generally to indicate a purchase order number, purchase order or similar.
- Invoice status: Pending payment, paid or cancelled.
- Internal note: A comment excluded from the PDF invoice.
- Description: Text that will appear on the invoice, generally clarifying order data or adding additional information.
- Language: The invoice will be generated in PDF in the specified language and this copy will be added at the end in the Files section. That way you will always have control of each change made to the document. Once the invoice is created you may also attach other files (purchase order, quotations, etc.).
If an invoice is modified, when saving, the PDF is generated again to reflect those changes and replace the old PDF. Invoices may be locked (lock icon or Lock button) so that only the creator may modify them.
Only administrators and/or users with CIM profile will be able to delete invoices.
ACL for invoices
There are different profiles for users in invoice management. While users of type superadmin are unrestricted, other users may query and/or modify on a case-by-case basis.
There are two types of invoices:
- Received.
- Submitted.
As they are created as Received type, unless they are blocked, they can be modified (change language, expiry date, etc.) according to each user's profile.
Invoices created as Submitted type are automatically blocked.
- Users with a CIR profile can only view and download invoices.
- Both CIR and CIW profile users will only be able to view Submitted invoices, i.e. without editing options.
- Users with CIW profile can create and block invoices. If it is of type Received, they can also edit them.
- Invoices of type Submitted, when created or edited, are automatically blocked and can only be unblocked by users with a CIM profile.
- Users with a CIM profile can edit and unblock invoices.
- When editing an invoice of type Submitted , a PDF file is created, deleting the previous one (or the previous ones if it is an invoice prior to this change and has several PDF invoice files). Those of type Received do not generate a PDF file.
- When editing it, if it is of type Submitted, it will show a modal warning that the PDF file will be replaced.
- When you click on the download button, if you only have the PDF invoice, the respective PDF file is created and downloaded; if you also have attachments, a ZIP file is downloaded with the PDF invoice and the respective attachments.
Leads
Pandora ITSM allows the management of business leads (sales lead, business lead or simply Lead).
Through Pandora ITSM Leads management you can track potential customers. The system allows you to record the activity of each Lead and modify its status, so that it progresses from an initial Lead to a successful closed (or omitted) sale. If done from Pandora ITSM, the sending and receiving email responses can be managed, which will be reflected in the Lead tracking.
Menu CRM → Leads → Leads.
Leads can be created manually from the editor or they can be entered through a integration with Pandora ITSM API. Like other Pandora ITSM objects, a Lead has a owner who administers it and a company that manages it (this last point is important when moving to the contracting and billing stages).
In the advanced search you can filter by language as each Lead allows this information to be matched to the Lead templates.
Another useful option is to filter by lead types because when selecting one of them, if it has custom fields, these will be loaded and will allow to further refine the results. These custom fields can also be optionally displayed as columns in the Leads view.
There are many more advanced features for Leads; one simple feature is the use of colored tags to quickly mark Leads that require special attention.
Lead Management
Menu CRM → Leads → Leads → Search Leads .
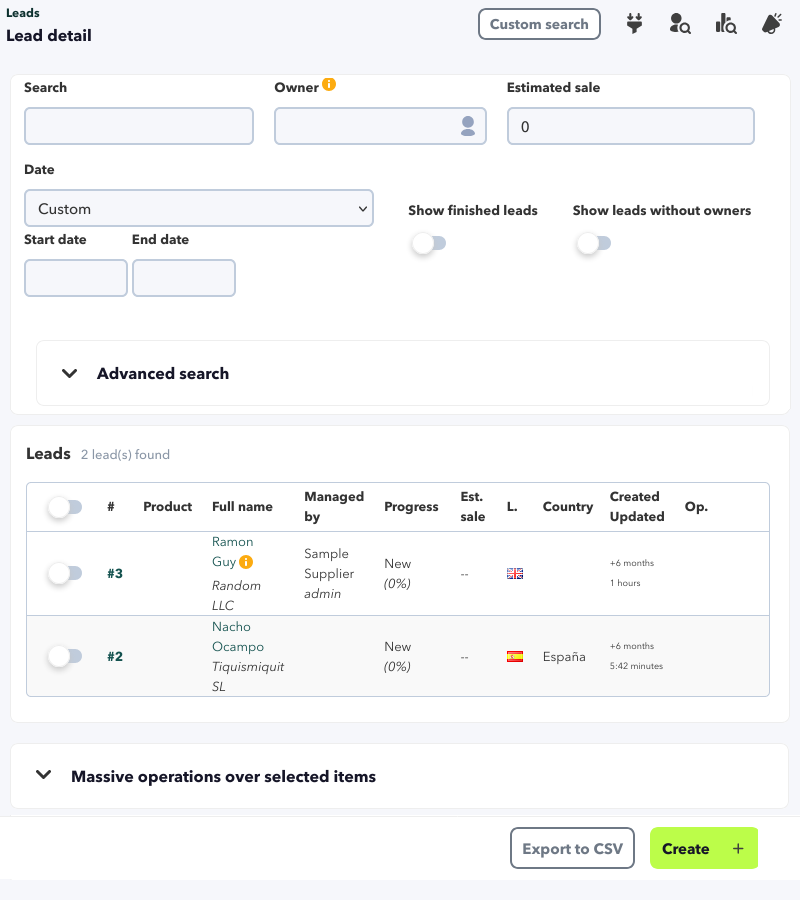
When you enter the Leads view, by default you are presented with the basic Leads search option, plus an advanced search. Whenever one or some of the search parameters are changed, the Search button must be clicked.
For frequent and/or complex searches there is the option of the Custom search button which will allow you to save the current parameters with a name. Clicking again on the Custom search button will show the saved filters to choose and load one of them, as well as allowing to delete it, if necessary.
In the advanced search you can filter by language as each Lead allows this information to be matched to the Lead templates.
Another useful option is to filter by lead types because when selecting one of them, if it has custom fields, these will be loaded and will allow to further refine the results. These custom fields can also be optionally displayed as columns in the Leads view.
There are many more advanced features for Leads; one simple feature is the use of colored tags to quickly mark Leads that require special attention.
Menu CRM → Leads → Leads → Search statistics
For the filtered Leads statistics options are presented:
- Leads funnel.
- Conversion rate (there must be closed Leads).
- Leads per country.
- Users per Lead.
- Top 10 estimated sales.
- New Leads.
Menu CRM → Leads → Leads → Lead pipeline .
The filtered Leads are shown, and according to the Leads tracking scheme, sorted by estimated sales. You can also sort by modification date or by estimated closing date.
Types of Leads
Menu CRM → Leads → Types of Leads
Optionally, each Lead can enjoy this classification, which allows the addition of all the custom fields necessary for the management of particular cases.
Once created, the list of Lead types created will be displayed and the buttons in the Actions column will allow you to edit the Lead type, delete it or add fields. These fields can be marked as visible in the Leads view and with one of the following options:
- Box, a value of true and false.
- Combo, a comma-separated list of options.
- Linked, to display a related list and sublist.
- Date.
- Numeric.
- Text, single line.
- Text, multiple lines.
Lead tags
Menu CRM → Leads → Manage tags.
With the right choice of colors, each Lead can be labeled and then easily filtered in the Leads view. By clicking on each created tag you can edit or delete each element.
Lead tracking scheme
Menu Setup → Setup → CRM setup.
In the general configuration of Pandora ITSM the indicative steps of Leads progress are defined:
- New: Initial state of every Lead.
- Meeting arranged: A meeting with the prospective customer has been arranged.
- Needs discovered: After meeting with the client, the tools that will be useful to him have been identified.
- Proposal delivered: A proposal is submitted, either a predefined contract or a specially created contract.
- Offer accepted: Customer accepts proposal.
- Closed, not response or dead: Lead closed without success.
- Closed, lost: Lead closed without success.
- Closed, invalid or N/A: Lead closed without success.
- Closed successfully: Lead successfully closed.
By default the steps are described in English language. Changing the language of the Web Console will not translate these steps, they must be translated into the language selected by consensus by the Leads team.
Lead activity management through emails
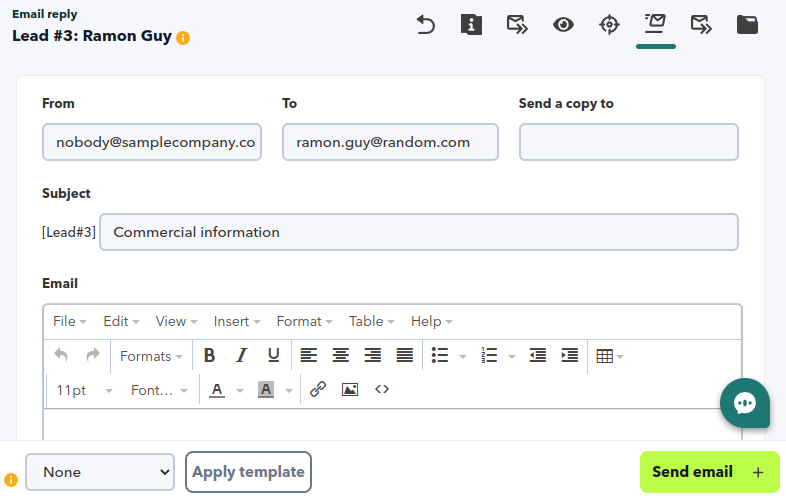
Menu CRM → Leads → Leads → < edit a Lead > → Email reply .
Menu CRM → Leads → Leads → < edit a Lead > → Forward Lead .
Pandora ITSM allows to manage the commercial activity of the Leads through e-mails. This functionality will allow updating the conversation between the parties and uploading files to the Lead automatically.
For this, an e-mail box is used as a reference, from which Pandora ITSM will read the messages to extract the information and attachments. In section Email setup are all the details about the PITSM mailbox setup.
This functionality is used through the Email reply option available in the Leads. With this option Pandora ITSM will send an email message by adding a token of the type [Lead#XXX] at the beginning of the subject of the email message. In addition, when sending the email, the address of the reference mailbox will be added in the CC field.
In this way, when a customer or a sales employee replies to the email, a copy will arrive in the reference mailbox and Pandora ITSM will identify the email and process it. To update the Lead, the information in the body of the email will be added to the Lead activity and the attachments will be uploaded to the server and associated to the corresponding Lead.
Both customers and business employees should use the Respond to All functionality of their email client to ensure that a copy of the message arrives in the reference mailbox that is in the CC field.
You can select a template CRM, in the same language defined in the Lead, in order to save time in writing thanks to the macro templates, and always present communication in a professional manner.
Lead templates
Menu CRM → Leads → Leads → CRM Templates.
Lead templates are communications that make use of template macros that are replaced with values from each Lead and thus personalize each message.
The language and the company that manages the template must be defined, so that users belonging to that company can have access to each corresponding template.
Macros in Leads templates
The following macros can be used in Lead templates:
_DEST_NAME_: Full name of the mail recipient, as it is in the Lead record._DEST_EMAIL_: Lead's email inbox._SRC_NAME_: Full name of the Pandora ITSM user who sends the Lead._SRC_EMAIL_: Email of the Pandora ITSM user who sends the Lead.
Lead creation through a web form
Using the REST API 1.0 of Pandora ITSM it is possible to create new Leads from a web contact form. In this way you will be able to enter the information of your Leads automatically in the tool.
The following PHP code creates a form and collects the data submitted by the form. With them it composes a call to the Pandora ITSM API 1.0 which creates a new Lead.
- pitsm_lead_form.php
<!DOCTYPE html><html><body> <?php //Config parameters $pitsm_url = "http://192.168.70.163/pandoraitsm"; $user = "api_user"; //Get post parameters $name = $_POST["name"]; $email = $_POST["email"]; $company = $_POST["company"]; $role = $_POST["role"]; $country = $_POST["country"]; $comments = $_POST["comments"]; //Create url to call the API $myurl = $pitsm_url . "/include/api.php?user=" . $user . "&op=create_lead¶ms="; $myurl .= urlencode($name) . "," . urlencode($company) . ","; $myurl .= urlencode($email) . "," . urlencode($country) . ",0,0,,,"; $myurl .= urlencode($role) . ",,," . urlencode($comments) . ",1,0"; // Configure curl $ch = curl_init(); curl_setopt($ch, CURLOPT_URL, $myurl); curl_setopt($ch, CURLOPT_HEADER, 0); curl_setopt($ch, CURLOPT_RETURNTRANSFER, true); // Send curl request and close $ret = curl_exec($ch); curl_close($ch); ?> <h2>Pandora ITSM Lead form</h2> <form method="post"> Full name: <input type="text" name="name" size="35"><br><br> E-mail: <input type="text" name="email" size="25"><br><br> Company: <input type="text" name="company" size="30"<br><br> Position: <input type="text" name="role" size="30"><br><br> Country: <input type="text" name="country" size="20"><br><br> Comments and questions:<br> <textarea name="comment" cols="50" rows="8"></textarea><br><br> <input type="submit" name="submit" value="Submit"> </form> </body></html>
Contacts
Menu CRM → Contacts → Contacts.
Contacts are associated to companies, so any Pandora ITSM user with access to a company will be able to see its contacts, its contracts and invoices. Contacts have nothing to do with users, they are only informative pieces of information without any access to Pandora ITSM.
To add a contact the required fields are full name, email and related company. You can also create custom fields (menu CRM → Contacts → Contact fields) with different types of data (date, numerical values, list of options, etc.) as needed.


 Home
Home


