Advanced settings
Settings
Once you have finished modifying the token values, click Update to save the changes in the database.
General setup
Setup → Setup → General setup menu.
- Language: Global language for the system (by default English), each user can have a language defined and it overrides the value defined here.
- Sitename: Site name (by default Pandora ITSM), visible in the title of all windows and in the subject field of all messages.
- Enable error log: File with the error log, located by default at
/pandora_itsm.log. - Timezone for Pandora ITSM: It defines the Web Console time zone. Default value
Europe/Madrid. - List of IP addresses with access to API: Comma-separated list of IP addresses with API access. An asterisk (
*) means “any” (not recommended), default value127.0.0.1. - Default admin user: In Pandora ITSM, there must always be an active superadmin . This option allows to specify one of these super users or, by default, in automatic option, it will choose the first active superadmin to run periodic tasks of PITSM system.
- API password: Password required to make requests through API.
- First day of the week: First day of the week for calendars and other uses of the application, Monday by default.
- URL update manager: Address of the update server for Pandora ITSM.
- Login hash password: It is used to generate a unique URL to be used for pre-authentication.
- Enable HTTPS access: Configure Pandora ITSM to use HTTPS to encrypt communications.
When enabling the HTTPS protocol and increasing security at the transport layers, it will be necessary to add an OpenSSL certificate verification. For that purpose, the following line should be added to file php.ini:
openssl.cafile=/etc/ssl/certs/certificate_name.ca-bundle
- Access port: Configure the server access port number, default value
80. - Public access to server: Public access URL to the server, it can be an IP address or a URL address. Specify HTTP or HTTPS and the suffix
pandoraitsm:https://mydomain.com/pandoraitsm. - CSV encoding type: Default file encoding type
.csv(see Separator data in CSV). - Enable Update Manager checks: It enables notifications of available updates for Pandora ITSM.
- Maximum direct download size (MB): It defines the maximum size of a file to download in the application.
- Max. upload file size: It defines the maximum size of a file to upload to the application. If you have a lower system size (
php.ini) this limit may not be respected. - Max. Upload file size in CRM (MB) and Max. Upload file size in incidents (MB): It defines the maximum size of a file to upload to the application in the ticket and CRM sections.
- Separator data in CSV: Data separator in CSV files, default value comma
,' . - Temporary directory of pdfs: Directory for storing temporary files in PDF reports.
- Hide version: It hides the version in both the footer and the login screen.
- Show modal last time logged: It shows each user the date and time of their last login (modal form).
- Welcome view: It defines the time (by default the last 21 days) to be displayed in the welcome screen if the user has this option enabled in their profile.
- Chromium path: Location of the dependency for report generation, by default
/usr/bin/chromium-browser. - Send vacation request notifications to: See Project management.
- Active automatic timetrack stop: Used to record the maximum time worked. It is active by default and stops automatically when the value specified in Stop timetrack after (eight and a half hours by default) is added and reached.
- Use SSL certificate: To enable the use of Secure Socket Layer(SSL).
- Path of SSL Cert: Full path to the SSL certificate you want to use. By default located at:
/etc/ssl/certs/pandoraitsm.pem
Visual Configuration
Setup → Setup → Visual setup menu.
Custom images, favicon and logos can be stored at ../images/custom_logos and ../images/favicon directories, accordingly.
From version OUM 103 onwards, the Theme token is available for color schemes in the Web Console, both for general configuration and at user level. Default (Light) is set by default as the global theme and likewise for users. Unless otherwise specified, the other configuration values refer to that particular subject.
In the case of the dark theme, specific tokens have been established.
- Favicon: It allows you to set an icon (generally 16 by 16 pixels) as a favorite.
- Block size for pagination: Number of elements per page in listings. It is recommended to use low values to avoid performance impact .
- Global dashboard (welcome message): It allows to set a dashboard as initial screen (optional).
- Font for ITSM: Font type, both for the interface and for PDF files.
- Tabs menu: Used in inventory objects and tickets, allow to view the options as a drop-down menu, as a tab or as both options.
- Global search limit: Number of items that will appear in listings when any search is used.
Global search performs a search for the keyword(s) entered with the default search parameters in the following areas:
- Manage tickets (closed tickets are not shown).
- Project management.
- People.
- Contacts.
- Contracts.
- Companies.
- Invoices.
- Leads.
- Wiki (if it does not produce results, it presents a link to create an article).
It must be taken into account that the search results in each area are limited to the number of items established in Global search limit. This limit value is not displayed in the requested search result.
Each user, according to their rights (ACL) will be able to see more or less areas and results.
Password Settings
Setup → Setup → Password policy setup menu.
Make sure that the Enable password policy token is enabled, otherwise none of the other tokens will work.
- Min. size password: Minimum length that the password must have, by default five characters.
- Password must have numbers: The password must contain numbers.
- Password must have symbols: The password must contain symbols.
- Password expiration (days): Time, in days, of password expiration, by default zero (it never expires).
- Force password change on first login: Force password change on first login.
- User blocked if login fails (minutes): User lockout time, in minutes (default five), after failed login (after the retries configured in the next field).
- Number of failed login attempts: Number of failed identification attempts.
- As of OUM 95, there is the option (by default disabled) to show the user their last login (Show modal last time logged token).
- Password policy does not apply to administrator users.
Issue setup
Setup → Setup → Issue setup menu.
Visual Options
- Show ticket owner and Show ticket creator: Show ticket creator and show ticket owner in ticket listing and search views.
- Max. tickets per search: Maximum number of tickets per search, this limits the results in ticket search to avoid performance hits. It is recommended to be between 200 and 500.
- Enable quick edit mode: It allows you to quickly edit some ticket elements (owner user, criticality, status) without going into full edit mode.
- Show user name instead of ID in the ticket search: Show the real user name instead of the identifier in the ticket search.
- Format date: Two date format options, long
yyyy/mm/dd h:m:s(default option) and approximate (for example: 1 day, 2 hours). - Completion date WU: Checking this option will show the Completion Date field in the ticket Workunits (WU). This date may be different from the Workunit creation date.
- Sort work units by completion date: Sort WU by completion date (in the WU list of a ticket).
- Most recent comments at the bottom: When enabled, the most recent comments and the input field to add new ones will be displayed at the bottom of the incident view.
Ticket performance
- Disable ticket score: Disable incident evaluation, inactive by default.
- Allow IW to change creator and Allow IW to change owner: Users with this access bit will be able to change the creator and/or owner of the ticket.
- Editor adds a WU on ticket creation: A Workunit (WU) is automatically added when creating a ticket.
- Allow to change the ticket type: If deactivated, it will not be possible to change the type of ticket once it was created.
- Allow to configure the date/time when creating it: It allows defining the time and date of the ticket at the time of its creation.
- Ignore user defined by the group for the owner: It allows to ignore users predefined by the group for the owner.
- Ticket type required: It forces you to choose a ticket type, inactive by default.
- Ignore creator user by default: If enabled, the default creator user is ignored and must be specified manually.
- Allow to change creator and owner: It allows modification of the creator user and the owner user.
- Allow external users to modify their tickets: It allows external (non-grouped) users to modify their tickets.
- Ignore group template for the issue creator: It ignores group templates for the originator of the incident.
- Creator can see every user: The creating user will be able to see all users, even from other groups (inactive by default).
- Automatically assign ticket: Based on the group assignment rules, it allows ticket auto-assignment.
- Assign ticket to the first editing user: If checked, the user who edited the ticket will always be set as the user who edited the ticket in the first place.
- Change to assigned status if owner adds a note in the ticket: It changes the assigned status if the owner adds a note on the ticket.
Work Unit (WU) Options
- Automatically close ticket: Number of days (by default 45) after which a ticket will be closed automatically.
- Ticket WU default time: Default value used when entering a work unit, in units of hours. Example:
0.25will be 15 minutes. - Sending email when managing WU: Sending email when managing WU. As of version 103 OUM can also send an e-mail to a user if he/she is mentioned in the WU.
- Default internal work units: Default internal work units.
- New WU are always public: Comment activation is always public.
Workflows
- Check closed tickets when running workflow rules: This option is used for Workflow rules to process closed tickets.
- Days to check closed tickets: If the previous field is checked, the tickets closed in the last 15 days (value by default) will be taken into account.
Email Sending Options
With the exception of tokens 1, 2 and 15, all others are active by default.
- Masking email addresses: With this option enabled, e-mail addresses in the ticket content will not be displayed.
- Send all attachments for each issue update by email: Sending all attachments associated with the ticket with each update through email.
- Send email for each created ticket: Send notification of each created ticket.
- Send email for each closed ticket: Send email for each incident closure.
- Send email for each update of the issue status: Send notification for each ticket status change. In case of changing its status to closed, notification forwarding will depend on the previous token configuration.
- Send email for each update of the issue owner: If the owner of the issue is changed, an email will be sent.
- Send email for each update of the issue priority: It will send a notification for each change in the work priority of the incident.
- Send email for each update of the issue group: It sends an email for each update of the ticket group. This configuration could be general or group-specific. To make it group-specific, configure it in group editing.
- Send email for each update of the issue in other fields: It will send notifications for each modification of any of the other fields of the issue.
- Send email for each created work unit: it sends an email for each Workunit created. From version 103 OUM onwards, you may also send an email to a user if they are mentioned in the WU.
- Send email for each added attachment: It sends notifications for each attachment added.
- Group work units for each ticket and email: In order to reduce the number of messages to be sent, this token (active by default) groups several notifications (attached files and/or WU added in a period of 5 minutes) into a single notification.
- Send email for each validated work order: It sends an email for each work order validation.
- Send additional emails when the comment is internal: Different email addresses may be added to a ticket, including PITSM participants and users. To prevent these mailboxes from being notified when adding a WU in an internal comment, this option should be disabled.
- Send email to workunit creator: Disabled by default. To avoid looping behavior generated by automated email responses (vacation, after hours, etc.) to work unit creators.
Customization
Status and Resolution
Status labels and ticket resolutions may be modified. It is important to note that even if you change the label, the logic associated with the statuses remains the same, so the SLA, Workflow rules, or ticket colors according to their status (new/closed) will remain the same.
Messages themselves are set to English by default, changing the language of the Web Console will not translate these text strings.
Weekends are working days and Special days
Non-working days are used to define local/national holidays and so on. They are not taken into account in SLAs, and are displayed differently in calendars. With these two token weekends (Saturdays and Sundays) may be defined as working days and holidays may be added with the concept of special days, both for SLA calculation purposes.
Default custom columns
From version 105 the default columns to be shown in the list of incidents can be configured. By default the following fields are selected:
- ID.
- SLA.
- Description.
- Title / Type of incident.
- Group / Company.
- Status / Resolution.
- Priority.
- Date update / Start date.
- Creator.
- Propietario.
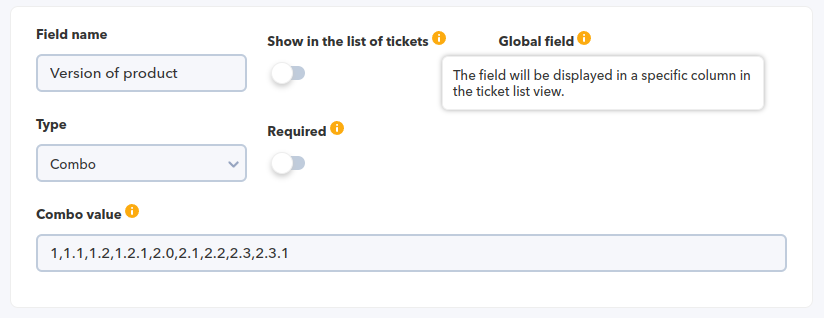
More system fields and even custom fields that are marked to be displayed in the event list can be added to this list.
If a custom field is unchecked to be shown in the list of tickets (Show in the list of tickets) it will appear as an empty column, without title or content. In this case, the field must be manually removed from the list of selected fields.
Email Settings
Setup → Setup → Email setup menu.
Sending mail is used, for example, when there is a change in a ticket or an SLA is breached.
Receiving emails is only necessary if you use ticket creation and management by email.
- Notification period: Notification period, minimum time in hours (24 by default) that must go by between two SLA notifications.
- System email from address: Email address from the system, it will be the sender that will be used when sending emails from Pandora ITSM.
Mail delivery settings
The common fields, regardless of their encryption type (except when OAuth 2.0 is used in the Encryption field), are:
- SMTP Host: Location of the post office. If left blank, it will try to use a local mail system postfix/sendmail (if enabled).
- SMTP Port: Port number to send mail.
- SMTP user: Username.
- SMTP password: User password.
Fields for configuration in Pandora ITSM list are:
- SMTP queue retries: It retries to send the mail queue. If this number is exceeded, the mail in the queue will be taken as incorrect.
- Max. pending emails: Maximum number of pending emails. If this number is exceeded, it will display a warning in the system notice area to indicate that there may be a problem when sending emails.
- Max. emails sent per execution: Maximum number of emails sent per execution, thus limiting the maximum number of emails in each periodic execution of the maintenance script.
Gmail (SMTP)
Gmail® only allows sending encrypted emails.
- Encrypted with STARTTLS:
- Encryption method:
STARTTLS. - SMTP Host:
smtp.gmail.com - Port: 587 (25 could also be used).
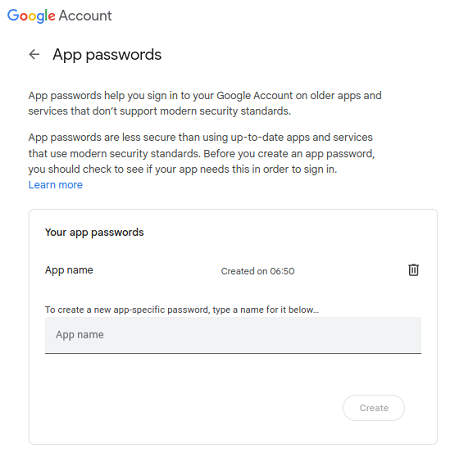
To get an application password from Google® (https://myaccount.google.com/apppasswords) you will need to create an application entry, automatically generate a password, manually copy without spaces to the corresponding field.
- SSL/TLS Encryption
- Encryption method:
SSL/TLS - SMPT Host:
smtp.gmail.com - Port:
465
Outlook (SMTP)
MS Outlook® only allows encrypted email forwarding with STARTTLS.
- Encryption method:
STARTTLS. - SMTP Host:
smtp-mail.outlook.com. - Port: 587 (25 could also be used).
- Compatibility: Outlook.
MS Outlook® does not allow the use of users from other mail services, only its own, so specify the same email that is used for the SMTP configuration.
Office 365 (OAuth 2.0)
Since January 2023, Microsoft® only allows sending emails through third-party authentication with OAuth 2.0 .
- Encryption method:
OAuth 2.0. - User ID: User identifier.
- Client ID: Application identifier registered with Microsoft®.
- Tenant ID: The allowed values are tenant ID for tenant ID or domain name,
commonfor both Microsoft® accounts and work/school accounts,organizationsonly for professional or educational accounts, andconsumersonly for Microsoft® accounts. - Secret: User private token.
Other (SMTP)
- Encryption:
Nonefor sending without encryption or encrypted with SSL/TLS, SSLv2, SSLv3, or STARTTLS. - Name: DNS name or IP address of the mail server.
- Port: Port on which the mail server is listening.
- User: User configured in the mail server.
- Password: Password configured for the user indicated above.
Mail reception settings
IMAP/POP Settings
It is recommended, as far as possible, not to use the IMAP/POP account of any internal Pandora ITSM user, as this may cause some strange behavior when creating and updating tickets in Pandora ITSM.
Gmail (IMAP/POP)
Gmail® only allows encrypted receipt of email messages using SSL/TLS.
IMAP:
- POP/IMAP Host:
imap.gmail.com. - POP/IMAP Port:
993. - POP/IMAP user: Email mailbox of the user.
- Select IMAP or POP:
IMAP. - Compatibility: Compatibility with
Gmail.
POP:
- POP/IMAP Host:
pop.gmail.com. - POP/IMAP Port:
995(POP). - POP/IMAP user: Email mailbox of the user.
- Select IMAP or POP:
POP - Compatibility: Compatibility with
Gmail.
The Accept any certificate option is not recommended, as it will not validate certificates for encryption.
To configure “Management of email queues by groups”, add a domain filter in the Email origin field that matches what is established here.
Outlook (IMAP/POP)
MS Outlook® only allows encrypted reception with SSL/TLS.
IMAP:
- POP/IMAP Host:
imap-mail.outlook.com. - POP/IMAP Port:
993. - Select IMAP or POP:
IMAP. - Compatibility: Compatibility with
Outlook.
POP:
- POP/IMAP Host:
pop-mail.outlook.com. - POP/IMAP Port:
993(IMAP)/995(POP). - Select IMAP or POP: POP/IMAP.
- Compatibility: Compatibility with
Outlook.
The accept all certificates option is not recommended, as it would not validate the certificates for encryption.
Within the MS Outlook® configuration, it is necessary to have the option Allow devices and applications to use the POP configuration activated.
To configure the “Management of email queues by groups”, add a domain filter to the Email source field.
Office 365 (IMAP/POP)
MS Office 365® only allows encrypted reception with SSL/TLS.
IMAP:
- Name:
outlook.office365.comvalid for both POP/IMAP. - Port:
993(IMAP) /995(POP). - Protocol selection:
POP/IMAP. - Compatibility: Office 365.
POP:
- Name:
outlook.office365.comvalid for both POP/IMAP. - Port:
993(IMAP) /995(POP). - Protocol selection:
POP/IMAP. - Compatibility: Office 365.
The option for accepting all certificates is not recommended to be used as it will not validate certificates for encryption.
To configure “Management of email queues by groups”, add a domain filter in the Email source field that matches what is established here.
Other (IMAP/POP)
- Encryption: You may configure the POP/IMAP server without encryption or encrypted with SSL/TLS, SSLv2, SSLv3 or STARTTLS.
- Name: IP address or DNS of the POP/IMAP server.
- Port: Port number on which the POP/IMAP server is listening.
- User: User configured in the mail server.
- Password: Password configured for the user indicated above.
- Protocol: POP or IMAP.
- Compatibility: Others.
- Accept all certificates: Checked if you wish to accept any certificate, even self-signed ones.
Generic texts for mail
Emails sent by Pandora ITSM are queued until the maintenance script sends them, by default every 5 minutes. To adjust this performance, there are a series of special parameters, as well as a queue manager for pending forwardings.
- Email header: It will be used in any automatic email from Pandora ITSM.
- Footer of the email: It will be used in any automatic email from Pandora ITSM.
Macros are not allowed in either of the previous two elements.
Email delivery queue management
This system allows you to view the mails that are still pending sending and their status. It also allows you to delete from the current queue and/or resend those messages checked as invalid. You may select mails individually by checking the box associated with each one and then clicking Reactivate pending emails or Delete pending emails.
Mail Templates
Setup → Setup → Email templates setup menu.
It allows you to edit the mail templates that Pandora ITSM will use to write emails, as well as the templates of the subject of the message. Mail templates are generic and are used for all groups.
To edit a template, click on its name or click the corresponding editing button in the actions column.
Macros are variables that will be replaced at the time of writing the message by a specific actual value:
_author_: Ticket creator._creation_timestamp_: Date and time of ticket creation._fullname_: Full name of the user receiving the mail._group_: Group assigned to that ticket._havecost_: For project work unit reports only._incident_id: Ticket identifier._incident_main_text_: Ticket main descriptive text._incident_title_: Ticket title._owner_: User who controls the ticket._priority_: Ticket priority._projectname_: For project reports only._resolution_: Ticket resolution._sitename_: Site name, as defined in General Settings._status_: Ticket status._taskname_: For project reports only._time_used_: Total time spent on this ticket._update_timestamp_: The last time the ticket was updated._url_: Ticket URL._username_: Name of the user receiving the mail (login name)._wu_text_: Workunit text._wu_user_: User reporting a workunit.- Custom field templates: This allows that when creating an item type, the name of the fields to be added may be included as a macro, which will display the value of that field:
“_custom field name_”.
Visibility Management
Setup → Setup → Visibility management menu.
This option is used to “hide” certain parts of Pandora ITSM from user groups. The following visibility levels may be configured for each section and user group:
- Hidden: It will not be displayed for those users who belong to the indicated group.
- Full: Users belonging to the indicated group will have full access to the section.
If a section has no visibility settings, the default access will be Full for all users.
Each section is associated to a profile, which is checked together with the user's group to find out if it has visibility or not:
- Projects ⇒ PR.
- Tickets ⇒ IR.
- Inventories ⇒ VR.
- BC ⇒ KR.
- File releases ⇒ KR.
- Agenda ⇒ AR.
- Persons ⇒ Any profile.
- Work Orders ⇒ WOR.
- Configuration ⇒ Any profile.
If the user is an administrator, they will always have full access regardless of the menu visibility settings.
If a user has profiles in several groups that have different levels of visibility in a section, the visibility for that user in that section will be the least restrictive.
If a visibility level is created for a section by selecting all groups (group All), any other configuration previously registered for that section will be deleted, and only the one entered will remain.
Pandora FMS Inventory
Setup → Setup → Pandora FMS inventory menu.
This section controls both inventory options and remote inventory management (processing of data sent by Pandora FMS agents to Pandora ITSM, without the need to install Pandora FMS).
Inventory Options
- Duplicate inventory name: It enables the option to have inventory item names with the same name. Option enabled by default.
- CSV compatibility import: If the option is disabled, it allows CSV to be displayed as a report showing the inventory items previously selected by the user as they appear in the list. Option enabled by default.
Inventory data processing from Pandora FMS agents (Remote inventory):
- Default owner: Default owner for these items.
- Associated company and Associated user: Companies and users with access to these items.
Authentication configuration
Setup → Setup → Authentication configuration menu.
Super administrator (superadmin) users are the only ones who always authenticate locally, unlike the rest of the users who, if configured, can authenticate remotely with LDAP® or Active Directory®.
If LDAP® or Active Directory® is configured, Pandora ITSM will first query these platforms if the user exists and if the password is correct.
With the token Session timeout (secs), the maximum session timeout (default nine thousand seconds) is set.
Active Directory
You may configure whether, in case of remote authentication failure, you can authenticate locally by enabling the token Fallback to local authentication.
By enabling the option to automatically create users (Automatically create remote users), you may configure the option to assign user level, profile and group and even specify a restricted user list (Automatically create blacklist). In the advanced configuration of Active Directory® (Advanced Configuration AD) new permissions may be added.
LDAP
Selecting LDAP® as remote authentication allows you to choose between LDAPv1, LDAPv2 and LDAPv3 and optionally encrypt communications by enabling the Start TLS token.
This authentication method lacks the option to authenticate locally in case of failure (for users other than superadmin).
Two-factor authentication
Two-step authentication (two-factor authentication or 2FA) has become for years one of the best options to increase the security of user accounts. Pandora ITSM incorporates this feature by integrating with the Google Authenticator® solution.
Requirements
It will be necessary to have the code generator application on a personal mobile device for each user.
You must have superadmin rights to access PITSM configuration options, menu Setup → Setup → Authentication configuration → Two-factor authentication and enable this feature.
That way each user will be able to activate two-step authentication with the option Edit my user. There is also the option Force 2FA for all users is enabled, by default disabled, to tell the rest of the users, at the beginning of each session, to activate two-step authentication.
It is extremely important for PITSM server to have the exact time and date configured.
Process to be followed for each user
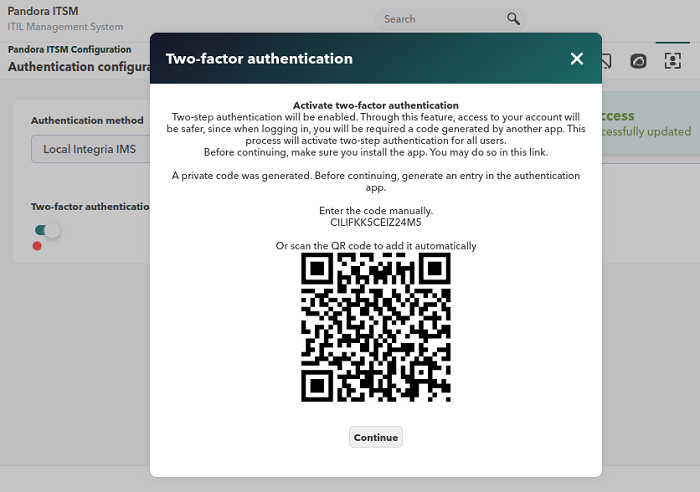
When each user edits their own data and activates their Two-factor authentication, Pandora ITSM will generate an authentication key which will also be displayed by means of a QR code:
By means of the installed application, you will be able to read the QR code (or manually enter the key) and the resulting code must be entered into PITSM and click Validate code.
After users log out, thay will have to re-enter their credentials and, if they are validated, the code generated by the personal device for that specific moment will be entered, thus completing the double authentication.
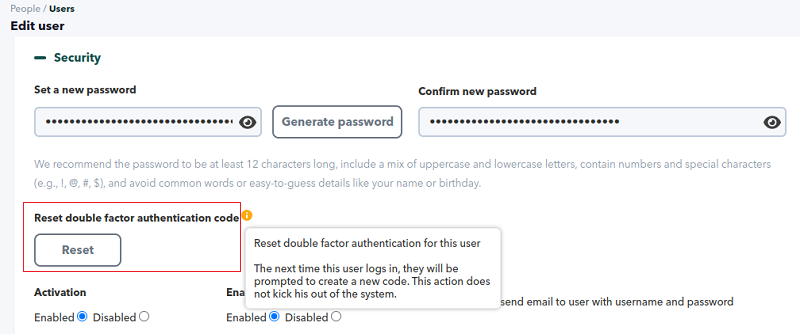
In case non superadmin users need their double authentication key to be reset, they must request it directly with a superadmin who will use the option Reset double factor authentication code of the requesting user:
If superadmins need to reset their two-step authentication key, they will have to log in with their username and password and then click Reset double factor authentication code. An email message will be sent to them immediately, together with a link and they will have 15 minutes to click on said link.
SMTP mail sending must be active and fully functional in order to reset the superadmin / two-factor authentication key.
CRM
Menu Setup → Setup → CRM setup
In this section you may configure invoice parameters such as header image, payment methods, or tax abbreviations. You may also hide the tax identifier (disabled by default) and automate invoice numbering.
You may enable (or disable) automatic invoice ID generation, and modify their structure:
In the Invoice ID pattern field, a text string is stored that will be used as a pattern to generate identifiers, by default 21/[1000]. This pattern will contain a fixed part and a variable part. The variable part must be numeric and will work as the first element from which to calculate a sequence. The variable part will be enclosed in square brackets. The rest will be constant in all invoices.
Invoice identifier generation applies only to Sent invoices.
In the CRM configuration section you may also rename the leads statuses to customize your pipeline.
Maintenance of old data
Setup → Setup → Old data maintenance menu.
It allows you to specify to the system how to manage history information. If the value indicated is zero 0 in a token, the related data will always be kept.
The Delete all data option will delete ALL data from the database and also attachments. Use this option to start over.
The Reset to Default button will change each and every token and save automatically. These defaults and relevant details are indicated:
- Days to delete events: 30.
- Days to delete tickets: 0. The related data will also be deleted.
- Days to delete work units: 0. As long as they belong to disabled projects, working hours older than the indicated days will also be deleted.
- Days to delete work orders: 0.
- Days to delete audit data: 15.
- Days to delete sessions: 7.
- Days to delete workflow events: 900.
- Days to delete attached files to tickets: 0.
- Days to delete old file tracking data: 30.
- Days to delete backups: 30.
- Days to delete invalid emails: 30. Messages that could not be sent.
- Days to delete reports: 365. Reports that have been self-generated on a periodic basis.
- Days to delete rooms chat-bot archived: 365.
Project management
Setup → Setup → Project management menu.
- Auto WU Completion (days): The number of days (default zero) in a work cycle is specified. Generally time periods such as weekly, bi-weekly or monthly are used by entering the actual number of days to work. This feature will autocomplete the UT backwards from the current time. These hours entered to users are not assigned to any task in any project, but to “Unjustified” hours.
- No WU completion users: This is a specific list of users (separated by a space) without UT auto-completion.
- Work hours per day: This number represents the number of hours (eight by default) of a normal working day, in order to calculate the UT autocompletion.
- Project WU Default time: Four hours, default value.
- Currency: Euro by default (
eu). - Disable tickets and WUs addition for Pending and Verified tasks: In order to be able to finish a verified project, this token is activated to stop adding work that causes delays.
- Total vacation days: Number of vacation days (twenty-two by default) that will be used for the corresponding calculations in the vacation report section.
- Send vacation request notifications to: It allows to set the default user for the vacation approval. It must be verified that a valid (existing and enabled) user is specified.
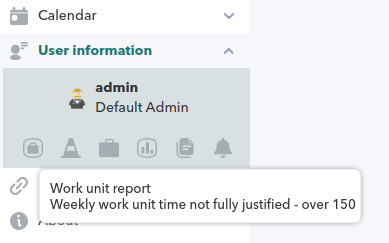
- Weekly work units notice: By default 40 hours per week, when enabled it places a information message in the User information menu for each user:
Pandora RC
Setup → Setup → Pandora RC menu.
To activate Pandora RC remote management system (formerly known as eHorus).
ChatBot
GitLab
Setup → Setup → GitLab menu.
For the integration with GitLab® an access token belonging to a GitLab user with permissions to see the tickets of a given project is required. Once it is configured, it will be possible to check through Pandora ITSM Web Console, only in read mode, the incidents registered in a project.
File Manager
Setup → Setup → File manager menu.
It allows to upload new files to the file distribution system integrated in Pandora ITSM. These files are located in the directory /attachment/downloads.
It also allows creating and deleting directories for better organization.
You can also change the default icons in the /images directory. The /images/custom_logos directory is used to store logo images.
Diagnostic Information
Setup → Diagnostic info menu.
Some features are described:
- Info status Pandora ITSM: With the version and the directory where it is installed, among other values.
- PHP setup: With the version installed and the value of important parameters such as the maximum dedicated memory and maximum size of the files to be uploaded.
- Database size stats: Total tickets, users and sessions registered.
- Database status info: Version and date of the database engine.
- System Info: With basic information about the hardware where Pandora ITSM is running.
- MySQL Performance metrics: Set values, in addition the recommended values are shown as a comparison measure.
- Pandora ITSM logs dates.
- Status of the attachment folder: General number of files stored.
- Date system: Date and time of Pandora ITSM.
News board
Setup → News board menu.
It allows you to add small system news, which will be visible to all users when they log in. Useful to warn about changes in the platform or warnings about interventions, disconnection of the service or others.
It can be sent to specific groups and optionally set an expiration date after which the message will no longer be displayed on the bulletin board.
Database Manager
Setup → DB Manager menu.
It is a direct interface against the system database, in SQL, to which only superadmin and users with DM profile have access.
For the exclusive use of expert users, as its misuse may cause irreversible damage to the tool and data deletion.
Links
Setup → Links
External links may be added and removed and will be displayed in the Links section of the main menu and will open in a new tab of the web browser. For internal links, subdirectories must be placed, just like for the Wiki: wiki/operation/wiki/wiki.
System Events
Setup → System events menu.
History of events that took place in the system, such as sending scheduled reports, execution of cron tasks, system failures, and so on.
User activity information is stored in the audit log.
Audit Logs
Setup → Audit log menu.
This record will reflect the actions of each user in each section, all of them in a summary of 51 actions. If someone modifies a customer's data, it will be known when and what was changed. If someone creates an invoice, you will know when and which invoice, and so on.
It allows searching by a specific substring and by date period, as well as being able to export to a CSV file.
Error Log
Setup → Error log menu.
It displays the error log (if this is enabled), useful to identify possible system code errors. By default, it reads from the file /var/www/html/pandoraitsm/pandora_itsm.log the last lines and displays a button to permanently delete data.
Translate strings
Setup → Translate strings menu.
It allows you to perform customized translation of any text that appears in Pandora ITSM interface.
You may select the language you wish to modify and a free field to search for specific text or you may leave it empty to display all strings.
The search is performed on the original English language, all translations are based on this language. Selecting this language in the list will allow you to adjust and/or correct strings.
Backup
Setup → Backup menu.
The backups section allows Pandora ITSM users to back up attachments and the database, both manually and on a scheduled basis.
Backup list
The first one consists of a list of existing backups in the backup folder inside Pandora ITSM directory. From there you may delete a backup, download or restore the PITSM system from any item in the list.
Special care should be taken when performing this action since the backup will replace the database information with the information that was in that backup, making the information added between the backup and the system in its current state disappear.
Backup programming
The second section allows you to schedule a backup of Pandora ITSM system after a specific time period. To create a backup schedule, include a name for the schedule, a backup mode (there are three modes, only database, only attached files or both) and a backup periodicity (by default weekly). An email address can be added, to which notifications will be sent if something goes wrong in this process. In addition, a list of schedules is available in the same section for editing or deleting, as appropriate.
Backup manager
The third and last section is in charge of performing manual backups at the current time, giving the possibility to create a backup with the desired name and mode (and optionally an email address for error notifications). This data backup will be created in the backup folder inside the Pandora ITSM directory and will then be available in the backup list.
It also has the possibility of uploading previously downloaded backups, these must have the same structure generated by the tool to maintain consistency and not be previously in the database.
Update
- Warp update → Update offline menu.
- Warp update → Update online menu.
- Warp update → Options menu.
- Warp update → Warp journal menu.
Since version 105 the Warp update is part of Pandora ITSM. It helps system administrators to update Pandora ITSM automatically, as it takes care of the task of finding new modules, plugins and features (including migration tools for future versions) automatically.
License
Warp update → License menu.
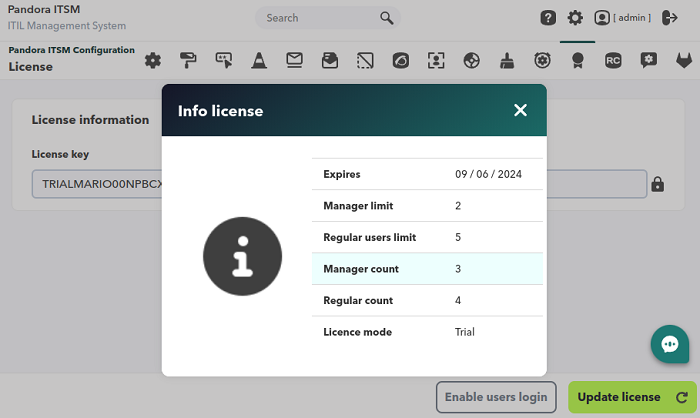
In this section, Pandora ITSM license must be entered. Once entered, click Update license so that Pandora ITSM verifies whether it is valid.
Apply for a new license
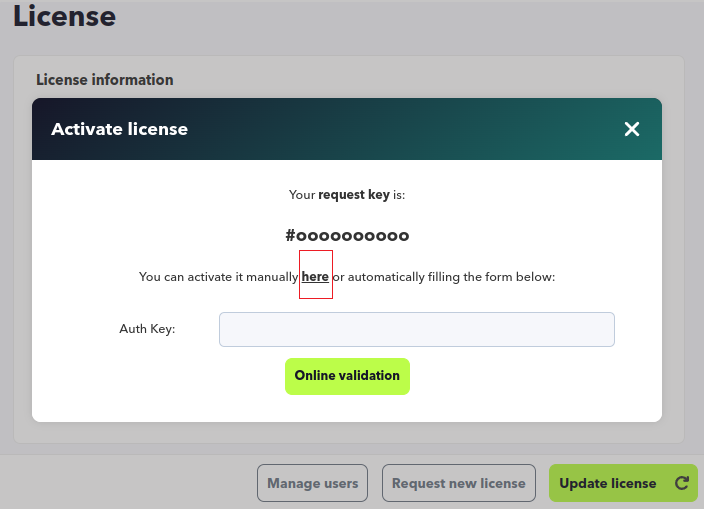
Clicking on the Request new license button will open a form where the authorization key (Auth key) provided by the support department must be entered.
Click on the Online validation button and finally update the license by clicking on the Update license button.
In case the Web Console is isolated from the Internet, the offline option can be used by copying the link (text here) which includes the Request key.
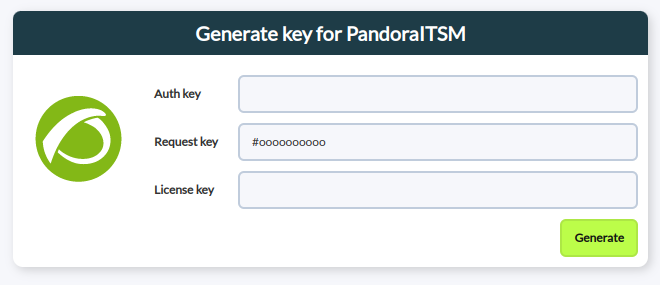
Once in the web browser with internet access, enter the Auth key provided by the support department, click Generate and obtain a new license. This must be copied and returned to the Web Console, delete the old license, paste the new license and click on the update license button.


 Home
Home

