Ticketing and Support
A ticket may be understood as a generic incident to a support team, a question, to report a problem, etc.
Tickets have a series of basic features such as the urgency or criticality of the issue, a title, the assigned group, and the users involved in it and their status, as well as advanced features such as the Description field that supports HTML elements, such as rich text, web links and images or the File upload field to be able to store and share files related to the incident.
Then there are many other optional fields and, of course, all those that the administrator defines for the type of ticket (custom fields).
Users involved in a ticket resolution
In a ticket each user has a specific role:
- User who created the ticket: This is the person who identifies the problem and initiates the management. They will be the person to help in the incident management process. Even if the ticket creator has a group defined and then the ticket group is changed, the ticket creator will always have ticket visibility (as long as they are not changed as the creator), this is designed that way and the rest of the ACL continue to work the same.
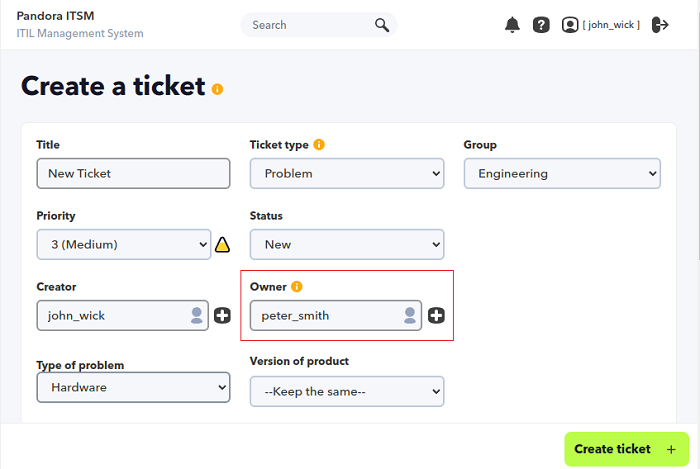
- User owner of the ticket: This is the person in charge of solving the problem. There can only be one person as the problem may escalate (pass the ticket ownership) to another person, but the owner can only be one person. That owner is the only person who may close a ticket.
- User ticket editor: It may be different from the source, someone just in charge of entering the ticket into the system. If the system is handled through an operator line, the person who picks up the call and enters the ticket is neither the ticket originator nor the person who will resolve the ticket.
- User with access to the ticket, and who provides information, but who is neither the one who created it, nor the one who will solve it: they may simply be a technician who provides some information.
- User associated to a ticket: Any person who participated at any time during the lifecycle of the ticket, making modifications or adding comments. You will also receive notifications with any updates to the ticket.
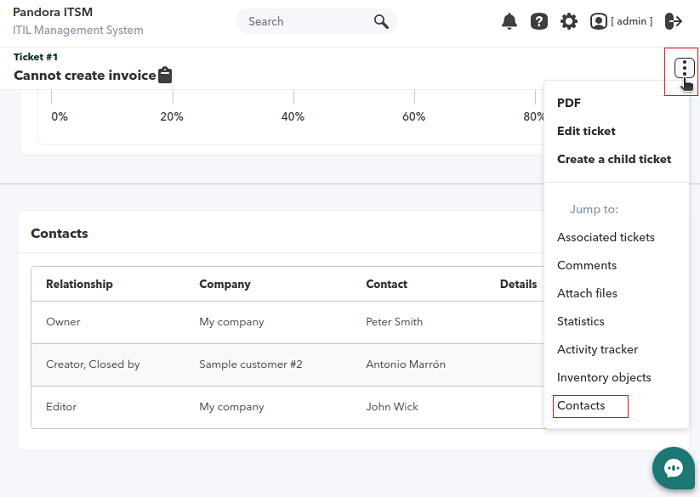
In the Contacts tab, you may see the complete list of people involved in a ticket and their role.
Users in turn belong to companies and groups, and ticket visibility is defined according to the permissions assigned to those users. There are access bits that define who may VIEW, EDIT or MANAGE tickets. Thus, the EDIT permission is required to be able to create tickets, and for a user to be able to see another user's ticket, they must have visibility over that group.
Practical case of ticketing flow with Pandora ITSM
An example will show ticket management operation. This support team consists of three people and a team leader.
Groups in support
There are several types of customers: Those who work in teams and those who work separately.
- Team operators will have several people working simultaneously who will be able to see each other's tickets, either to contribute or to take care of them. Customers or independent users may only see their own tickets, and no one else has access to them.
- The first type of client will have its own group and several users assigned to that group, the users of this group will be of type “grouped”, and their privileges will be based on the profile they have associated to their working group.
- The second type of client will work individually and its user will “independent”, so that it will only see its own content.
In this environment, when a grouped type customer opens a ticket, it is assigned to a team leader. That user will be the one who receives the ticket and may then escalate it, if appropriate, to other users.
It could also be sent to a generic user acting as a mailing list. As we will see later, workflows may be used to elaborate much more complex actions, such as sending a message to Telegram every time a high priority incident is received or assigning a ticket to certain types of users depending on certain criteria. An e-mail message will then be sent to both the ticket sender and the ticket recipient.
You may answer the email and this answer will be added to the ticket's comment “thread”. Another option is to continue its management through Pandora ITSM web interface, which will allow you to do much more than just post a comment.
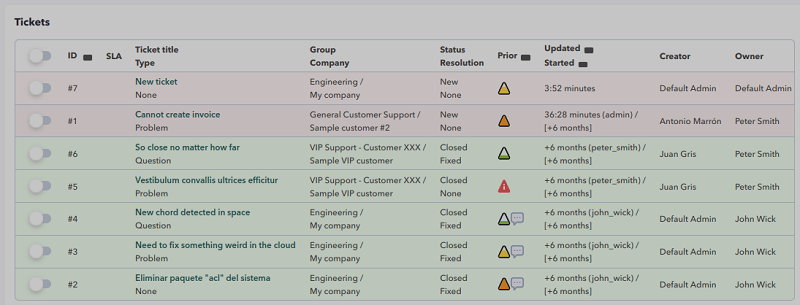
When a user creates a ticket and it remains in NEW status, it will be displayed with a slightly reddish background, similar to the following:
Clicking on the ticket number or its description takes you to the main ticket management screen. You may then change its status, or navigate through ticket tabs to see its history, notes associated with the ticket (workunits), files, etc.
Statuses of a ticket
The status of a ticket starts in a NEW status (New) and from that point the timer starts running. SLA management (Service Level Agreement) counts the time from when a ticket is opened until it starts being managed and changes status from NEW to ASSIGNED. It also counts the time from when the ticket creator writes and receives a reply and the total time it takes to solve an issue.
Only the owner of a ticket may change the ticket statuses.
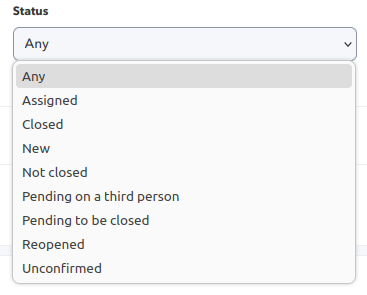
There are other important statuses on a ticket, such as Pending on a third person, which puts the ticket in “pause” mode regarding the SLA, as it generally refers to a situation whereby it is necessary to wait for someone to provide some information in order to proceed with the resolution of the ticket.
There are also two special statuses: Pending to be closed and Unconfirmed which are temporary statuses by which to check a ticket that is pending closure or has been received but not yet classified. They serve mainly to identify the ticket in a state that can then be processed with workflow rules, but without purpose to its incidence with SLA management.
The Closed status refers particularly to the end of life and allows you to add a resolution epilogue and a specific field to indicate the ticket resolution (solved, rejected, missing data, expired, etc.). A CLOSED ticket can be locked to prevent it from being reopened.
The Reopened state is similar to the ASSIGNED state, but it indicates that it was activated from the CLOSED state.
Adding information to the ticket
The team of people working on the ticket (the customer, the operator, second level technicians, etc.) interact with each other by adding text notes (or workunits, in Pandora ITSM terminology). Each user with access to the ticket provides information for its resolution. To do so, just answer one of the emails in the ticket or it may be entered manually through the interface using the tab marked with a speech bubble:
- WU (Workunits) allow you to type a text and additionally add attachments, specify the time spent on that action (in hours), if you worked jointly with another team member, if costs are included according to the imputed profile, and so on.
- From version 103 OUM, any other user may be mentioned, according to the ACL visibility the user has when interacting with a workunit, and the mentioned user(s) will receive an e-mail message for their information.
- All this information will then be used for support reports that include all these metrics (and many others). The intention is to be able to track in detail the processing of each issue in order to evaluate the support quality from all possible angles: costs, quality, time, effort, staff profiles, customer profiles, among others.
Clicking on the speech bubble icon will lead to the following dialog box:
- Time used: Time spent, in hours, on the message.
- Private workunit: Appears if the token New WU are always public is active in the configuration of working units, and allows private comments to be shown only to administrators and the user who added the comment.
- Cost: To indicate what should be taken into account for service cost calculations.
- Internal: To check if the comment will not be visible to the issue creator.
- Profile: It displays additional information about the profile of the person writing the message.
- Description: It features an HTML editor that allows you to add rich text, links and images.
- Workunit shared with: Share the WU with another user from the same company; type two or more letters to search for users.
A Super Administrator type user will always be able to see all messages.
Finally, the WU is added with the Add button.
When a work unit (comment) or file is added or its status is changed, an e-mail notification is sent to all users associated to that ticket. That way, interaction is constant. You may customize the sending of email through the configuration (see configuration options).
See also “Ticket configuration” and “Limits to ticket creation”.
Advanced details of a ticket
A ticket has a series of fields customized by user, which are related to ticket type. It is possible to create different types of tickets, and each one with its custom fields.
In addition to the fields defined by the administrator, there is a series of special fields, which may be seen in the editing view, in the “Advanced parameters” box (Advanced parameters):
Publisher is the application user who creates the ticket, and is there for auditing and logging purposes, cannot be changed. The same goes for the creator group. They are “fixed” fields that you may later use as filters in workflow rules.
You may define nested ticket hierarchies, linking one to the other in a parent-child relationship, for that there is the Parent ticket field. You may also link a support ticket to a project, through linking with a Task, since tasks are subdivisions of projects.
In the same way, one or several inventory items can be linked to an incident, so that later you may have traceability of which elements an incident affects and also see the history of incidents that a certain inventory object has had.
It is also possible to keep a group of third parties informed of the life flow of a ticket, of whom we only have their email address, who do not even have access to Pandora ITSM. In that way, they will receive copies of everything that happens through email. It is an easy way to include third parties and keep them informed.
Customizing tickets with custom fields
Tickets of different types may be defined, so that each ticket type has its own fields. These fields may be of the type text, dates, verification box (checkbox), a selector and even make it possible to chain several selectors, and depending on the user's selection some values or others are displayed.
It is also possible to configure certain types of tickets to be available only to certain groups: for example, if you have a technical support group and a user support group, the types of “Technical Incident” tickets that require filling in many detailed fields would only be available to the “technical” group, while other ticket types that do not require technical knowledge are available to anyone.
You may create or modify a custom ticket type: Support → Tickets Types → View tickets types.
Custom Fields
When you define a ticket type, you will be able to set one or more custom fields. You may need to define a common field for all custom ticket types (so you do not have to go one by one, putting it in all of them) and that is what the Global field is for.
There are text type fields (one line), extended text (a multi-line free text box), date type data (which will show a calendar), numeric type (and which the system will validate as a number) or type “ true False”.
There are two more complex types, such as the value selector (Combo) and the related fields (Linked).
Options list type fields (combo)
The possible values must be separated with commas and the system will display them in a selector.
The option string must begin with a comma, i.e. the first option must be empty.
Related fields
They are custom fields related to each other. For example, an IT technician needs to identify the item to be repaired. To get there, they will first need to choose the element type:
- Portable computer (Laptop).
- Desktop computer (PC).
- Keyboard (Keyboard).
- Mouse (mouse).
- Screen (Monitor).
- Other
In addition, depending on the type of element, choose manufacturer brands for each of them.
First create the custom field “Hardware type”. In this case, a parent field (Parent) is not selected because it is the first in the hierarchy. The values will be separated by commas.
The second linked field, in this case it would be the brand, will have the “Hardware Type” field as its parent and the linked values will have a special format:
type_value1|brand_value1,[type_value2|brand_value2],[type_value3|brand_value3]...
That way, following the previous example, it should be defined like this:
Laptop|HP,Laptop|Lenovo,Laptop|Mac,PC|HP,PC|Dell,Keyboard|ES,Keyboard|UK,Keyboard|Mac,Mouse|Mac,Mouse|Logi,Mouse|HP,Mouse|Microsoft,Other| trackball
Ticket Statistics
There is a tab inside the ticket details that will show all the details, as a summary. You may expand this information with the detailed ticket reports (see reports), but overall you will find everything you need to know here. Depending on the history of that incident, you will see more or less data.
Work Report
If in the process of the incidence it is necessary to generate a document (PDF) with all the details, in a specific format, to deliver to a client or a supplier as a delivery note or proof of execution of a job, it is necessary to generate a work report. You may define your own work reports by means of a template and then have it automatically filled in using macros.
To create a work ticket, go to the Support → Ticket Types → Work Ticket Templates menu and click Create.
It will be created with the system template (there is one defined by default, which can be customized). It will automatically make it accessible for download in that same location.
Some of these fields have been filled in with ticket data, others could be filled in using custom fields and others are left blank to be filled in manually by the client or operator in person. Download the document, and if you wish you may validate it by uploading a version of that same document signed by the client (scanned or photographed) for the record.
Different worksheet templates may be assigned depending on the ticket type. There is a set of macros you may use to replace them with ticket data. We recommend you to edit the default template to understand how it works.
The following macros will be replaced by the actual value in templates that use them:
_sitename_: Name of the page, as defined in the configuration._incident_title_: Title of the incident._username_: Username._fullname_: Full name of the user._incident_id_: Incident identifier._url_: URL of the incident._creation_timestamp_: Date and time of incident creation._update_timestamp_: Last time the incident was updated._owner_: User who manages the incident._group_: Group assigned to the incident._author_: Incident creator._type_tickets_: Type of tickets._priority_: Priority of the incident._status_: Status of the incident._resolution_: Resolution of the incident._time_used_: Total time used in the incident._incident_main_text_: Description of the incident.- PlanCustom field templates: This allows the name of the fields to be added to be included as a macro when creating an item type that will display the value of said field:
_custom field name_.
Ticket status mapping
One of the most important fields in tickets is the status. By using this field, you may accurately track where the ticket is in its life. This cycle is open to users and may be modified.
It is possible to define a controlled flow to limit the order of states a ticket can go through using the State Mapping feature. Using state mapping you may define whether a ticket should go through different stages before being closed. This is configured in Support → Workflow → Status mapping.
SLA
The SLA (Service Level Agreement) is the way to “verify” that ticket management works under specific criteria. Pandora ITSM has automatic SLA management features. The SLA is processed according to some parameters and is configured in Support → View SLA menu.
Some of the fields that require explanation are the following:
- SLA Base: It indicates the relationship with another SLA for informational purposes.
- SLA Type:
- Normal SLA: When calculating, tickets that are not in “Closed” or “Third Party Pending” status will be taken into account.
- Third party SLA: Only tickets that are in “Third Party Pending” status will be considered.
- Both: Tickets in any status other than “Closed” will be considered.
- Max. response time (in hours): Maximum time elapsed between a ticket creator's workunit and another response. For example, if this time is 4 hours, and a new ticket has 4 hours and 6 minutes to live, the SLA will be triggered. If a ticket is already several days old and the last work unit is from the ticket creator, after 4 hours without response, the SLA will also trigger.
- Max. resolution time (in hours): The maximum lifetime of a ticket. If a ticket is older than that time and is not closed or solved, the SLA will go off.
- Max. tickets at the same time: If it is exceeded, the SLA will go off. Please note that all SLAs are set at group level.
- Max. ticket inactivity (in hours): Time that the ticket can stay without updates by any user with access to the ticket.
- Start hour to compute SLA: Hour of the day from which the SLA starts to be calculated.
- Last hour to compute SLA: Hour of the day from which the SLA is no longer calculated.
- Disable SLA on weekends: Saturdays and Sundays are taken into account.
- Disable SLA on holidays - Days defined as holidays will not be included in SLA calculations. In ticket settings (see below) you may define the calendar days that the SLA will consider as holidays.
What does mean "SLA going off"?
It means that the system will send an email notification to the ticket owner, warning abouth the ticket not meeting the criteria set in the SLA rule set associated with the ticket.
This will depend on the group the ticket is associated to, since it is in the group configuration where it is specified which SLA will be applied to group tickets.
SLA evaluation of a ticket
Using the SLA system, in the ticket view you may see on a time scale (histogram), when the ticket was not fulfilled (in red) and when it was fulfilled (in green). In addition to an indicator of the percentage of compliance of the ticket throughout its life or by date ranges (last 15 days, today, etcetera).
SLA metrics may be obtained through API for each incident, for each group, for each operator. They are also used in reports. These are the most important metrics to measure service quality.
Quality assurance and feedback
Ticket Quality Assurance or Q/A and feedback may as well be configured.
By default the system will ask the ticket creator, when the ticket is closed (regardless of who closes it), how the ticket was closed. An email will be sent to access a rating screen.
The rating can only be good or bad, and in both cases an optional explanatory text may be added. These ratings are associated with the ticket and the person who owns it. Only users with Q/A permissions and the user who created the ticket may access this data.
The default support ticket rating is enabled at general level in the Setup → Setup → Issue setup → Ticket behavior → Disable ticket score menu.
At group level, in the People → Groups management menu, the token Send customer satisfaction email is enabled by default.
Limits to ticket creation
You may limit, for each group, the total number of tickets created per user (Total ticket limit), and the total number of active tickets for a user (Open ticket limit). These are two different limits that may be configured together.
This is configured in the group definition in the People → Groups management menu in the Open ticket limit and Total ticket limit fields. It is also possible that the limit of simultaneous open tickets may be forced and not allow to create new tickets or just warn with a message, but allow to create them. To work without limits, leave the value at 0.
Ticket limit is calculated by counting the number of tickets for the last year as of the current date.
Custom searches and dashboard
A custom search may be created and stored for use in reports, the dashboard and the ticket search itself by loading the filter.
All saved custom searches may be reused in the ticket overview as well as being the base data for standard ticket reports.
To do this, first use the ticket finder in Support → All tickets, set search criteria and display the results.
In the Owner field, by entering at least two characters you may choose from a list of matching users and then search for results. However, if the Current user field is enabled, the tickets that belong to the logged in user will be displayed. Filters may be saved with this Current user field active and may be used in Dashboards, in which case tickets belonging to the logged in user (and meeting the other conditions of the search filter) will be displayed.
Click on Add custom filter. The filter name will be asked and saved with the Save custom filter button.
For future searches with custom filters, just click Load custom filters and the selected results will be displayed in a few seconds.
Email Templates
You may customize all emails that are sent, changing their appearance. That is done using a set of macros inserted into the template. The templates are HTML files that may be edited from the tool itself in menu Setup → Setup → Email templates setup.
Mail templates are applied to incidents and also to project management. You may even assign different templates, depending on the group. Editing is simple and intuitive, and minor changes (logo, texts) can be made from the editor itself without any HTML knowledge.
Note that any image included in the template must be accessible from the Internet when someone opens it from the mail.
Macros for e-mail templates, each introduce:
_author_: Creator of the incident._creation_timestamp_: Date and time of incident creation._creatorcompany_: Company of the ticket originator._epilog_: Summary of ticket closure._id_group_: Identifier of the group assigned to the ticket._id_priority_: Numeric value of the ticket priority._id_status_: Numeric value of the ticket status._incident_closed_by_: User who closed the ticket._incident_id_: Incident identifier._incident_main_text_: Description of the incident (main text)._incident_title_: Title of the incident._fullname_: User's full name._group_: Group assigned to the incident._owner_: User who manages the incident._ownercompany_: Company of the owner of the ticket.- Custom Field Templates: This allows that when creating an item type the name of the fields you add may be included as a macro, which will display the value of that field: _ckgedit_QUOTcustom_field_nameckgedit>.
_priority_: Incident priority._resolution_: Resolution of the incident._status_: Incident status._sitename_: Name of the page, as defined in the configuration._time_used_: Total ticket life time._ticket_satisfaction_: When a ticket is closed, this macro is replaced by a link to the ticket satisfaction screen._type_tickets_: Type of ticket._url_: Incident URL._update_timestamp_: Last time the incident was updated._username_: User's name._wu_user_: In WU templates, the user who wrote the note._wu_text_: In the WU templates, the text of the note.
Advanced ticket configuration options
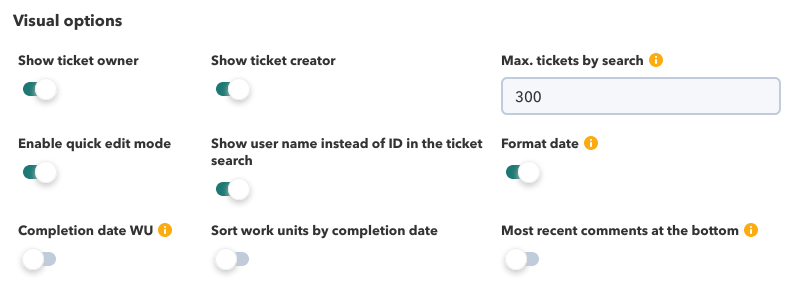
Setup → Setup → Issue setup menu.
Visual Options
Ticket Behavior
Work units options (WU)
Workflows
Email sending options
Customization
In each of the Status and Resolution sections there are a series of fields that can be modified according to need and language. In the case of languages, right next to the two sections, there is a button to reload default values in the language used by the user who configures Customization.
In the Special day section you may add and remove holidays and check whether these holidays are working days.
The list of fields to be displayed in the incident list is preconfigured and can be modified in section Default custom columns.
Ticket import by CSV
The fields will be the following according to the logical order established by the tool (the names have been numbered to make work easier):
- Start.
- Close.
- Qualification.
- Description.
- User ID.
- State.
- Priority.
- Group ID.
- Update.
- Identifier of the creator.
- Task identifier.
- Resolution.
- Epilogue.
- Father's identifier.
- SLA disabled.
- Identifier of the affected SLA.
- Incident type identifier.
- Punctuation.
- Emails in copy.
- Publisher.
- Identifier of the creator group.
- Last state.
- Closed by (name).
- Extra data.
- Extra data 2.
- Locked.
- Old state.
- Old resolution.
- Old state 2.
- Old resolution 2.
- Extra data 3.
- Extra data 4.
- Do not show a notice to assess the resolution of the ticket.
- Hash.
- Evaluation (positive or negative).
- Valuation comment.
- Custom fields: They must previously exist in Pandora ITSM system and must be indicated in order, being able to choose a value, or in case of not wanting to give them a value, blank space. In the case of tickets, it will be necessary to create the type the fields belong to and obviously reference that type in the ticket itself.
Example
“2021-01-21 19:24:19, 2021-01-21 19:47:44, Terminal broken, Needs replacement, support_technician, 7, 3, 4, 2021-01-21 19:47:44, admin, 0, 1, 0, 0, ,0, 0, 1, 0, , support_technician, 1, 0000-00-00 00:00:00, support_technician, , , , 0, 3, 0, 0, 7, 1, , , , , , 0, , 0, ,custom_field_value1, custom_field_value2”


 Home
Home

