Inventory and CMDB
Inventory
The Inventory feature provides all the utilities necessary to manage the whole set of items available to the company, find out their location, their manufacturer, their support contracts, contact persons and phone numbers, references and serial numbers, etc. Inventory items can be associated to tickets, allowing efficient management of the company's material and intangible resources.
Within the inventory, there are different types of items, with their own fields. It is possible to create new types and modify, add or delete fields of any type of item.
Creating an inventory item type
Inventory item types are used to customize the different fields that the item will have.
You may manage item types by clicking on CMDB → Object types.
To create a new item type, click Create, fill in its characteristics and click Create again. To edit an item type, click on its corresponding name in the list of registered inventory item types.
An inventory item type is associated with a name, an icon, the minimum value it must have instock and a description. You may also define whether or not this type will appear as a root in the inventory tree view.
Custom fields
Each item type has a number of custom fields. To access them, click on the corresponding Field icon in the list of inventory item types in the Actions column.
The list of custom fields will be displayed and if there are several of them, the relative order between them can be changed with the arrow buttons in the Actions column. You may also delete each one in that column by means of the Delete button.
To create, click Create, specify the values for each of the fields and click Create again . To edit a custom field, click on its name, make the changes and save it with the Update button.
Custom fields of certain inventory item types (such as Pandora agents) are displayed in read-only mode.
Custom field properties
- Unique: When this option is enabled, there can only be one inventory item with the same value for this field (similar to an identifier or ID).
- Global field: If this option is activated, it is allowed to add this custom field to all types of items. It should be used with caution.
- Inherit: If this option is enabled, the owner, user and company values of the parent object will be inherited.
- Show in list: When enabled, it is displayed by default in the general list.
- Prevent updates: If this option is enabled, the field will not be updated when receiving remote inventory data.
- Types: Type of information to be filled in later:
- Numeric.
- Check box.
- Text.
- List of options: When selected, a text box called Combo values will be enabled where the different values separated by commas (
,) must be entered. - Date.
- Web link.
- Password.
External type fields
Simple external fields
Simple external fields will display information from additional tables (manually added by an administrator using the DB Manager) in Pandora ITSM database.
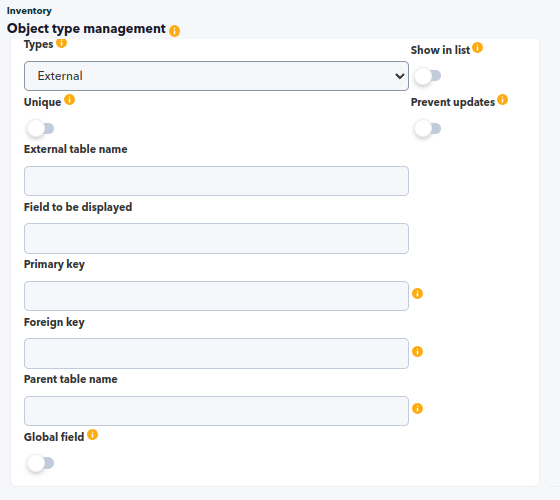
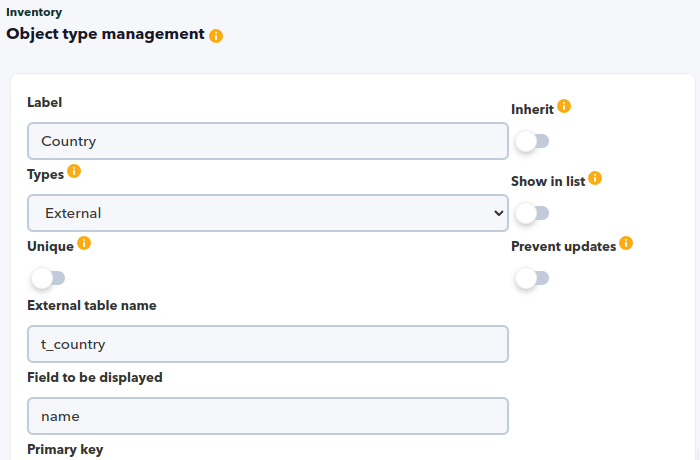
To configure and be able to use an external field you will need to create a field in any inventory item (menu CMDB → Object types → < object type target > → Fields → Create) with the External Type selected(Types → External) and all the necessary fields for its configuration will appear:
- External table name: Exact name of the external table, in the database, of the table where this external field is located. Required.
- Field to be displayed: Field to be displayed, name of the column containing the values that will be finally displayed in the inventory item. Required.
- The inventory items that have external fields will be updated automatically.
- The Primary key, Foreign key, Parent table name fields should be left empty as they are only used in the external compound fields.
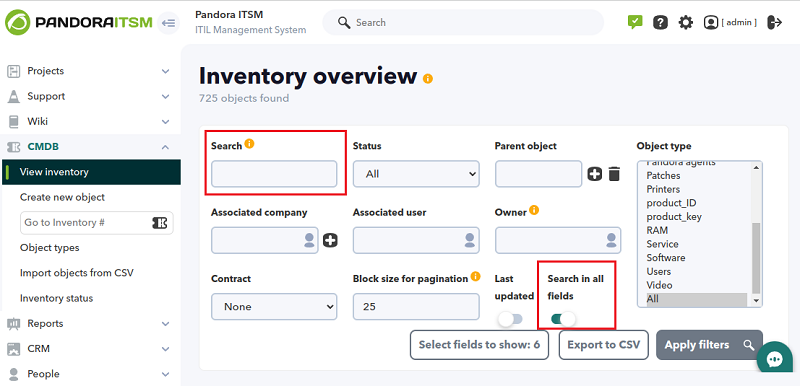
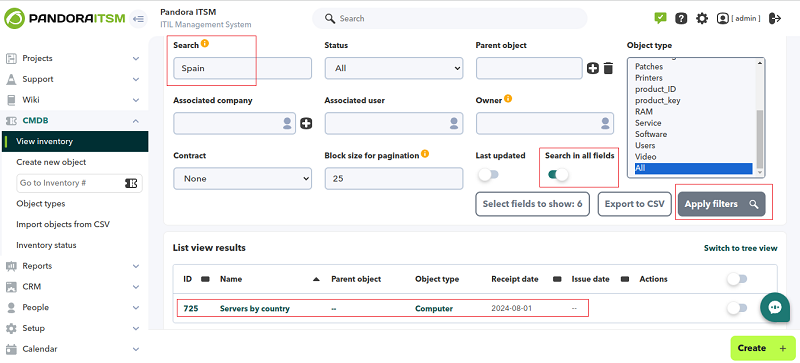
- Both external fields can be used in the inventory view filter if a keyword search (Search field) is performed with the option to search in all fields (Search in all fields selector) enabled.
- See case study 1.
External compound fields
External compound fields can be related to each other, creating dependencies. This will cause that depending on the value selected in the first field, the second field will show different values.
- To do this, the two external tables to be used in the two external fields must also be related by one of their columns, which will usually be an ID.
- When editing an inventory item that uses external composite fields, the second field can be freely selected by deleting the first field.
The parent table will have an ID column that will be its primary key and the child table will have an ID_relation column that will correspond to its foreign key, a column that will relate this child table with its parent table.
An external type compound field shares the same configuration of an external simple field with the difference of being a parent type and a child type.
For the creation of a compound parent field:
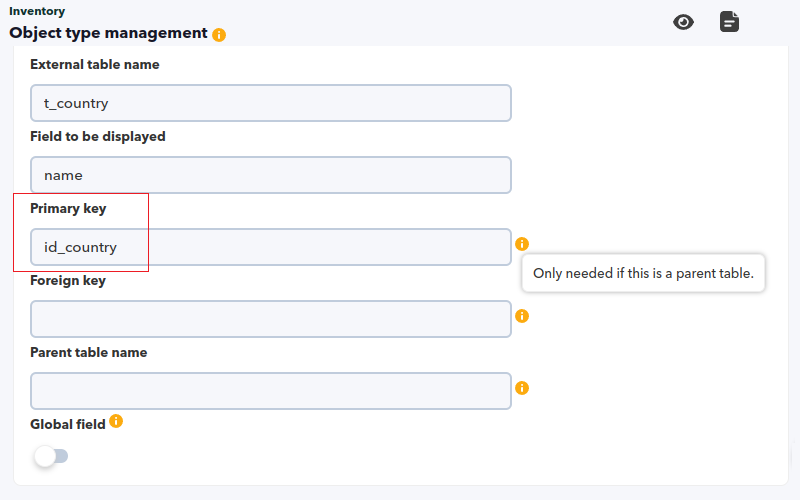
- Primary key: Identifier field or “primary key”, normally corresponding to the ID column.
For the creation of a compound child field:
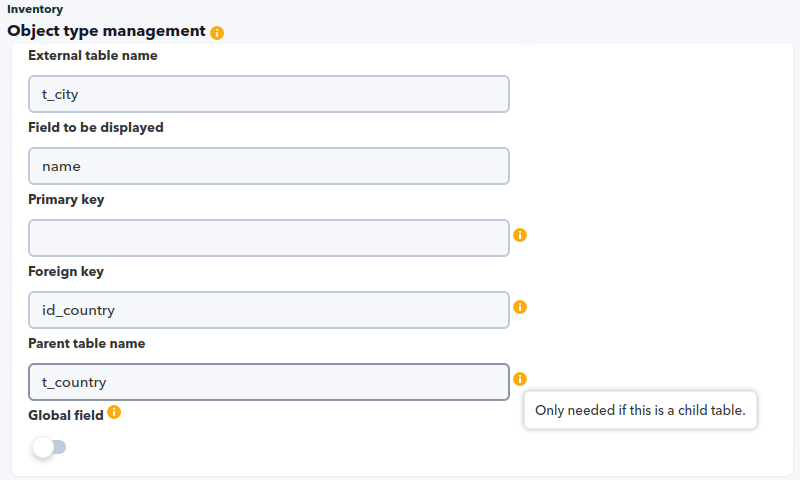
- Foreign key: Field of the child table that relates both tables, it corresponds to the Foreign Key in the child table.
- Parent table name: Name of the parent table.
With this configuration, an external field can be used, see case study 2.
Case study 1
A single external field will be created by creating a table called t_country added manually by an administrator through the DB Manager. This simple external field will be used to register the country where a Computer item is located, which is created by default when installing Pandora ITSM.
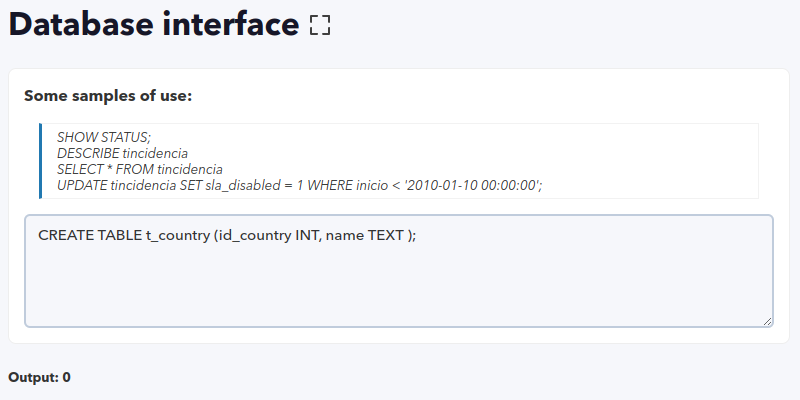
Table creation:
CREATE TABLE t_country (id_country INT, name TEXT );
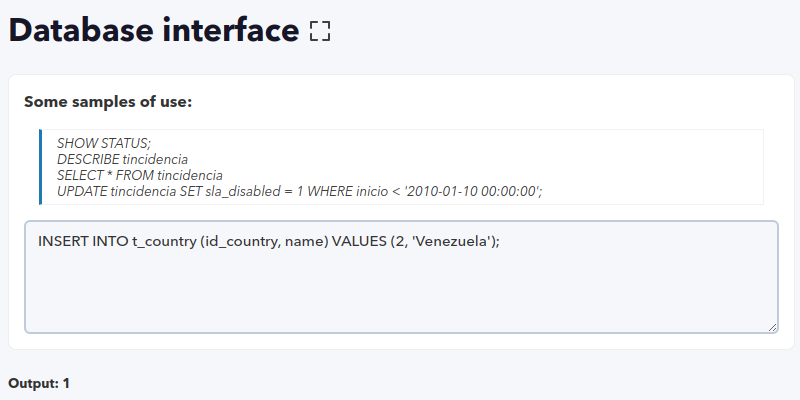
Note the result(Output) of each SQL statement executed. Special care must be taken when manipulating the structure of a database. Other technical specifications (COLLATION, et cetera) are outside the scope of this case study.
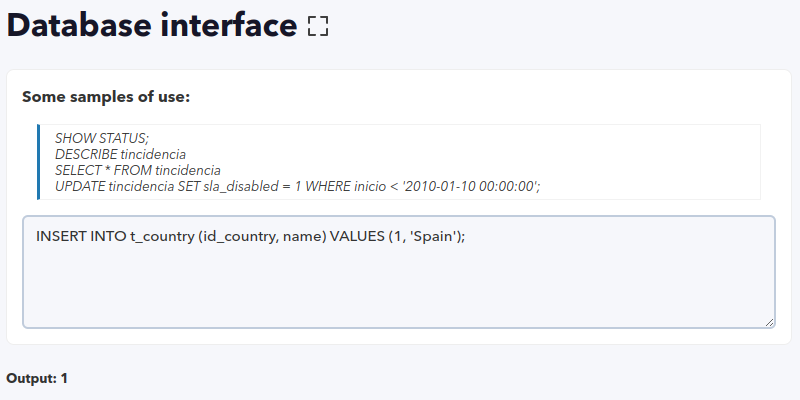
Now two countries are added to the created table:
INSERT INTO t_country (id_country, name) VALUES (1, 'Spain');
INSERT INTO t_country (id_country, name) VALUES (2, 'Venezuela');
The countries added with the instruction can be checked:
SELECT * FROM t_country;
Now a field will be created in the Computer inventory item by accessing the CMDB → Object types menu and clicking on Actions → Fields → Create. Choose the selected External Type (Types → External) and all the necessary fields for its configuration will appear:
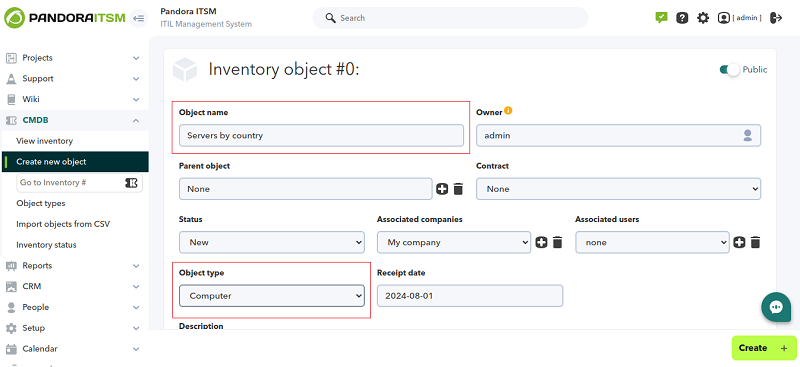
Any Object type → Computer item will automatically have this simple external type field. For this case study 1, a inventory object will be created with the following features:
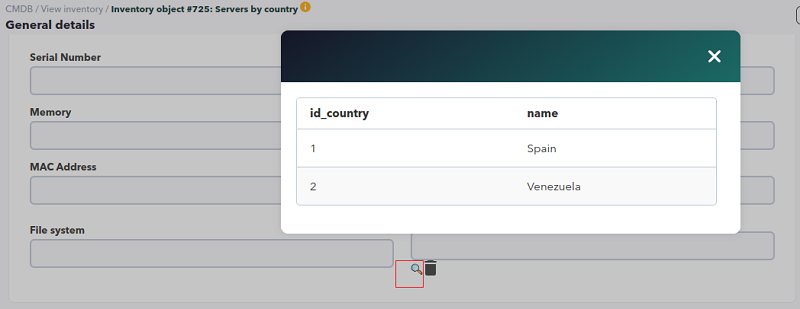
When editing this inventory item (details omitted), Servers by country in the Custom fields section, the field named Country will appear and clicking on the magnifying glass icon will pop up a dialog box to select one of the available countries.
For this practical case, choose the country Spain and then save the changes. Once this is done, in the inventory display you will be able to locate the servers located in that country as follows:
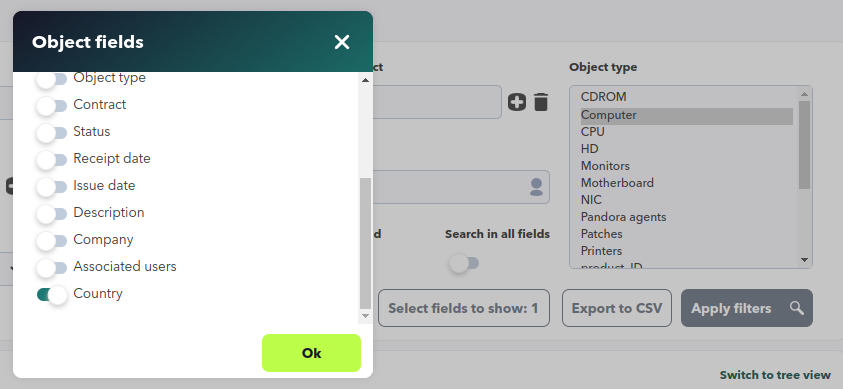
Certain conditions must be applied so that external type fields can be selected and shown as columns in the inventory list (Select fields to show button).
- External fields to be displayed in the inventory view must have the Show in list token enabled.
- Go to CMDB → View inventory menu and in Item type select the item that uses external fields.
- Click Apply filters.
- Click Select fields to show.
- All external fields marked to be displayed (and also other types of fields marked to be displayed with the Show in list option).
- It should be noted that any other user, in real time, may have modified any token, if the desired fields are not displayed, go back to point number one.
- Check the desired fields to be displayed, for this practical case the
Countryfield:
- If there is only one inventory item that uses the inventory item type that has external fields, it must have a value assigned to it, otherwise it will not be displayed as a column.
- If there are several inventory items with the desired external field to be displayed, the ones with no assigned value will be displayed with
--.
Case study 2
In this case study 2 we will use the single external type field created in case study 1 to convert it into an external composite field of type parent. To do this:
- The
t_countrytable in the database will be modified to add a primary index. - This index will be specified by modifying the external Country field in PITSM Web Console.
- A table
t_citywill be created containing the cities belonging to each of the aggregated countries. - Several cities will be added to the above table.
- Finally, a composite field called City will be created in PITSM Web Console.
Using the DB Manager the following statement must be executed to add a primary index to the t_country table:
ALTER TABLE t_country ADD PRIMARY KEY(id_country);
The external field Country will now be modified to add this primary index:
The table t_city will be created with an external index linked to the previous table (parent table) with the following instruction:
CREATE TABLE t_city (
 id_city INT,
 name TEXT,
 id_country INT ,
 FOREIGN KEY (id_country) REFERENCES t_country(id_country)
);
A new external field will be created as in practice case 1 with the following values:
The cities will be added minding to correctly assign to each country:
INSERT INTO t_city (id_city, name, id_country) VALUES (1, 'Madrid', 1);
INSERT INTO t_city (id_city, name, id_country) VALUES (2, 'Barcelona', 1);
INSERT INTO t_city (id_city, name, id_country) VALUES (3, 'Valencia', 2);
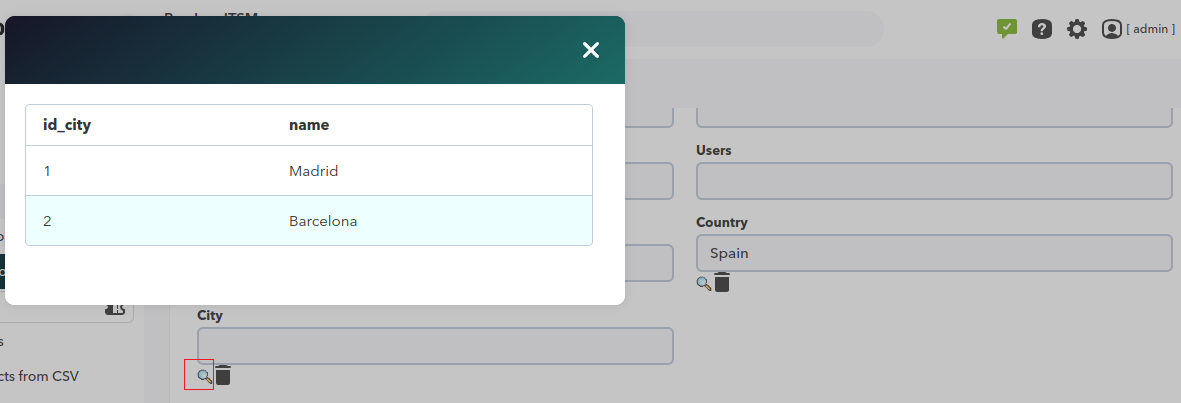
Now you may modify the inventory item Servers by country created in case study 1 and select one of the two cities in the country Spain (note that the city Valencia located in the country Venezuela does not appear in the list):
Editing external tables
In the list of inventory item types, those with external fields will have a button for editing tables, Edit external tables:
You may edit and delete existing data in these tables, as well as add new data.
Creating an inventory object
CMDB → Create new object menu.
The most important fields in this form are:
- Owner.
- Associated companies.
- Associated users.
- Public.
These fields define who can see the item, so the item may be accessible by the owner, users directly associated to the item or users belonging to an associated company. In addition, if the Public flag is checked, all users will be able to see the item.
An inventory item may have an item “hierarchy” (an item can be a child of another). This is defined by choosing a parent. In addition to this parent and child, you may set relationships between items.
Pandora ITSM inventory has a stock control system. To manage the stock, all inventory items have a status field that allows to keep a stock system (you may also record the date of receipt and cancellation).
Inventory searches
CMDB → View inventory menu.
Relevant fields:
- Search: Free text field that will search for the keyword entered in the description, numeric identifier and custom fields.
- Status: Search by object status.
- Block size por pagination: Select the pagination block size. By default it is configured in the general options and is limited within a range of 2 and 1000.
- Item type. It is possible to select more than one type of item in the search using the selector.
You may also export the search results in CSV format. The inventory search result may be displayed in two modes: tree or list.
The tree view shows the inventory items grouped by type. The stock is also displayed, showing:
- Total units.
- News.
- Unused.
- Minimum stock. If the number of total units is less than the minimum stock, it will be marked in red.
In the list mode view, information about the inventory is displayed, as well as its custom fields that were marked for display. In this list mode, in addition, mass operations may be performed.
Massive operations on selected objects
In listing mode, each inventory item can be selected individually or all those shown in paging mode.
Once you have selected several inventory items you may delete (this operation is irreversible) or change the following values:
- Parent object.
- Associated company.
- Contract.
- Owner.
- Status.
Inventory status
CMDB → Inventory status menu.
There are four status types defined by default in Pandora ITSM and can only be modified:
- New.
- In use.
- Unused.
- Issued.
In addition:
- In this menu, you may add and delete as many states as necessary, as long as they are singular.
- If a status is deleted and this status was assigned to an inventory item, its status will be changed to New.
- All those states defined by the user in the inventory configuration menu of Pandora FMS.
Import inventory data from CSV
To do this, the CSV file is selected and loaded with a header and a row for each inventory item. The header must be in the first row and must contain at least the name column.
- name: Required. The setup option that allows having duplicate inventory object names shall be taken into account.
- owner:This column collects the identifiers of the users who own the item, which must exist in the database. If this column is not entered, the default value will be empty.
- id_parent: This column contains the identifier of the parent inventory item, which must exist in the database. By default it is zero (
0). - id_manufacturer:This column contains the identifier of the companies to which each inventory item belongs, so these companies must exist in the database. By default it is zero (
0). - id_contract: This column contains the identifier of the contract to which each inventory item belongs. By default it is zero (
0). - status: This column may contain the four types of status defined by default by Pandora ITSM (
new,inuse,unused,issued) or a user-defined status. - receipt_date: This column will contain the date of receipt and must be in a valid date format.
- issue_date: This column will contain the date of use and must have a valid date format.
- description (optional).
- public: It will only admit values
1or0depending on whether it is public or not, accordingly. The default is one (1). - id_company the associated companies can be one or several, therefore the identifiers will be introduced in the following way:
[ id1 .id2 .id3 .id4 ]. It is important to use square brackets and within them the use of dots to separate the elements. - associated_user: The associated users can be one or several, as follows:
[ id1 . id2 .id3 . id4 ]. It is important to use square brackets and within them the use of dots to separate the elements. - id_object_type: This column contains the identifier of the item types, which must exist in the database. By default it is zero (
0). - The rest of the columns to be added will correspond to the custom fields of an item type.
There are four different types of fields that must respect the limitations of these custom fields:
- Text type fields. No limitation.
- Numeric type fields. Only numbers are allowed.
- Combo type fields. They allow a list of words, therefore the characters entered in this column can only be those included in this list.
- External type fields. These fields allow to associate external tables to enter the values, the existence of the table and its references will be validated.
All custom fields must also comply if they are unique or not. This depends on whether you selected custom field creation, which will result in not being able to enter values that already exist in these custom fields.
Remote inventory based on Pandora FMS Agents
This feature allows you to retrieve customized inventory information from any device and operating system.
The remote inventory is based on the use of Pandora FMS software agents that are installed in the machines from which the information needs to be retrieved. Agents collect inventory information through scripts and send the data to the server where Pandora ITSM is running. Once the information is received, PITSM will process it and create the relevant inventory items based on the data received.
Unlike Inventory Synchronization with Pandora FMS, to use PFMS Remote Inventory just install the software Agents in the rquired machines.
Internal operation of the remote inventory
Pandora FMS agents send an XML file with the inventory information to the server that supports Pandora ITSM. PITSM processes these files through the maintenance script: file processing is generally performed every 5 minutes. These XML files must be received in the /attachment/inventory directory located inside PITSM directory.
With the inventory information sent in the XML, several inventory items will be created. So if an agent sends information about 12 applications installed in the system, 13 inventory items will be created (one for the agent and 12 for the different installed applications).
When information about a device or inventory item is received, two things can happen:
- That the item exists: Then the inventory information will be updated.
- That the element does not exist: In this case, a new inventory object will be created only if the associated item type is defined in Pandora ITSM.
It is important to define the item types to be used before starting the inventory. The following explains how data acquisition works in detail and you will see how the types are associated with the different elements.
Pandora FMS agents are associated to the type called Pandora agents, so for the inventory to work it is necessary for this element to be defined. The other inventory items are associated to their types:
<?xml version='1.0' encoding='UTF-8'?>
<agent_data description='' group='' os_name='linux' os_version='"Ubuntu 22.04"' interval='300' version='7.0NG' timestamp='2024/10/22 09:27:38'
agent_name='sample_linux_host' timezone_offset='0' address='192.168.70.163'>
 <inventory>
  <inventory_module>
    <name><![CDATA[Users]]></name>
    <datalist>
      <data><![CDATA[root]]></data>
    </datalist>
  </inventory_module>
  <inventory_module>
    <name><![CDATA[Process]]></name>
    <datalist>
      <data><![CDATA[COMMAND]]></data>
      <data><![CDATA[/sbin/init]]></data>
      <data><![CDATA[[kthreadd|]]]></data>
      <data><![CDATA[[migration/0|]]]></data>
      <data><![CDATA[[ksoftirqd/0|]]]></data>
      <data><![CDATA[[scsi_eh_6|]]]></data>
      <data><![CDATA[sh -c ps -eo command |  tr -d "" ]]></data>
      <data><![CDATA[ps -eo command]]></data>
      <data><![CDATA[tr -d ]]></data>
    </datalist>
  </inventory_module>
  <inventory_module>
    <name><![CDATA[Software]]></name>
    <datalist>
      <data><![CDATA[acl;2.2.49;Access control list utilities]]></data>
      <data><![CDATA[acpid;1.0.10;ACPI Event Daemon]]></data>
      <data><![CDATA[alsa-lib;1.0.22;The Advanced Linux Sound Architecture (ALSA)
      library]]></data>
      <data><![CDATA[alsa-plugins-pulseaudio;1.0.21;Alsa to PulseAudio backend]]>
      </data>
      <data><![CDATA[zenity;2.28.0;Display dialog boxes from shell scripts]]></data>
      <data><![CDATA[zip;3.0;A file compression and packaging utility compatible
      with PKZIP]]></data>
      <data><![CDATA[zlib;1.2.3;The zlib compression and decompression library]]>
      </data>
    </datalist>
  </inventory_module>
  <inventory_module>
    <name><![CDATA[File system]]></name>
    <datalist>
      <data><![CDATA[tmpfs;0;244M;/dev/shm]]></data>
      <data><![CDATA[/dev/sda1;34M;426M;/boot]]></data>
    </datalist>
  </inventory_module>
 </inventory>
 </agent_data>
PITSM will create an item for the agent that reported the XML and then process the different inventory modules separately:
  <inventory_module>
    <name><![CDATA[Software]]></name>
    <datalist>
      <data><![CDATA[acl;2.2.49;Access control list utilities]]></data>
      <data><![CDATA[acpid;1.0.10;ACPI Event Daemon]]></data>
      <data><![CDATA[alsa-lib;1.0.22;The Advanced Linux Sound Architecture (ALSA)
      library]]></data>
      <data><![CDATA[alsa-plugins-pulseaudio;1.0.21;Alsa to PulseAudio backend]]>
      </data>
      <data><![CDATA[zenity;2.28.0;Display dialog boxes from shell scripts]]></data>
      <data><![CDATA[zip;3.0;A file compression and packaging utility compatible
      with PKZIP]]></data>
      <data><![CDATA[zlib;1.2.3;The zlib compression and decompression library]]>
      </data>
    </datalist>
  </inventory_module>
The name of the inventory module defined in the XML, in this case Software, will be chosen to identify the type of object associated with these elements.
Then, inventory items of that type will be created for each of the elements reported in the XML:
<datalist>
  <data><![CDATA[acl;2.2.49;Access control list utilities]]></data>
  <data><![CDATA[acpid;1.0.10;ACPI Event Daemon]]></data>
  <data><![CDATA[alsa-lib;1.0.22;The Advanced Linux Sound Architecture (ALSA)
  library]]></data>
  <data><![CDATA[alsa-plugins-pulseaudio;1.0.21;Alsa to PulseAudio backend]]>
  </data>
  <data><![CDATA[zenity;2.28.0;Display dialog boxes from shell scripts]]></data>
  <data><![CDATA[zip;3.0;A file compression and packaging utility compatible
  with PKZIP]]></data>
  <data><![CDATA[zlib;1.2.3;The zlib compression and decompression library]]>
  </data>
</datalist>
The inventory elements separate the information by the ; character. The information would be broken down as shown below:
<data><![CDATA[acl;2.2.49;Access control list utilities]]></data>

acl     2.2.49     Access control list utilities
The first component defines the name for the new inventory item. The rest of the components will be associated to the item type fields in the same order in which they appear in the inventory item definition. In this case, the second element is associated to Version and the third to Description.
In addition, all the items corresponding to the elements will have as parent the agent that reported them through the XML.
In the inventory, along with all the objects that were created based on the different inventory modules in the XML, an item will appear for the agent, in this case named localhost.localdomain.
By default, Pandora ITSM has the main inventory modules predefined for MS Windows® agents, such as Software, Patches, HD, Video, CPU, Services and RAM:
Remote inventory configuration
Automatic inventory configuration is located in the Setup menu in Pandora FMS Inventory tab, Remote Inventory section.
The configurable fields are:
- Default owner: Default owner of the new inventory item.
- Associated company: Default companies for the new inventory item.
- Associated user: Default users for the new inventory item.
The Default owner field is mandatory in order to create inventory items. The other fields are for the purpose of configuring the access ACL and displaying the items.
In addition to the configuration of the mentioned fields, it is necessary to enable the maintenance script. You may see how to install this script in the “Maintenance script installation” section.
By enabling the maintenance script, the files sent by Pandora FMS agents will be processed.
File forwarding is done through a TCP connection to port 41121. Therefore, for the correct operation of this feature you may need to check the routing rules or network firewalls.
Pandora FMS agent configuration
To retrieve the information from devices you should install Pandora FMS Agents. You may see the compatibility of Pandora FMS agent with the different systems in section “Software agent requirements of the Pandora FMS manual”.
The additional parameters to be configured in the agent are the following:
server_ip: IP address of the server running Pandora ITSM.server_path: Directory for receiving files from the server.module_plugin: Directive to execute scripts to retrieve inventory information.
By default Pandora FMS agents have a plugin module to retrieve inventory information:
module_plugin inventory 1 cpu ram video nic hd cdrom software
init_services filesystem users process ip route
Inventory customization
If you need to customize the information collected you may modify this script or create your own.
The section "Creating local inventory modules" of Pandora FMS guide describes the XML structure of the inventory modules on how to create inventory modules for GNU/Linux® and MS Windows® platforms.


 Home
Home

