OpenSearch installation and configuration
To configure Pandora FMS with OpenSearch see “Log collection and monitoring” and “SIEM monitoring”.
Server Requirements
It is advisable to distribute Pandora FMS server and OpenSearch on independent servers.
- Rocky Linux 8 / RHEL 8 / Ubuntu 22.04 (recommended operating systems).
- Minimum 4 GB RAM (testing, dev), recommended 8 GB of RAM for each OpenSearch instance (minimum base requirements, for each environment and amount of data to be processed and/or stored, the specific requirements must be estimated).
- Disable SWAP on the node or nodes where OpenSearch is.
- Minimum 4 CPU cores (minimum base requirements, for each environment and amount of data to be processed and/or stored, the specific requirements must be estimated).
- 50 GB system storage.
- 100 GB OpenSearch storage (minimum base requirements, for each environment and amount of data to be processed and/or stored, the specific requirements must be estimated).
- Connectivity from Pandora FMS Server and Web Console to the OpenSearch API (default port
9200/TCP) and between cluster nodes (default port9300/TCP).
A single node environment with these features can store up to 1 GB of data per day and store it for 30 days. In the case of requiring greater data resilience, greater data processing and storage, and fault tolerance, the configuration of an OpenSearch cluster will be necessary (with a minimum of 3 nodes to guarantee data integrity).
By switching to a cluster environment, it is also possible to distribute the load between the nodes, doubling (in the case of 3 nodes) the processing capacity of the environment. A load balancing system will be necessary (Keepalived, for example) if you want to work with the different nodes simultaneously.
Unattended installation of OpenSearch for Pandora FMS
This online installer will create an OpenSearch node ready to use with Pandora FMS with basic configuration including HTTPS and password authentication. It features environment variables for customization and is compatible with EL8, EL9 and Ubuntu 22.04 server:
curl -SsL https://pfms.me/pandorafms-opensearch-el | bash
Default environment variables
[ “$CLUSTER_NAME” ]by default:CLUSTER_NAME='pandora_opensearch'.[ “$OPENSEARCH_PASS” ]by default:OPENSEARCH_PASS=“P4nd0r4!FMS”.
env CLUSTER_NAME="pandora_opensearch" \
OPENSEARCH_PASS="P4nd0r4!FMS" \
bash -c "$(curl -SsL https://pfms.me/pandorafms-opensearch-el)"
Installation check and example with default values
curl -X GET https://< ip_opensearch >:< opensearch_port > -ku '< user >:< pass >'
curl -X GET https://127.0.0.1:9200 -ku 'admin:P4nd0r4!FMS'
Manual installation and advanced OpenSearch configuration
Before running OpenSearch, you should disable memory paging and swap on the host to improve performance and increase the number of memory maps available to OpenSearch. See “Important Settings” for more information:
# Disable memory paging and swapping.
sudo swapoff -a

# Edit the sysctl config file that defines the host's max map count.
sudo vi /etc/sysctl.conf

# Set max map count to the recommended value of 262144.
vm.max_map_count=262144

# Reload the kernel parameters.
sudo sysctl -p
For Rocky Linux 8, installation via RPM package is recommended. Once OpenSearch is installed, access to OpenSearch must be checked from Pandora FMS. Before performing this test configure the node or cluster. For this installation check, run:
curl -X GET https://<ip_opensearch>:<opensearch_port> -u 'admin:admin' --insecure
You should get a response similar to:
  {
     "name" : "hostname",
     "cluster_name" : "opensearch",
     "cluster_uuid" : "6XNc9m2gTUSIoKDqJit0PA",
     "version" : {
        "distribution" : "opensearch",
        "number" : <version>,
        "build_type" : <build-type>,
        "build_hash" : <build-hash>,
        "build_date" : <build-date>,
        "build_snapshot" : false,
        "lucene_version" : <lucene-version>,
        "minimum_wire_compatibility_version" : "7.10.0",
        "minimum_index_compatibility_version" : "7.0.0"
     },
     "tagline" : "The OpenSearch Project: https://opensearch.org/"
  }
By default, the OpenSearch installation enables SSL, username and password which is a good practice; It is recommended to change the default username and password.
Node Configuration
First edit the configuration file /etc/opensearch/opensearch.yml and then the OpenSearch service will be restarted.
This file contains the configuration of all the parameters of theOpenSearch service; See the official documentation for more information:
https://opensearch.org/docs/latest/install-and-configure/configuration/
Minimum configurations necessary to start the service and its use with Pandora FMS.
- Port number.
# ---------------------------------- Network
# Set the bind address to a specific IP (IPv4 or IPv6):
network.host: 0.0.0.0
# Set a custom port for HTTP:
http.port: 9200
# For more information, consult the network module documentation.
- Location of stored data and logs:
# ----------------------------------- Paths
# Path to directory where to store the data (separate multiple locations by comma):
path.data: /var/lib/opensearch
# Path to log files:
path.logs: /var/log/opensearch
It will also be necessary to uncomment and define the following lines:
cluster.name: pandorafms
node.name: ${HOSTNAME}
network.host: 0.0.0.0
cluster.name: This will be the name that the group or cluster will receive.node.name: To name the node using the${HOSTNAME}system variable, it will automatically take the name of the host.- For
network.hostthe value0.0.0.0allows OpenSearch to “listen” on all network interfaces (NIC); To use a specific NIC, enter a corresponding specific value.
If you work with a single node, add the line to the configuration file to allow the single node to start:
discovery.type: single-node
In case of working with a cluster, you need to complete the discovery.seed_hosts parameter:
discover.seed_hosts : ["ip:port", "ip", "ip"]
In the most recent versions of OpenSearch, memory management of the Java® virtual machine is done automatically and it is recommended to let it be managed this way in production environments, so it is unnecessary to modify the JVM values.
To start OpenSearch, execute:
systemctl start opensearch.service
To restart, use restart, to stop stop and status to check the status.
If the service does not start, check the logs located at /var/log/opensearch/ (in this case the file pandorafms.log or the name given to the node).
Remember that to check the installation and operation of OpenSearch you may run:
curl -X GET https://<node-ip> -u 'admin:admin' --insecure
Setting up an OpenSearch cluster
To configure an OpenSearch cluster, follow the official documentation:
https://opensearch.org/blog/optimize-opensearch-index-shard-size/
OpenSearch User Management
To change the default password from admin, a series of steps must be followed. The first step is to export the variable to use the Java® JDK installed by OpenSearch to use any of the tools:
export OPENSEARCH_JAVA_HOME=/usr/share/opensearch/jdk
Then, to generate the hashed password to place in the OpenSearch configuration file, the following script is used (replace < password > with the password to use):
/usr/share/opensearch/plugins/opensearch-security/tools/hash.sh -p <password>
For example:
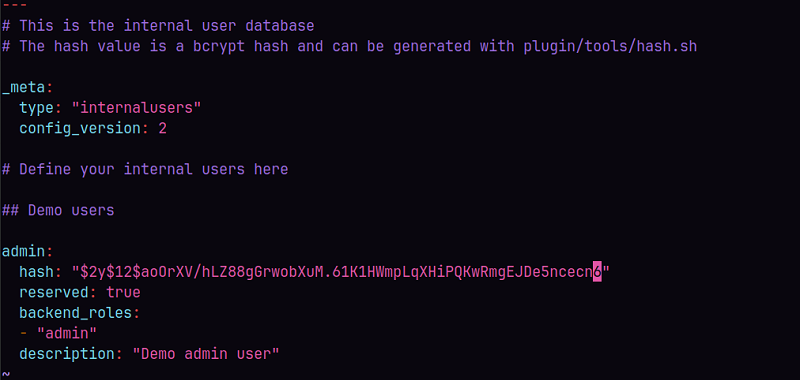
Then open the file /etc/opensearch/opensearch-security/internal_users.yml with the text editor vim or nano to modify the password of the required user or users.
It is recommended to leave only the admin user for use with Pandora FMS, it is unnecessary to maintain any other user.
Example file:
To make the changes effective, the following must be executed:
cd /usr/share/opensearch/plugins/opensearch-security/tools
OPENSEARCH_JAVA_HOME=/usr/share/opensearch/jdk ./securityadmin.sh -cd /etc/opensearch/opensearch-security/ -cacert /etc/opensearch/root-ca.pem -cert /etc/opensearch/kirk.pem -key /etc/opensearch/kirk-key.pem -icl -nhnv-t internalusers -icl -nhnv -cacert /etc/opensearch/root-ca.pem -cert /etc/opensearch/kirk.pem -key /etc/opensearch/ kirk-key.pem
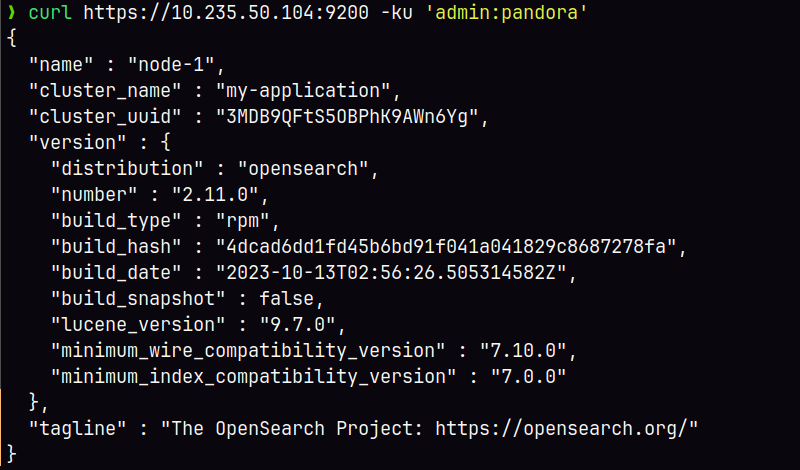
A final message Done with success should be displayed; to check the new password (following the previous example with pandora used):
For more information on user management in OpenSearch:
Pandora FMS configuration with OpenSearch
To configure Pandora FMS with OpenSearch see the topic “Log collection and monitoring”.
Data Models and Templates
Before setting an environment into production, whether it is a single node or a data cluster, it is recommended to apply the corresponding configurations to this node or cluster based on its use. In the case of indexes generated by Pandora FMS, the most effective way to do so is by defining a template to define the configuration of the fields and the stored data.
Templates are configurations that are only applied at the time of index creation. Changing a template will not have any impact on existing indexes.
To create a basic template, you only need to define the following fields:
curl -X PUT -ku 'admin:admin' https://<node_ip>:9200/_index_template/pandorafms -H 'Content-Type: application/json' -d'
{
  "index_patterns": [
    "pandorafms*"
  ],
  "template": {
    "aliases": {
      "pandorafms_logs": {}
    },
    "settings": {
      "number_of_shards": 1,
      "auto_expand_replicas" : "0-1",
      "number_of_replicas": "0"
    },
"mappings" : {
     "properties" : {
       "agent_id" : {
         "type" : "long"
       },
       "group_id" : {
         "type" : "long"
       },
       "group_name" : {
         "type" : "text"
       },
       "logcontent" : {
         "type" : "text"
       },
       "source_id" : {
         "type" : "text"
       },
       "suid" : {
         "type" : "text"
       },
       "type" : {
         "type" : "text"
       },
       "utimestamp" : {
         "type" : "long"
       },
       "@timestamp": {
          "type": "date"
        }
     }
   }
}
}
'
Through Pandora FMS (menu) interface you may upload said template:
- PUT _template/<templatename>: In this example
PUT _template/pandorafms.
You may also check the templates through Pandora FMS interface itself:
- GET _template/<templatename>: In this example
GET _template/pandorafms.
Multinode Templates
To define a multinode template, take into account the following information:
- When configuring the template (JSON format), you need to configure as many shards as nodes you have, however to correctly configure the replicas, subtract 1 from the number of nodes in the environment.
For example, in a Pandora FMS environment with 3 nodes configured, when you modify the fields number_of_shards and number_of_replicas, it should look like this:
{
  "index_patterns": ["pandorafms*"],
  "settings": {
    "number_of_shards": 3,
    "auto_expand_replicas" : "0-1",
    "number_of_replicas" : "2"
  },
From the command line you may list the environment templates by running:
curl -X GET "localhost:9200/_cat/templates/*?v=true&s=name&pretty"
You may also see the details of a template, for example, created for pandorafms by running:
curl -X GET "localhost:9200/_template/pandorafms*?pretty"
which will return the configuration you defined in JSON format.
You may perform these operations through Pandora FMS interface:
- PUT _template/<template_name> {json_data}: It allows you to enter the data of the template to be created.
- GET _template/><template_name>: It allows you to see the created template.
To configure Pandora FMS with OpenSearch see “Log collection and monitoring”.


 Home
Home


