Support and Workflow
Pandora ITSM allows you to control the workflow of your tickets by Workflow rules and Status mapping.
Workflow Rules
Menu Support → Workflow → Workflow rules.
In this section you can define custom rules for automated tickets management. Due to the power of this functionality, only administrator users (superadmin) will be able to create and edit these rules.
The tickets to be checked will be the open tickets, to check also the closed tickets the token must be activated in the menu Setup → Setup → Issue setup → Workflows → Check closed tickets when running workflow rules.
Creation of workflow rules
Menu Support → Workflow → Workflow rules → Create.
A description and a mode of execution must be included:
- Cron: The Workflow rules will be checked at each execution of the cron (usually every 5 minutes).
- Real time: The checking of Workflow rules will be done at the same time that any ticket is created or edited.
Conditions
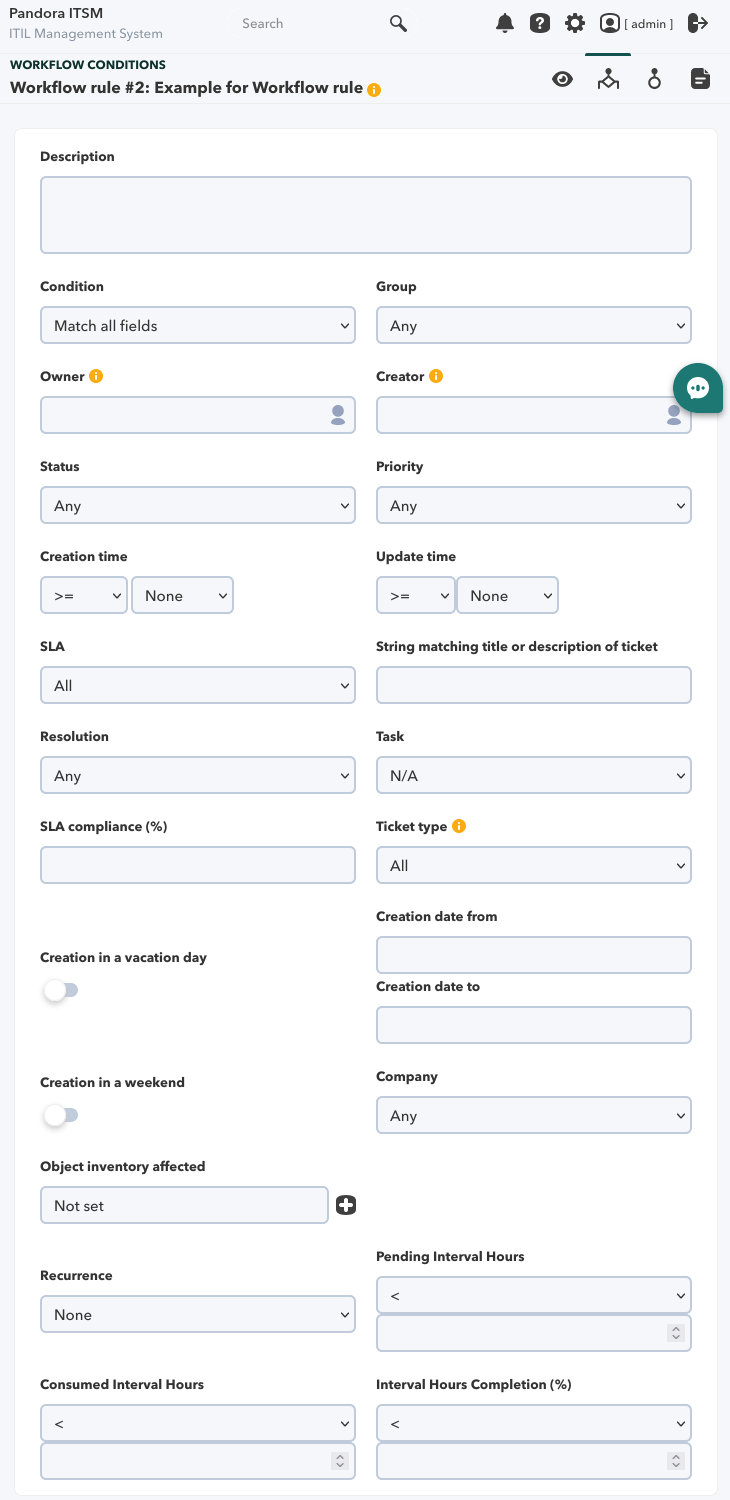
When editing a workflow rule (by clicking on its description in the list of rules) you will also have access to the Conditions tab which can be added by clicking on the Create button, filling in the parameters in the ticket fields and saving with the corresponding button.
Within each condition there is an important field also called Condition which will define how it will be applied to the rest of the filter fields:
- Match all fields.
- Match any field.
- No match.
Some details of the filter fields:
- Priority: A numerical superior does not encompass the inferior ones.
- Ticket type: When selecting an item that has custom fields they will appear and can be used to add them to the condition filter set.
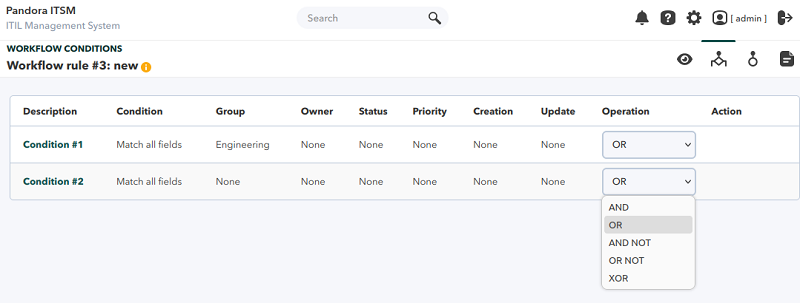
You can have one or several conditions per rule. The default relationship between each of the conditions of a rule is OR: if one of them is met, the rule will be activated and the programmed action or actions will be executed.
These relationships can be changed and each condition can be moved up or down in the Action column in the order of evaluation.
Actions
The next step is to create the action(s) to be performed if the chosen conditions are met. Depending on the Action type one or more fields and subfields to be set will appear below, for example, if you choose to send e-mail message you will see “To”, “Subject” and “Text”.
The actions to be performed on the ticket are:
- Change priority.
- Change owner.
- Change group.
- Change status.
- Send e-mail.
- Add Work Unit.
- Change update date.
- Change resolution.
- Execute a command, either execute a command on the server or a custom script.
- Block.
- Unblock.
- Change the type.
Macros
To configure the actions, macros can be used. These will be replaced by the value corresponding to that of the ticket.
_access_url_: Direct URL to the ticket._author_: Ticket creator._creation_timestamp_: Date and time of ticket creation._fullname_: Full name of the user receiving the mail._id_group_: Group ID assigned to the ticket._id_priority_: ID of the ticket priority._id_resolution_: ID of the resolution of the incident._id_status_: Incident Status ID._incident_auth_email_: e-mail of the user who created the ticket._incident_closed_by_: User who closes the ticket._incident_epilog_: Epilogue of the ticket._incident_group_email_: e-mail of the assigned group._incident_id_: Ticket ID._incident_own_email_: e-mail of the owner user._incident_title_: Ticket title._name_group_: Name of the group assigned to the incident._name_priority_: Name of the ticket priority._name_resolution_: Name of the resolution of the incident._name_status_: Incident State Name._owner_: Ticket owner._sitename_: Name of the site, as defined in the setup._type_tickets_: Ticket type._update_timestamp_: Last time the ticket was updated._username_: Identifying name of the user who receives the mail (login name).- Custom Field Templates: Allow you to use the custom fields of the ticket types. The name of the custom fields you added can also be included as a macro which will show the value of that field, the format would be: “_custom_field_name_”.
Status Mapping
A ticket has numerous fields. Perhaps the most important is the status field. This field refers to whether a ticket, problem or change is closed, pending a third party, new or newly created, whether it is assigned, whether it has been reopened, whether it has been verified or whether it has not been confirmed. This cycle is open to the user and can be passed from one to another without restriction by default.
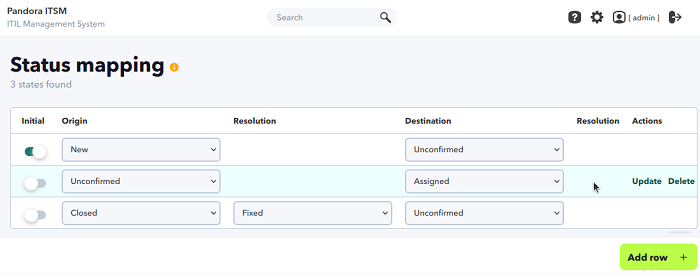
In case you need to define the flow, you have the option of State Mapping, in which you can define which states and resolutions will be available to the user.
There are certain circumstances that are automatically triggered when moving from one state to another. When passing from any state to the “closed” state, a text box called “epilogue”, which was not accessible before, is automatically activated to explain what was the result of the intervention or change or what was - in short - the cause of the problem and its solution.
A solved ticket is the basis for generating an article in the knowledge base that can be used in the future to solve a problem quickly and documented.


 Home
Home


