

 Home
Home

Ticketing and support
| Last modification: August 2026. | Version: 109 OUM |
A ticket can be understood as a generic incident to a support team, a question, to report a problem, etc.
The tickets have a series of basic characteristics such as the urgency or criticality of the matter, a title, the assigned group, and the users involved in it and their status and advanced features such as the SLA or the Description field that supports HTML elements like rich text, web links, and images, or the File upload field to store and share files related to the incident.
Searches in Reports and Dashboards are used to display important summarized information about the registered incidents.
There are many other optional fields and any defined by the administrator for the ticket type (custom fields).
See also “Support and email management”.
Users involved in a ticket resolution
In a ticket each user has a specific role:
- Ticket creator user: This is the person who identifies the problem and initiates the management. It will be the person to help in the incident management process. Even if the ticket creator has a group defined and later the ticket group is changed, the ticket creator will always have visibility of the ticket (as long as they are not changed as the creator), this is designed that way and the rest of the ACLs continue working the same.
- ticket owner user: This is the person in charge of solving the problem. It can be a user or a Team. There can only be one person or team since the problem can be escalated (passing the ticket ownership) to another person, but the owner can only be a single user/team.
- ticket editor user: It can be different from the creator, someone simply in charge of entering the ticket into the system. If the system is managed through a line of operators, the person who takes the call and enters the ticket is neither the ticket creator nor the person who will solve it.
- User with access to the ticket, and who provides information, but who is neither the one who created it nor the one who will solve it: It can simply be a technician who provides some information.
- User associated with a ticket: Anyone who has participated at some point during the life of the ticket, making modifications or adding comments. They will also receive notifications with the updates that occur in the ticket.
In the Contacts tab, you will be able to see the full list of people participating in a ticket and their role.

Users, in turn, belong to companies and groups, and the visibility of the tickets is defined based on the permissions assigned to those users. There are access bits that define who can VIEW, EDIT, or MANAGE tickets. Thus, the EDIT permission is needed to create tickets, and for a user to see another user's ticket, they must have visibility over that group.
Ticket creation modes
Menu  Setup → Setup →
  Issue setup → Ticket submission settings.
Starting from version 109, the new Smart Ticketing and Simplified modes are added to the “Manual” creation mode (which has always been the standard).
There it is allowed to choose between Manual Mode or Simplified Mode as a first option and later the Smart Mode can be enabled:

Manual Mode: The classic standard for creating tickets. It allows creating a ticket by filling in all available fields as well as all custom fields associated with the chosen ticket type.
Simplified Mode: Similar to the manual mode but reduced to the mandatory fields in the ticket creation. The mandatory fields are the following:
- Title / Incident name.
- ticket type.
- Criticality.
- Group.
- Description.
- File upload.

Smart Mode: When activating this mode, the user enters their query and the system analyzes the text using AI (OpenAI®), checks the knowledge base (KB) and shows possible answers or related articles before creating the ticket. If the answer resolves the doubt, the query can be saved as resolved to consult it later. If not, the user can create a ticket keeping the context generated during the process. When opening the ticket, after the query, the previously selected mode will open, that is why in the configuration the Manual Mode and the Simplified Mode coexist independently, both with the Smart Mode.
The Manual Mode will always be available, even with the Simplified Mode active, since there will be an additional option to go to Manual Mode.
For the activation of the Smart Mode, the following options are available in its configuration:
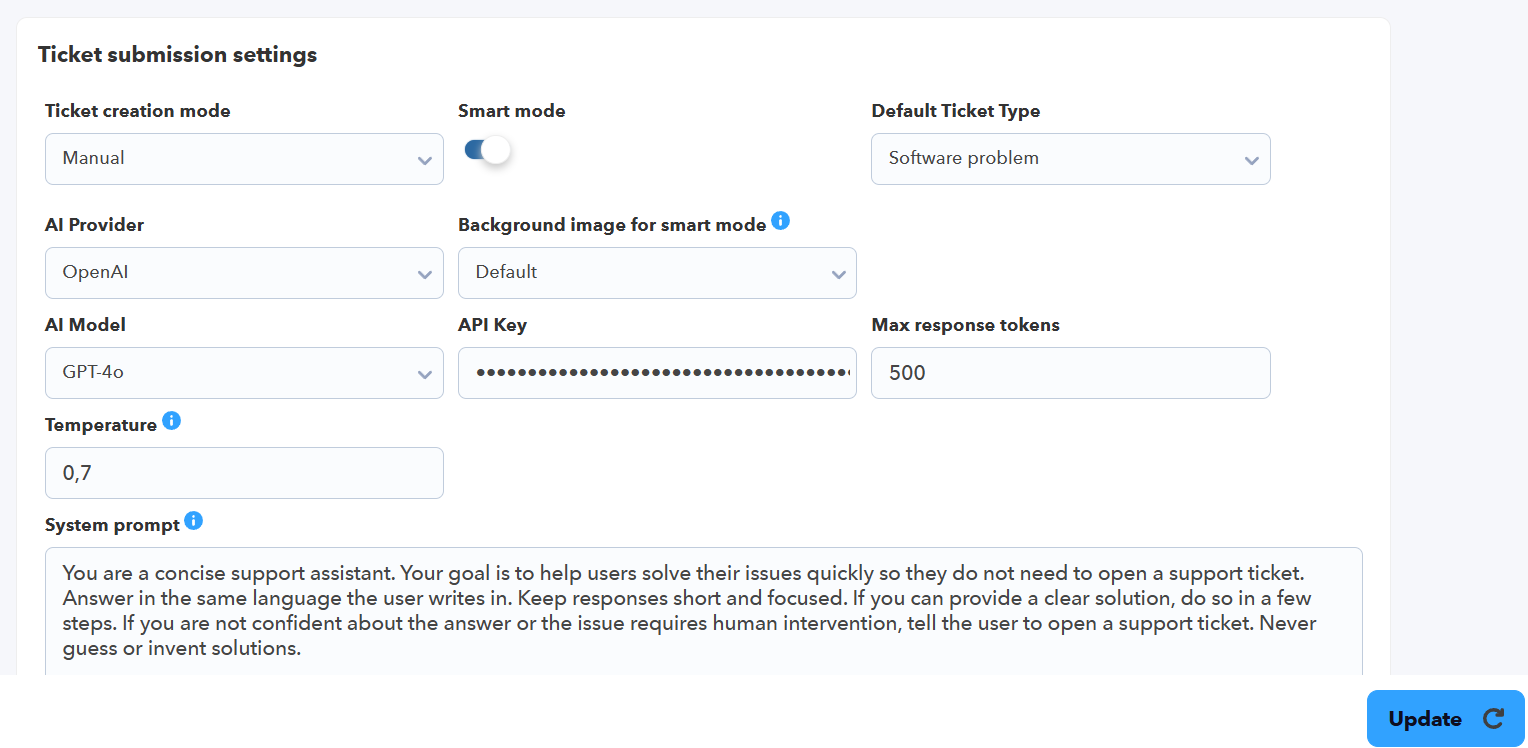
Note that an API Key is necessary to connect with OpenAI® and correctly configure the System prompt so that it acts according to the level of tickets that can be opened in the environment.
Once enabled, a screen will appear when creating a new ticket:

If it is unnecessary to use the AI's System prompt, a ticket can be created by clicking on the Create ticket icon at the bottom.
When asking a question in the System prompt, you will get an answer from the AI:

As well as possible matching articles from the KB below. In case of saving the response as a ticket, the Mark as Solved option can be selected and a ticket will be automatically created with all the information reported by the AI. If the Create ticket option is checked, it will lead to the ticket creation form with the question being asked and in turn the conversation with the AI will also be saved in the ticket:

Support teams
Starting from version 109, a new role in ticket management is introduced within Pandora ITSM. A support team is usually composed of several users to facilitate collaborative ticket management and distribute the workload through automatic assignment rules and availability checking.
The creation of the team will be carried out from the  People → Teams section, and for it to operate within the support section, it is necessary to have the support bit activated.
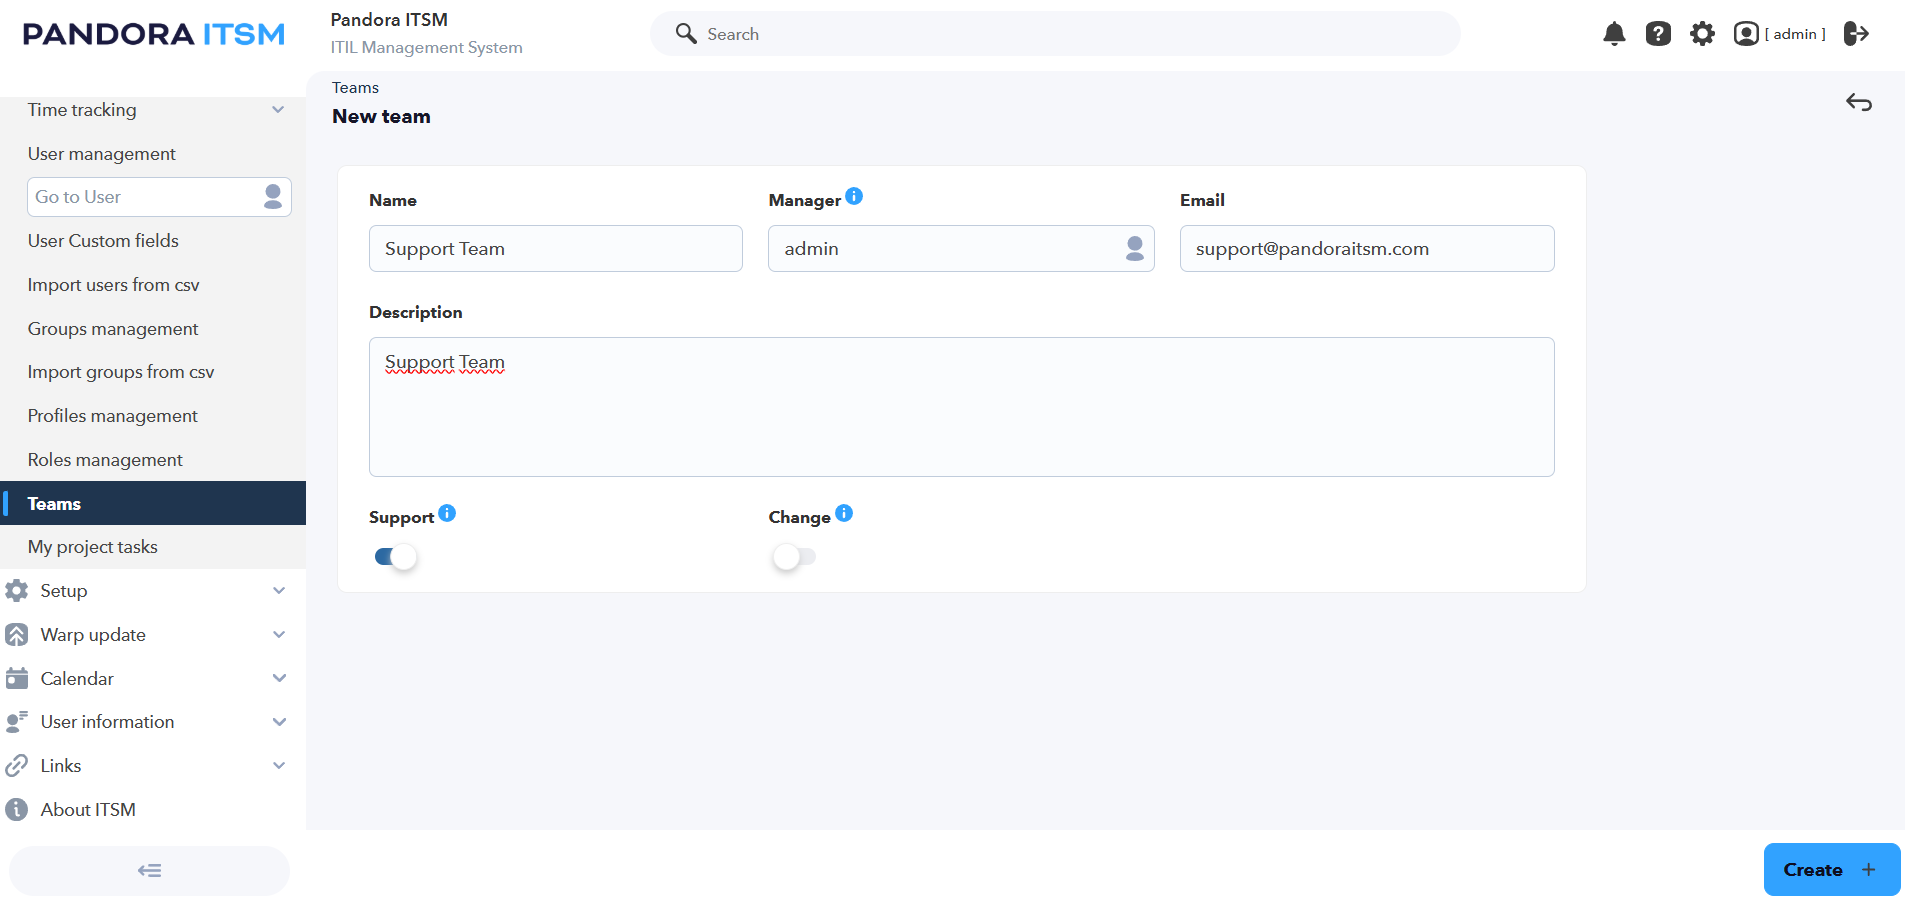
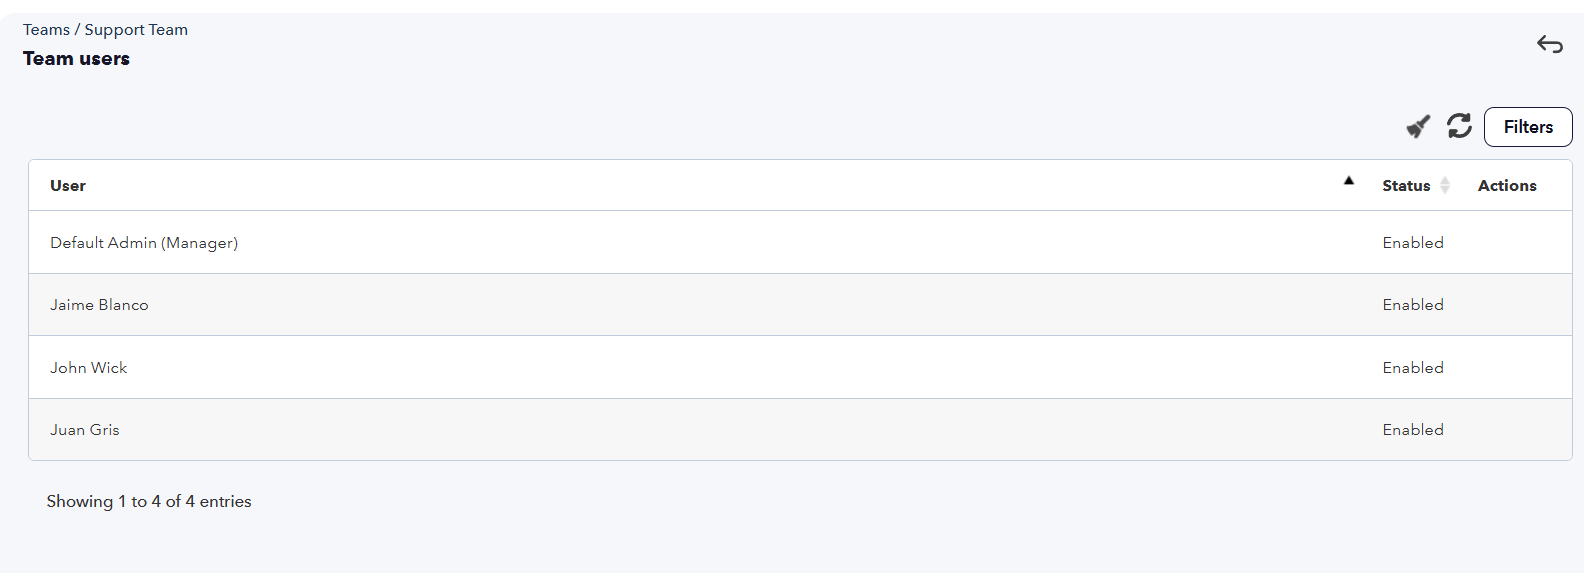
After creating the team, we can add the associated users to the team within the users tab that is displayed when accessing the team's edition.

Once the team is created, it will appear available in  Support → Teams to configure the work mode the Team will operate with.
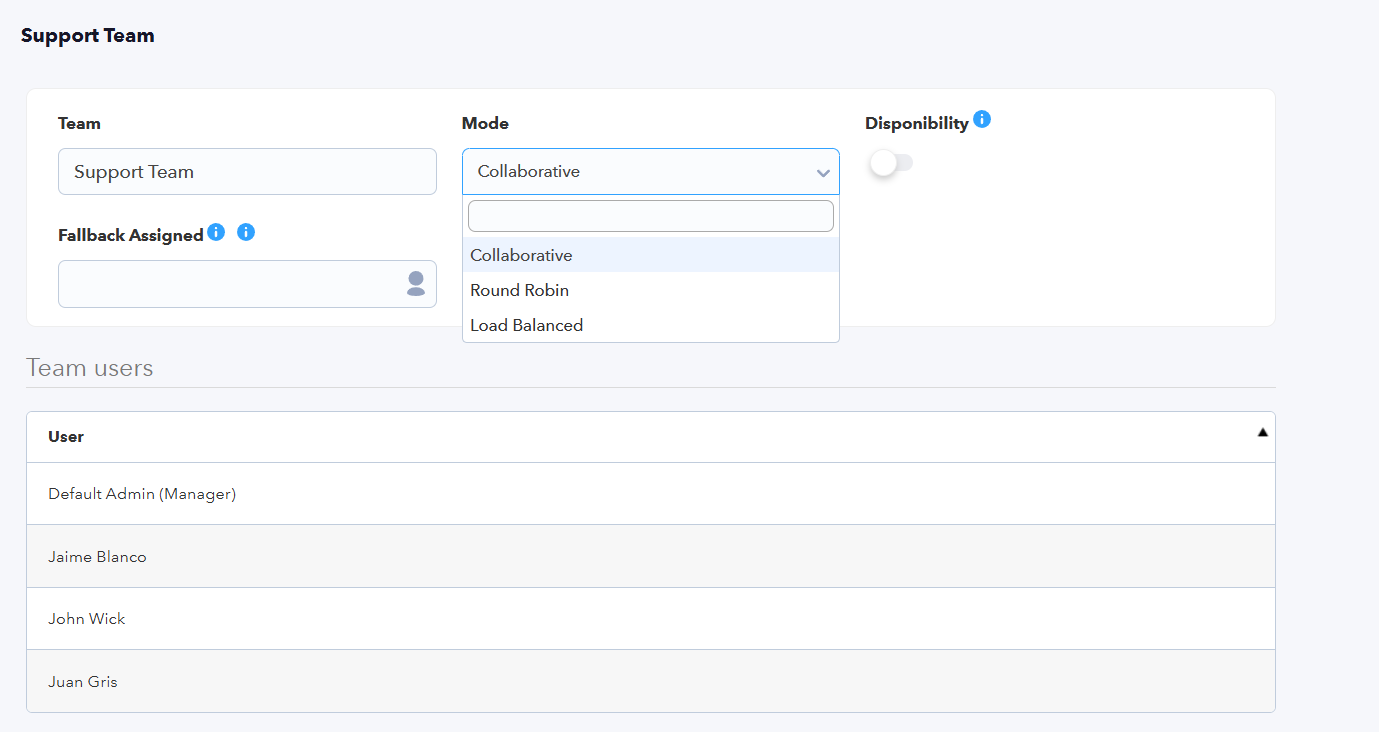
- Collaborative Work: tickets can be assigned directly to a Team. All members of the group will have visibility and can work on the ticket jointly and coordinately.

- Automatic Assignment Models:
- Round Robin: Equal random/rotational distribution among team members.
- Load Balance: Intelligent assignment based on the current workload, delivering the ticket to the user with the fewest active cases.
Availability Management (Timetracker)
Integration with time tracking. The system will check the Timetracker status of each user in real time; if the agent is not available or is outside their working hours, the system will avoid assigning the ticket automatically. In the event that no one is available, we will have the option to enable a Fallback user so that all tickets are assigned to them when no one is available. In the event that no user is configured on this selector, the ticket will be associated with the team.
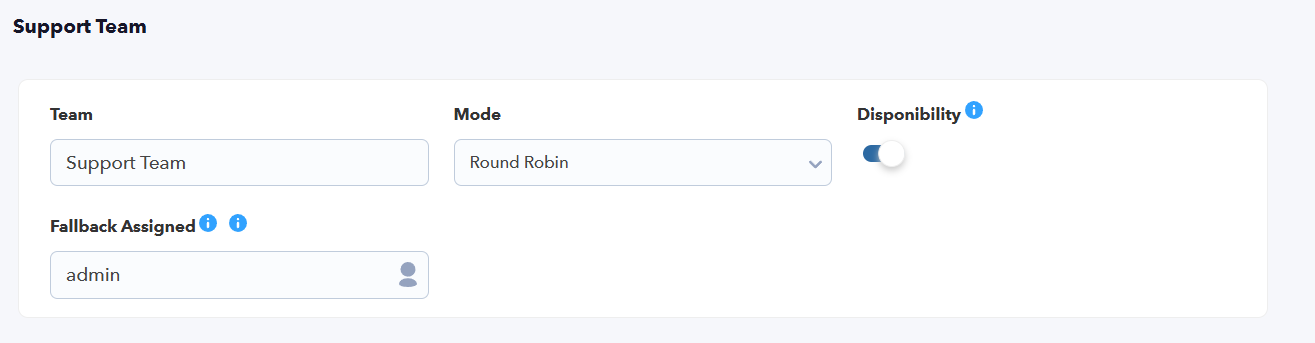
For all these work modes to apply, it is necessary for the ticket to be associated with the team upon its opening, either automatically when configured in the Group or manually at the opening of the ticket.
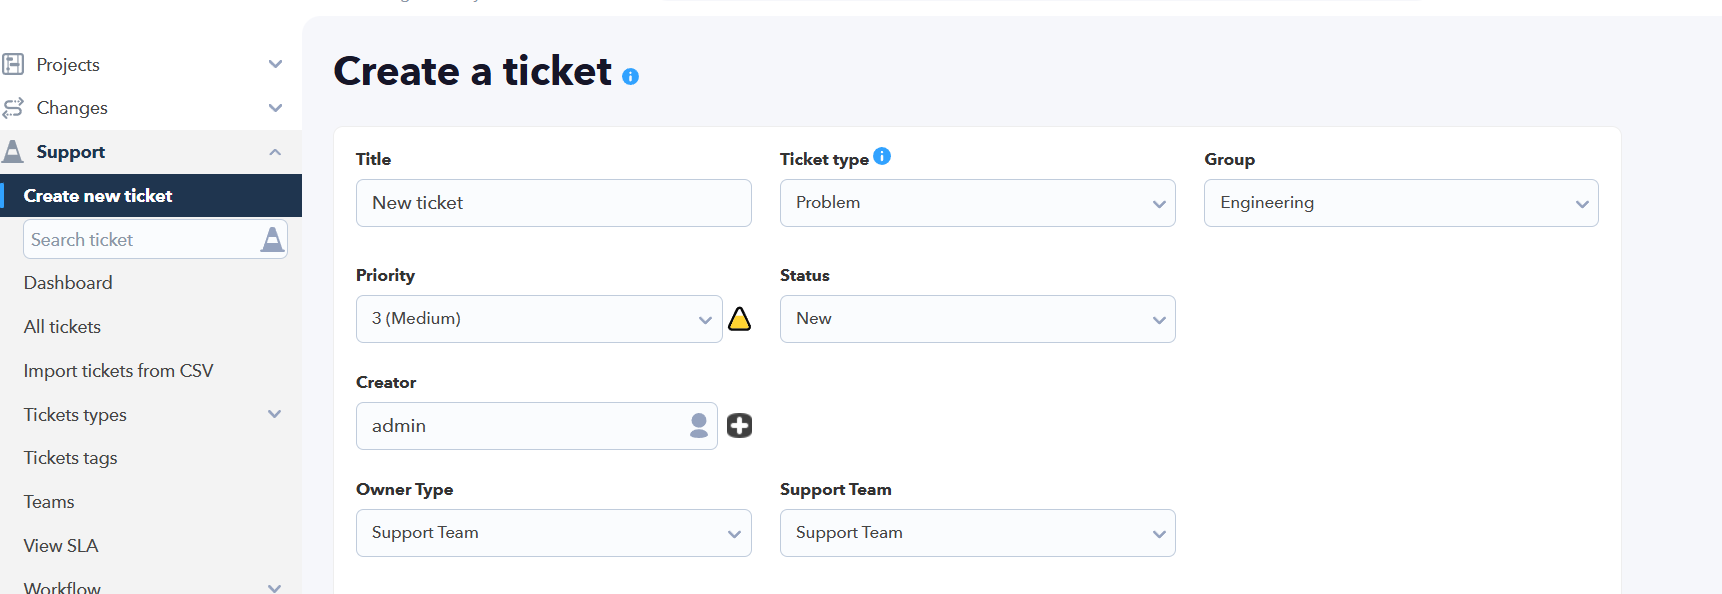
From this moment on, depending on the indicated configuration, the ticket will be assigned to the team or to a user of it.
By clicking on the ticket number or its description, you enter the main ticket management screen. You can thus change its status, or navigate through the ticket tabs to see its history, notes associated with the ticket (WorkUnits), files, etc.
Practical case of ticketing flow with Pandora ITSM
Through an example, the ticket management operation will be shown. This support team consists of three people and a team leader.
Groups in support
There are several types of clients: Those who work in a team and those who act independently.
- Those who operate in a team will have several people working simultaneously who will be able to view their colleagues' tickets, either to contribute something or to take charge of them.
- Independent clients or users can only view their own tickets, and no one else has access to them.
- The first type of client will have its own group and several users assigned to that group, the users in this group will be of the “grouped” type, and their privileges will be based on the profile associated with their work group.
- The second type of client will act individually and their user will be of the “independent” type, so they will only view their own content.
In this environment, when a grouped type client opens a ticket, it is assigned to a team leader. That user will be the one who receives the ticket and can then escalate it, if applicable, to other users.

It could also be sent to a generic user acting as a mailing list. As will be seen later, with the workflows, much more complex actions can be developed, such as sending a message to Telegram every time a high priority incident is received or being able to assign a ticket to a certain type of users depending on certain criteria. Then an email message will arrive to both the ticket creator and the ticket receiver.
The email can be replied to and that response will be added to the “thread” of ticket comments. Another option is to continue its management through the Pandora ITSM web interface, which will allow doing many more things than simply adding a comment.
When a user creates a ticket, it stays in the NEW status and can be sorted by the date and time of the last modification:

By clicking on the ticket number or its description, you enter the main ticket management screen. You can thus change its status, or navigate through the ticket tabs to see its history, notes associated with the ticket (workunits), files, etc.
Ticket statuses
Menu Setup → Setup → Issue setup → Customization → Status.
Possible ticket statuses:

- New: ticket opening status. During this time, the first response SLA of the ticket will be counted, until the owner user of it makes the first reply. Once this first response is made, the user must decide which status the ticket will mandatorily go to. In the event that the owner user of the ticket was the one who made this first response, they should change the ticket to the Pending customer status.

- Pending Customer: When the last reply has been made by the ticket owner user and a response is expected from the creator user, this should be the status set in the ticket for a correct interpretation of the SLA and a correct status flow. When the ticket owner user is going to make a new response, this is the status that will be configured by default when adding it.
- Pending Support: Status the ticket must be in when a response from its owner user is expected. In this status, the response SLA will be counting until the response is effective, and it will be executed in case the limit is exceeded. When the ticket creator user replies, this will be the status it goes to by default.
- Re-opened: Custom status, it will have the same effect as the Pending Support status at the SLA level.
- Pending to be Closed: Custom status, it will have the same effect as the Pending Support status at the SLA level. If the option Enable client validation before closing ticket is activated in the setup, a special option will appear to close the ticket when the creator user accesses the ticket in this status:

- Pending on a third person: Custom status, in this status the SLA is not counted except for the resolution time. SLA inactivity or response is stopped.
- Closed: Closed ticket, the same operation from previous versions is maintained.

All these changes have been made to allow for greater tracking and statistics of the ticket statuses. In the statistics tab, it will be possible to track how much time the ticket has been on the Support side and the Client side, so that in this way the ticket resolution times by the support team are better accounted for. Some of these times have also been added in the incident view to be able to track them in the ticket view itself:

Adding information to the ticket
The team of people working on the ticket (the client, the operator, second-level technicians, etc.) interact with each other by adding text notes (or work units, workunits, in Pandora ITSM terminology). Each user with access to the ticket provides information for its resolution. To do this, simply reply to one of the ticket emails or it can be manually entered through the interface using the tab marked with a speech bubble  :
:
- WUs (Workunits) allow writing a text and, additionally, adding attachments, specifying the time spent on that action (in hours), whether it was worked on jointly with another team member, whether it includes cost calculation based on the imputed profile, etc.
- From version 103 OUM, you can mention any other user (Work unit shared with), according to the ACL visibility that the user has when interacting with a workunit, and the mentioned user(s) will receive an email message for their information.
- All this information will later be used for support reports that include all these metrics (and many others). The intention is to be able to make a detailed tracking of the treatment of each incident to be able to evaluate the quality of the support from all possible angles: costs, quality, times, effort, personnel profiles, client profiles, among others.
Clicking on the speech bubble icon will lead to a dialog box with the following fields:
- Time dedicated (hours): Time spent, in hours, on the message.
- Private workunit: Appears if the New WU are always public token is active in the work units configuration, and allows private comments to only be shown to administrators and the user who added the comment.
- Add to project`s cost: To indicate that it should be taken into account for service cost calculations (projects).
- Internal workunit: To mark if the comment will not be visible to the incident creator.
- Description: Presents an HTML editor that allows adding rich text, links, and images.
- Workunit shared with: Share the WU with another user from the same company; type two or more letters to search for users.
A Super Administrator type user will always be able to see all messages.
To finish, the WU is added with the Add button.
When a Work Unit (comment) or a file is added or its status is changed, an email notification is sent to all users associated with that ticket. This way the interaction is constant. Email sending can be customized through the configuration (see configuration options).
See also “Ticket configuration” and “Limits to ticket creation”.
Advanced ticket parameters
A ticket has a series of fields customized by the user, which are related to the ticket type. It is possible to create different types of tickets, and each of them with its custom fields.
In addition to the fields defined by the administrator, there is a series of special fields, which can be seen in the edit view, in the Advanced parameters box:

The Editor is the application user who creates the ticket and is always recorded for auditing and logging purposes (cannot be changed). The same goes for the Creator group. They are “fixed” fields that can later be used as filters in workflow rules.
Nested ticket hierarchies can be defined, linking one to another in a parent-child relationship, for this there is the Parent ticket field.
A support ticket can be linked to a project, through the linkage with a task (Project Task), since tasks are subdivisions of projects. A ticket can also be linked to a change in Change. For the advanced details section to be displayed and include a link to a task, it must be selected in Change Task:

In the same way, one or several inventory objects can be linked to an incident, so that later there can be traceability of which elements an incident affects and also see the history of incidents that a certain inventory object has had.
It is also possible to keep a group of third parties informed of the life flow of a ticket of which we only have their email address and who do not even have access to Pandora ITSM. Thus, they will receive copies of everything that happens via email. It is a simple way to include third parties and keep them informed.
Customizing tickets
Menu Support → Tickets types → View tickets types.
tickets of different types can be defined, so that each ticket type has its own fields. These fields can be text, dates, a checkbox, or a list selector.
You can even chain several selectors and depending on the user's selection, some values or others will be displayed.

It is possible to configure that certain types of tickets are only available for certain groups: If you have a technical support group and a user support group, the “Technical incident” ticket types (which require filling in many detailed fields) would be available to the “technicians” group. Thus other ticket types that are without technical knowledge would be available to anyone.
Custom fields
Menu Support → Tickets Types → View tickets types → Add Field.
When a ticket type is defined, one or more custom fields can be set.
You may need to define a common field for all custom ticket types (to save work by editing all of them at once): For this, the Global field exists.
Other options allow the custom field to be shown in the incidents list (Show in the list of tickets) and whether it is necessary to specify its value or not.
Text type fields (one line), extended text (a multiline free text box), date type data (which will show a calendar), numeric type (and the system will validate that it is a number), or “true/false” type are available.
There are two more complex types, such as the value selector called Combo and the related fields called Linked.
Option list type fields (combo)
You must add a custom field and choose the Combo option. The possible values must be separated by commas and the system will show them in a selector.

If Required is activated, the string of options must start with a comma, that is, the first option must be empty.
Linked fields
They are fields linked to each other, a main one and a secondary one. Depending on the choice in the main field, the secondary field will show different values.
If it is necessary to address hardware incidents in the keyboard and mouse peripheral accessories, a main field can be created with those two options and then a secondary field with the types of connection to the computer for those peripherals.
Main field creation:
- Add a custom field (to the desired ticket type).
- In Field name enter:
Peripherals. - In Type select Linked.
- In Parent, since it is the main field, leave it with the default value Select parent.
- In Linked value insert:
,Keyboard,Mouse. - Click the Create button to save the main field.
Secondary field creation:
- In Field name enter:
Peripheral connection type. - In Type select Linked.
- In Parent, since it is the secondary field, select:
Peripherals. - In Linked value insert:
,Keyboard|USB,Keyboard|Bluetooth,Keyboard|PS/2,Mouse|USB,Mouse|Bluetooth. - Click the Create button to save the secondary field.
When creating or editing a ticket and choosing its type to the one previously modified, it will result in something similar to this:

Ticket statistics
There is a tab  inside the ticket details that will show them all as a summary. These statistics are grouped into the following sections:
- General: Time since it was opened, closed, last update, time spent, and time not assigned to third parties.
- Of Work Units: Time elapsed since the last work performed, number of work units, etc.
- Of user activity according to Work Units.
- By status (time in the last status).
- By group to which the incident belongs.
- By each user who has been the owner of the ticket.
- By company.
- By SLA time. In this case, starting from version 107, calculations by percentage were discontinued and the following times are used:
First response ( FRT):
Total SLA time that has been computed from the opening of the ticket, until the moment the first response is received:
- Used: Time that has elapsed from the creation of the ticket to the agent's first response. In the event that the first response has not been made, this time will be constantly updated. The times within the SLA time slot will be counted.
- Limit: First response SLA limit defined in the SLA associated with the ticket.
- Deviation: If the used value is less than the limit, the deviation is the time remaining within the SLA (positive value), in the event that the used value is greater than the limit, the deviation represents the breach time (that is, delay). In the latter case, an SLA alert will be executed.
Response time:
It measures the time between responses subsequent to the initial one between the ticket creator and the agent. For it to be accounted correctly, the ticket status must be “Pending Support”.
- Used: Time elapsed since the Client's last response, within the SLA time slot.
- Limit: Maximum response time configured in the SLA associated with the ticket.
- Deviation: If the used value is less than the limit, the deviation is the time remaining within the SLA (positive value), in the event that the used value is greater than the limit, the deviation represents the breach time (that is, delay). In the latter case, an SLA alert will be executed.
Inactivity time:
It measures the time since the last update of the ticket.
- Used: Time elapsed since the last update of the ticket within the SLA time slot.
- Limit: Inactivity time limit established in the SLA associated with the ticket.
- Deviation: If the used value is less than the limit, the deviation is the time remaining within the SLA (positive value), in the event that the used value is greater than the limit, the deviation represents the breach time (that is, delay). In the latter case, an SLA alert will be executed.
Resolution (TTR):
It measures the total time from the creation of the ticket to its resolution. It guarantees that incidents are solved within an acceptable timeframe.
- Used: Time elapsed from the creation of the ticket to the last update of the ticket.
- Limit: Inactivity time limit established in the SLA associated with the ticket.
- Deviation: If the used value is less than the limit, the deviation is the time remaining within the SLA (positive value), in the event that the used value is greater than the limit, the deviation represents the breach time (that is, delay). In the latter case, an SLA alert will be executed.
This information can be expanded with the detailed ticket reports, and in general, everything you need to know is here. Depending on the history of that incident, you will see more or fewer data.
Work orders
Menu Support → Tickets types → Work order templates → Create.
If during the incident process it is necessary to generate a document (PDF) with all the details, in a specific format, to deliver to a client or a supplier as a delivery note or proof of execution of a job, you need to create a work order (Work order).
Work orders can be created by defining a template and then having it filled out automatically for each incident using macros.
Different work order templates can be assigned depending on the ticket type.

Some of those fields are filled with data from the ticket (macros), others could be filled using custom fields (macro with the field name), and others are left blank to be manually filled out by the client or operator in person.
<table style="border-collapse: collapse; width: 99.9664%;" border="1">
  <colgroup>
    <col style="width: 49.9561%;">
    <col style="width: 49.9561%;">
  </colgroup>
  <tbody>
    <tr>
      <td>_sitename_</td>
      <td>_incident_title_</td>
    </tr>
    <tr>
      <td>
        <p>_owner_</p>
        <p>_author_</p>
      </td>
      <td>_incident_id_</td>
    </tr>
  </tbody>
</table>
Then you access the ticket edition, Work order option, and press the Work order button:

Once the work order is created from the corresponding template, the document can be created by pressing the New work order button:

After having created a work order, it can be validated (Validate work order) by uploading a version of that same document signed by the client (scanned or photographed) so that there is a record of it.

Work order macros
The following macros will be replaced by the real value in the templates that use them:
| Macro name | Description |
|---|---|
_sitename_ | Page name, as defined in the configuration. |
_incident_title_ | Incident title. |
_username_ | User name. |
_fullname_ | User's full name. |
_incident_id_ | Incident identifier. |
_url_ | Incident URL. |
_creation_timestamp_ | Date and time of incident creation. |
_update_timestamp_ | Last time the incident was updated. |
_owner_ | User who manages the incident. |
_group_ | Group assigned to the incident. |
_author_ | Incident creator. |
_type_tickets_ | ticket type. |
_priority_ | Incident priority. |
_status_ | Incident status. |
_resolution_ | Incident resolution. |
_time_used_ | Total time used in the incident. |
_incident_main_text_ | Incident description. |
| Custom field templates | This allows that when creating an object type, the name of the fields added can include them as a macro which will show the value of that field: “_custom_field_name_” . |
Ticket status mapping
Menu Support → Workflow → Status mapping.
One of the most important fields of tickets is the status. Through this field, you can accurately track the moment in its life cycle where the ticket is.
By default, this cycle is free to the user and can be modified without a prerequisite.
It is possible to define a controlled flow to restrict the order of statuses a ticket can go through using the Status mapping feature. Using status mapping, you can define if a ticket must mandatorily go through different phases before being closed.
Unless a ticket is in a Blocked status, any superadmin can change, without any limit, the status of a ticket, as many times as needed.
The combinations between the different statuses are many, one of the simplest cases is shown: A new ticket (initial status) can only transition to being assigned. After being worked on, it can only be pending closure, and after review, it can be closed with two options: solved or incomplete. In case of being incomplete, it has the possibility of being reopened, and from there more conditions can be added.

SLA
The SLA (Service Level Agreement) is the way to “verify” that ticket management works under specific criteria. Pandora ITSM has automatic SLA management features. The SLA is processed according to some parameters and configured in the Support → View SLA menu.
Some of the fields that require explanation are the following:
- First response SLA (in hours) (Maximum first response time, in hours): Maximum time in hours that can elapse between the creation and the first response to the ticket by its owner.
- SLA Base: Indicates relationship with another SLA for informational purposes.
- SLA Type (SLA Type):
- Normal SLA: For the calculation, tickets that are not in “Closed” or “Pending third party” status will be taken into account.
- Third party SLA (Third-party SLA): Only tickets that are in “Pending third party” status will be taken into account.
- Both (Both): tickets in any status that is not “Closed” will be taken into account. Version 106 or later: When selecting both, the option Max. ticket inactivity (in hours) for Third party SLA will appear to be able to configure some parameters for Normal SLA and other parameters for Third-party SLA, and they will be applied depending on the ticket status, in one way or another.
- Max. response time (in hours) (Maximum response time, in hours): Maximum time that can elapse between a workunit from the ticket creator and another response. For example, if this time is 4 hours, and a new ticket is 4 hours and 6 minutes old, the SLA will be triggered. If a ticket is already several days old and the last work unit or workunit is from the ticket creator, after 4 hours without a response, the SLA will also be triggered.
- Max. resolution time (in hours) (Maximum resolution time, in hours): The maximum lifetime of a ticket. If a ticket is older than that time and is not closed or resolved, the SLA will trigger.
- Max. tickets at the same time (Maximum number of tickets open at the same time): If exceeded, the SLA will trigger. Note that all SLAs are configured at the group level.
- Max. ticket inactivity (in hours) (Maximum inactivity time, in hours): Time the ticket can remain without an update from any user with access to the ticket.
- Disable SLA on holidays (Disable SLA on holidays): Days defined as holidays will not be included in SLA calculations. In the ticket configuration (see below), you can define the calendar days the SLA will consider holidays.
Starting from version 107, Scheduled was introduced with its simple and detailed options to configure, even with minute accuracy (the cron must be configured minute by minute for this), the time periods when the SLA will be counted:

In version 106 and earlier, SLAs were counted by full 24-hour days. Starting from version 107, only the hours (and minutes if the detailed mode is chosen) configured in Scheduled will be counted.
What does "the SLA will trigger" mean?
It means that the system will send an email notification to the ticket owner, warning that the ticket does not meet the criteria established in the SLA rule set associated with the ticket. This will depend on the group the ticket is associated with, since it is in the group configuration where it is specified which SLA will be applied to the group's tickets.
Starting from version 107, you can change the default assigned SLA (by group) in each ticket at the time of the incident creation. You can reload the group SLA (if any SLA is assigned to the group) by pressing the  button and saving the changes.
Additionally, in the incident list, you can also filter by triggered SLAs or not:

Ticket SLA evaluation
Using the SLA system, in the ticket view you can see on a timeline (histogram), when the ticket has failed (in red) and when it has complied (in green). In addition to an indicator of the compliance percentage of the ticket over its entire lifetime or by date ranges (last 15 days, today, etc.).
SLA metrics can be obtained via API for each incident, for each group, for each operator. They are also used in reports. They are the most important metrics to measure service quality.
Quality assurance and feedback
Quality assurance (Quality Assurance or simply Q/A) and feedback (feedback) of the tickets can be easily configured.
By default, the system will ask the ticket creator, when it is closed (regardless of who closes it), how the ticket was closed. An email message will be sent for them to access a rating screen.
The rating can only be good or bad, and in both cases, an optional explanatory text can be added.
These ratings are associated with the ticket and the person who owns it. Only users with Q/A permissions and the user who created the ticket can access this data.
By default, the rating of support tickets is activated globally in the menu  Setup → Setup →
  Issue setup → Ticket behavior → Disable ticket score.
At the group level, in the People → Groups management menu, the token Send customer satisfaction email (Send customer satisfaction email) is activated by default.
Limits to ticket creation
Menu  People → Groups management.
You can limit, per group, the total of tickets created per user, and the total of active tickets for a user. These are two different limits that can be configured together:
- Total ticket limit: If it is a grouped user, it shows the maximum number of tickets for the group that a user can have in total (open or closed). If it is an independent user, it shows the maximum number of tickets for a user, for that group, that a user can have in total (open or closed).
- Open ticket limit: If it is a grouped user, it shows a maximum number of tickets for this group that a user can have open at the same time. If it is an independent user, it shows the maximum number of tickets for this group and for a user that a user can have open at the same time.
It is also possible that the simultaneous open tickets limit can be “forced” to not allow creating new tickets or simply “warn” with a message and allow creating them. To work without limits, the value must be left at 0.
The ticket limit is calculated by counting the number of tickets from the last year starting from the current date.
Custom searches and dashboard
Menu Support → All tickets → Filters.
A custom search can be created and stored for use in reports, in the dashboard, and the ticket search itself (including the chosen columns with Set custom columns), loading said filter.
Starting from version 107, SLA calculations using percentages have been discontinued and the following filter times were introduced:

All saved custom searches can be reused in the general tickets view in addition to being the base data for standard ticket reports.
In the Owner field, by entering at least two characters you will be able to choose from a list of matching users and then search for results. However, if the Current user field is activated, the tickets belonging to the logged-in user will be displayed. Filters can be saved with this Current user field active and can be used in Dashboards, in which case the tickets belonging to the user who has logged in (and that meet the other conditions of the search filter) will be shown.
Once the filtering criteria have been established, it is saved by clicking the Add custom filter option. It will ask for the name of the filter and it will be saved with the Save custom filter button.

For future searches with custom filters, you just have to click on the Load custom filters button and click on the corresponding Load preset. In this dialog box, you can also select one or more filters and delete them with Delete selected presets.
Saved filters are immutable. It is recommended to load the parameters from an existing filter, modify it, and save it with a different name.
Custom columns
The columns to display in the incident list can be customized globally by the general configuration. These columns will be shown to each and every user when using the Support → All tickets menu.

Then the necessary columns can be set using the Set custom columns option and later save that selection in a custom filter.

In Available fields, the necessary fields can be multiple-selected and added with the > button to Selected fields and vice versa. When finished, the selection can be saved with the Save changes button.
Email templates
All the emails that are sent can be customized, changing their appearance. For this, a set of macros are used that are inserted into the template. The templates are HTML files that can be edited from the tool itself in the Setup → Setup → Email templates setup menu.
Email templates are applied to incidents and also to project management. You can even assign different templates depending on the group. Editing is simple and intuitive, and minor changes (logo, texts) can be made from the editor itself without needing to have HTML knowledge.
Keep in mind that any image included in the template must be accessible from the Internet when someone opens it from the email.
| Macro name | Description |
|---|---|
_author_ | Incident creator. |
_creation_timestamp_ | Date and time of incident creation. |
_creatorcompany_ | Company of the ticket creator. |
_epilog_ | ticket closure summary. |
_id_group_ | Identifier of the group assigned to the ticket. |
_id_priority_ | Numeric value of the ticket priority. |
_id_status_ | Numeric value of the ticket status. |
_incident_closed_by_ | User who has closed the ticket. |
_incident_id_ | Incident identifier. |
_incident_main_text_ | Incident description (main text). |
_incident_title_ | Incident title. |
_fullname_ | User's full name. |
_group_ | Group assigned to the incident. |
_owner_ | User who manages the incident. |
_ownercompany_ | Company of the ticket owner. |
_priority_ | Incident priority. |
_resolution_ | Incident resolution. |
_status_ | Incident status. |
_sitename_ | Page name, as defined in the configuration. |
_time_used_ | Total lifetime of the ticket. |
_ticket_satisfaction_ | When a ticket is closed, this macro is replaced by a link to the ticket satisfaction screen. |
_type_tickets_ | ticket type. |
_url_ | Incident URL. |
_update_timestamp_ | Last time the incident was updated. |
_username_ | User name. |
_wu_user_ | In WU templates, the user who wrote the note. |
_wu_text_ | In WU templates, the text of the note. |
| Custom field templates |
Advanced ticket configuration options
Menu Setup → Setup → Issue setup.
Visual options
Menu Setup → Setup → Issue setup → Visual options.

Ticket behavior
Menu Setup → Setup → Issue setup → Ticket behaviour.

Work unit options (WU)
Menu Setup → Setup → Issue setup → Work unit options (WU).

Workflows
Menu Setup → Setup → Issue setup → Workflows.

Email sending options
Menu Setup → Setup → Issue setup → Email sending options.

Customization
Menu Setup → Setup → Issue setup → Customization.
In each of the Status and Resolution sections there is a series of fields that can be modified according to need and language. For the case of languages, right next to the two sections there is a button to reload default values in the language used by the user who is configuring the Customization.

- In the Special day section, you can add and remove holidays and mark whether these holidays are working days.
- The list of fields to display in the incident list comes preconfigured and can be modified in the Default custom columns section.
Survey Questions
Menu Setup → Setup → Issue setup → Survey Questions.
By enabling this option, the ability to have a ticket evaluation survey is activated when the rating is negative.
As many options as needed to have in the environment can be added, with the option to translate them for the different languages used by the system users.
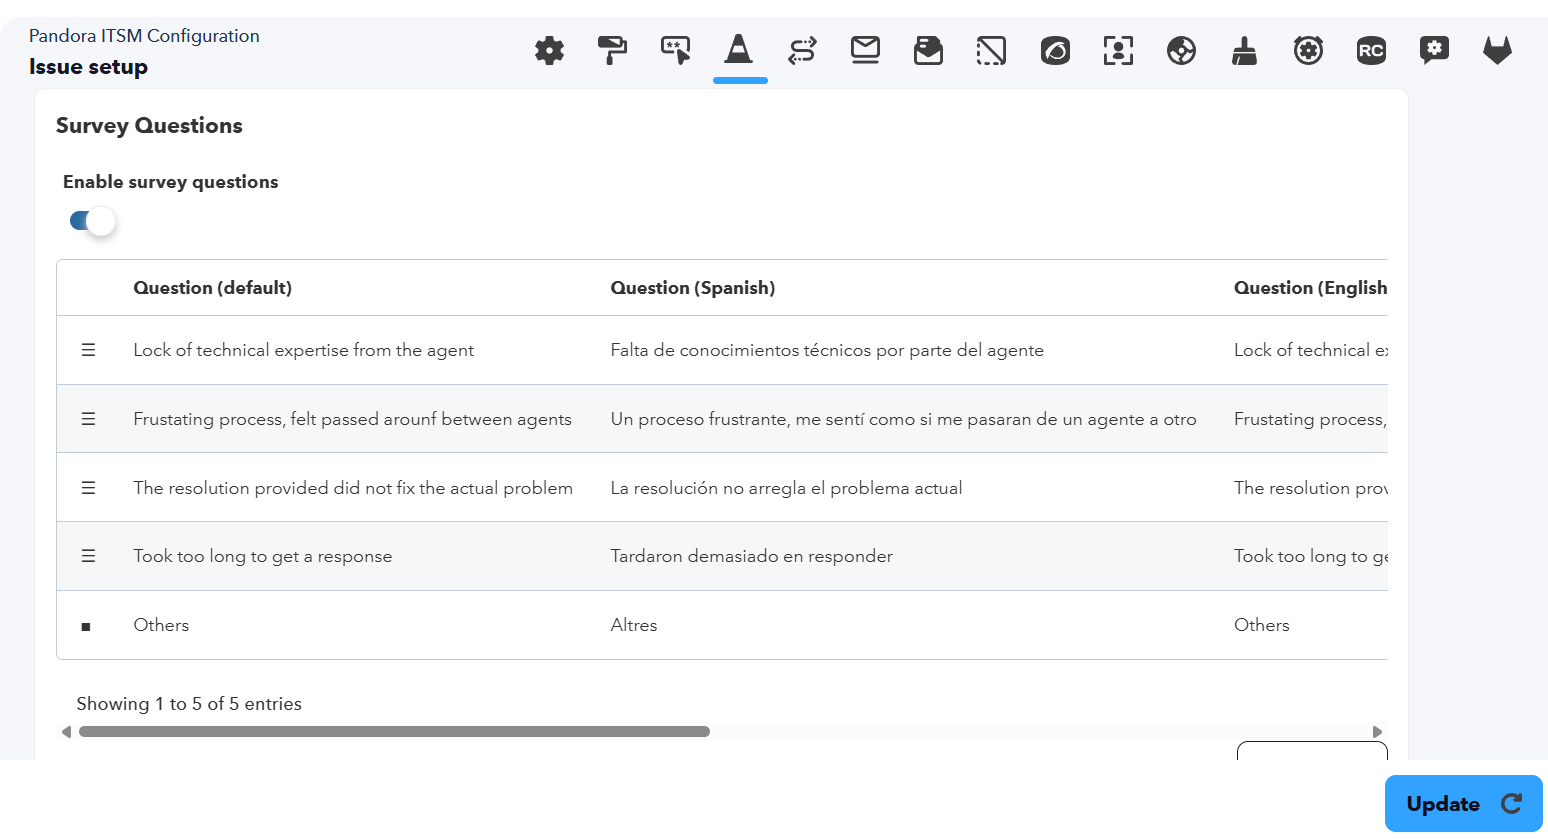
Once the ticket is closed, the rating survey and the previously configured available options will appear. It is only possible to take the survey once.

Massive operations on incidents
Support → All tickets menu.
Each item has an individual selector or a selector for all displayed elements in order to perform the same operation on the made selection:

The interface is shown to all users, however, when ordering the execution of the changes, the permissions will be checked and, if applicable, the requested modifications will be saved.

You can massively modify the status of each ticket, priority, resolution status, task label, group, assign a ticket as parent of the selected ones, or change its owner. Finally, and it should be used carefully, there is the option to delete the selected elements.
Ticket import by CSV
The fields will be the following according to the logical order established by the tool (names have been numbered to facilitate work):
- Start.
- Close.
- Title.
- Description.
- User ID.
- Status.
- Priority.
- Group ID.
- Update.
- Creator identifier.
- Task identifier.
- Resolution.
- Epilogue.
- Parent identifier.
- SLA disabled.
- Affected SLA identifier.
- Incident type identifier.
- Score.
- Cc emails.
- Editor.
- Creator group identifier.
- Last status.
- Closed by (name).
- Extra data.
- Extra data 2.
- Blocked.
- Old status.
- Old resolution.
- Old status 2.
- Old resolution 2.
- Extra data 3.
- Extra data 4.
- Do not show warning to rate ticket resolution.
- Hash.
- Rating (positive or negative).
- Rating comment.
- Custom fields: must exist previously in the Pandora ITSM system and must be indicated in order, being able to choose a value, or in case of not wanting to give them a value, a blank space (
,,). In the case of tickets, it will be necessary to create the type to which the fields belong and obviously reference that type in the ticket itself.
Example
“2025-01-21 19:24:19, 2025-01-21 19:47:44, Broken terminal, Needs replacement, support_technician, 7, 3, 4, 2025-01-21 19:47:44, admin, 0, 1, 0, ,0, 0, 1, 0, , support_technician, 1, 0000-00-00 00:00:00, support_technician, , , 0, 3, 0, 7, 1, , , , 0, , 0, ,custom_field_value1, custom_field_value2”


