Inventory
Introduction
Pandora FMS allows you to maintain an inventory of the devices monitored by Pandora FMS. With this inventory it is possible to maintain lists and reports of:
 Processor model and speed (MS Windows®, GNU/Linux®).
 Storage and filesystems.
 Firmware version (network hardware).
 Device configuration (network hardware).
 Serial numbers and licenses (e.g. MS Office®, MS Windows®).
 Applications installed on the computer (MS Windows®, Android Linux®, GNU/Linux®).
 Network cards and their MACs associated with IP addresses.
 RAM memory modules and their capacity (MS Windows®, GNU/Linux®).
 Installed routes.
 Running services.
 Storage devices (MS Windows®, GNU/Linux®).
 System users.
Data collection for inventory
The inventory is independent of monitoring and can be obtained:
- Remotely, through Inventory Modules, through scripts integrated into Pandora FMS that execute WMI queries, or scripts executed through SSH with Expect or similar methods.
- Locally, with the Pandora FMS Software Agent, through plugins in the Agent.
Inventory Modules
Inventory Modules are remote Modules that execute a command against a remote machine. These Modules work similarly to a plugin. The same modules can be defined as local when they obtain data through a Software Agent.
In the User and Password parameters you can use the following macros: _agentcustomfield_n_ (custom field number n of the agent) .
Remote Inventory
With Pandora FMS a good number of inventory modules are installed by default and it also allows you to build new inventory modules, modify, delete and customize those that already exist using the inventory module editor.
Creation of remote modules
In the menu Management → Configuration → Inventory Modules you can see this list, and with the Create button add a new one.
Some important fields:
- Interpreter:Leave blank if it is a local Module. Field where the command interpreter used in the module is placed. It can be Shell Script, Perl or another valid interpreter for the inventory server running on a GNU/Linux system.
- Code:Leave blank if it is a local Module. Module Code; usually it is Perl code or Shell Script. If it were binary code, it would need a different loading procedure that must be introduced through auxiliary scripts.
- Block mode: Displays and detects changes in the configuration.
- Format: Type the fields separated by
;that the module will return.
- In Format make sure to place each and every field separated by semicolons. If you omit this field you will not be able to create or save an inventory module and you will lose any changes made.
- It is very important to choose the corresponding operating system because when adding inventory modules to an agent, only those modules will appear in which the operating system of the module matches the operating system of the agent.
Assign remote modules
The assignment of Inventory Modules is carried out in the Agent itself, in the Agent administration tab, click on the Inventory tab.
- Module: Choose the inventory module that needs to be added. Only modules whose Operating System matches that of the Agent will appear.
- Target: IP address or name of the server from which you want to retrieve the inventory.
- Interval: Choose the time interval in which the input module will be executedventory.
It is possible to define fields instead of the username and password that normally exist, for this it is necessary to activate the Use custom fields field. After doing this, a control will appear to add new fields (Add field).
- In this control you will have to enter the desired name before adding it.
- If you indicate that the field will contain a password, type It`s a password and the value will be saved in the database in an obfuscated manner.
- After creating the fields, you can give them a value and finally add the Module.
- These fields will be applied in order of creation in the execution of the remote inventory script.
Local inventory through Software Agents
Through Software Agents it is possible to obtain inventory data for a machine. It will be enough to apply the corresponding inventory modules in the Software Agent configuration.
As with remote modules, it is also necessary to add these modules as an inventory module in Management → Configuration → Inventory modules.
Creation of local Modules
To create a local Module go to Management → Configuration → Inventory modules where all the inventory modules that have been created appear. All modules that will be defined in the Agent configuration must be created here; The operating system assigned to the Agent in the console must also match that of the created Module.
The procedure is the same used for the remote case, except for filling in the Interpreter and Code fields. To edit the newly created inventory module (as well as all others) click either the name or the wrench icon.
Local inventory configuration for Software Agents
These plugins come by default with the installation of the software agent, although they are commented in the configuration file, to use them uncomment such lines and restart the software agent (software agents can be restarted due to their remote configuration).
Example for MS Windows®:
#module_begin
#module_plugin cscript.exe B t:20 "%PROGRAMFILES%\Pandora_Agent\util\cpuinfo.vbs"
#module_crontab * 12-15 * * 1
#module_end
More items can be downloaded from the script collection in the Pandora FMS library. Each one has its instructions for use and the scheduled execution of local inventory scripts must be configured in the pandora_agent.conf file by adding the information to the end of the file.
Inventory Module on Unix systems through Software Agent
The Unix Software Agent module uses, locally, a plugin to collect information about different aspects of the machine, both software and hardware.
The plugin that collects the inventory is in the directory /etc/pandora/plugins
The Module syntax is as follows:
module_plugin inventory 1 cpu ram video nic hd cdrom software init_services filesystem users route
The Module is made up of a line with the following parameters:
- Module Activation:
"module_plugin inventory" 1 cpu ram video nic hd cdrom software init_services filesystem users route
- Field where it is established how many days the Module will be executed. If it is zero (0) the inventory is returned on each Agent execution.
module_plugin inventory "1" cpu ram video nic hd cdrom software init_services filesystem users route
- Field where the inventory objects that are collected are defined.
module_plugin inventory 1 "cpu ram video nic hd cdrom software init_services filesystem users route"
You can also simply specify that it collect all available information. In this example, you will collect all inventory information daily:
  # Plugin for inventory on the agent
  module_plugin inventory 1
To activate the Inventory Module, copy the code described above and add it to the pandora_agent.conf file of the Software Agent and restart the service.
Assign local modules
It is unnecessary to activate the Modules in the Agents defined in the Console:
- If the modules have been created in Configuration → Inventory modules.
- If the operating system matches and execution is defined in the Software Agent configuration file.
- The collected data will appear directly in the View → Inventory section of the Agent in the Console.
Creation of local inventory modules with Software Agent
In addition to the inventory systems that come preconfigured in the Agent, Inventory Modules can be created for Unix® and MS Windows® systems. Basically you have to create a script thatgenerate an XML with the following structure:
<inventory>
     <inventory_module>
         <name>INVENTORY_MODULE_NAME</name>
         <type>generic_data_string</type>
         <datalist>
             <data>DATA1;DATA2;DATA3....</data>
         </datalist>
     </inventory_module>
</inventory>
- INVENTORY_MODULE_NAME: The same name of the Module that you registered in the inventory modules in the Pandora FMS Console must be entered.
- DATA1;DATA2… : These are the data to be extracted and that have been defined in the Inventory Module.
- In the file
pandora_agent.confthe script that generates the XML must be executed. - In order for the local script execution to store inventory information, it must have an inventory Module defined in the Console, specifying the operating system, Module name and the data to be stored separated by
;. - Therefore, the Inventory Module must be created in Pandora FMS before restarting the Pandora FMS agent.
Viewing data for inventory
Inventory data that has been collected from a system, whether locally or remotely, can be viewed from the Agent itself or from the Console Inventory menu.
View Inventory data in the Inventory menu
From Operation → Monitoring → Inventory it is possible to view the inventory data of all agents, perform searches and export the data to a CSV file.
By default, all agents are shown, but it is possible to view the modules of all agents that have inventory by choosing All in the search options and clicking Search. In any search case (group, module, etc.) you can group by agent if you check the Order by agent option.
In the detailed view of the Agent inventory, through a selector, you can choose the date of the specific inventory report to view (by default Last).
If you notice missing dates it will probably be because there are no changes in the data from the last inventory run. That is, Pandora FMS only stores inventory data when it changes compared to the last run.
Export inventory data to CSV
From Operation → Monitoring → Inventory it is possible to export the inventory data, the result of a filter, to a CSV file using the Export this list to CSV button. A file with the inventory data separated by the configured character will be created and downloaded in Setup → Visual styles → CSV divider.
Differences between inventory versions
Pandora FMS can visually show the differences between two configurations, displaying it in two columns to see the differences. The Block mode specifies that the result of an inventory module is a single element, instead of interpreting each line as different elements of the same type, as has been done in the inventory modules seen previously. Configured when defining a local or remote Inventory Module:
Inventory Alerts
Version 751 NG or later.
Inventory alerts They serve to launch specific alerts about the inventory content of a group of agents. Like SNMP alerts or event alerts, they are not applied agent by agent but are global, in this case, they are applied by groups.
To configure alerts, you must go to the Management → Alerts → Inventory alerts section.
Inventory alerts have fields similar to other alerts such as name, description, time threshold and action and with the following differences:
- The group in this case acts as the alert condition, so alerts will be evaluated for any data that comes from an Agent in said group.
- These alerts also have the option deactivate event which is used so that when the alert is triggered, an alert event is not generated. It is useful since it is possible that with the application of inventory alerts many alerts are triggered in a single execution.
Alert trigger condition
Text String Match
In this way, when a specific string arrives in a specific inventory module (for example “software”) the established action will be triggered. Inventory Modules have dynamic fields; For example, in the software inventory module, there are the fields name, version and description that can be used. This way you can set an alert for any of the three d fields.static, such as to monitor a package of a specific version:
In these fields you can enter regular expressions to make more complex searches. If a field is empty it counts as .* (it will match any value).
Restricted list
In this case (Condition, Black list) you must specify only one field of the Inventory Module type, and establish a list of strings (one per line) so that if the Agent contains an element from that list, the alert will go off
Allowed list
Similar to the previous case: A list of items (Condition, White list) is specified for one of the inventory fields, except that In this case, the value of the Inventory Module must always be found in one of the elements of the list, if not, the alert will appear.
Uses of Inventory Alerts
This functionality is really useful for detecting vulnerable versions of devices, unauthorized users on machines, or unauthorized use of software on computers.
Security Monitoring
Pandora FMS allows you to collect, in addition to inventory data, other important values of each operating system monitored through software agents. All this is centralized in the Operation → Security → Hardening section.
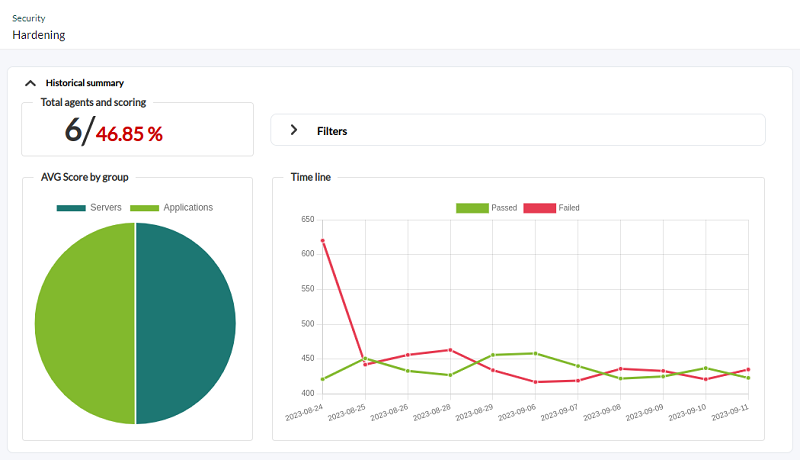
This tool seeks to strengthen the security of each of the monitored devices and the information is presented in three main sections.
Historical summary
The Historical summary presents the total number of agents that monitor the modules intended for security and the total average score (Total agents and scoring table).
The table AVG Score by group presents the average score for each group defined in PFMS.
There is also a historical graph (Time line table) with the average of failed and approved security checks grouped by days (maximum the last eleven days) regardless of the selected time period. In Filters you can select a custom time period or common values (last week, last month, etc.).
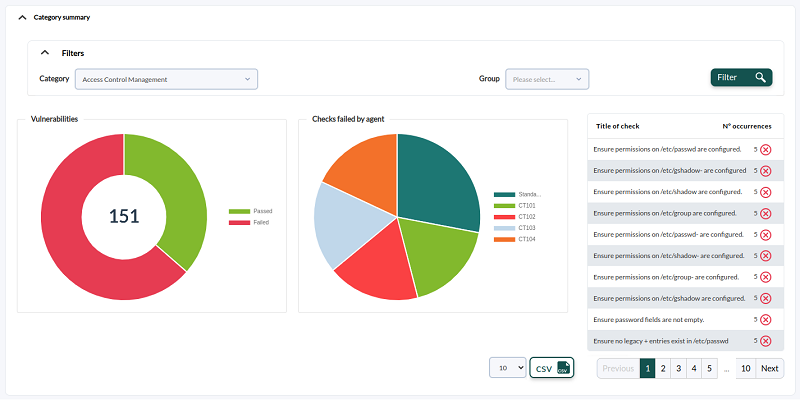
Category summary
In the Summary by categories it must be filtered by category and optionally by group to view. By default, the Access Control Management category is selected.
* The Vulnerabilities box will show the total number of failed vulnerabilities and overcome vulnerabilities. * In Checks failed by agent the list of failed checks for the selected category, clicking on each sector of the graph will list the details of the selected check and the affected agents.
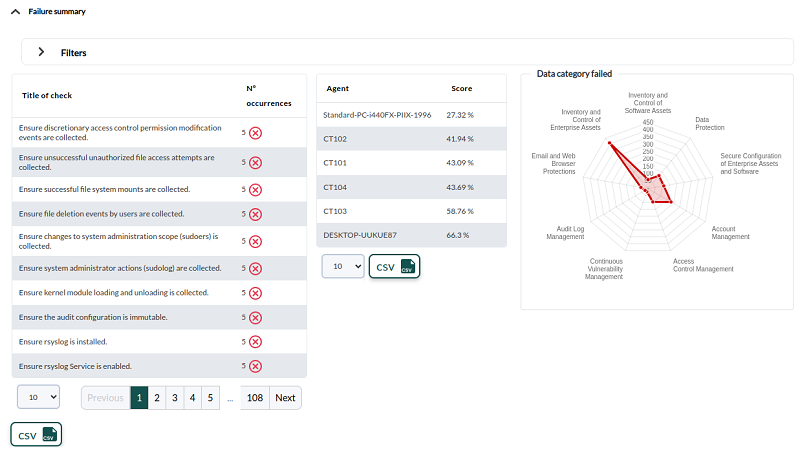
Failure summary
The failure summary is presented (Tittle of check): The list of failed checks filtered by group and the number of incidents. Use the Filters box to define new search and display parameters.
Also the list of the agents with the worst security score, with the option to view the security view of each agent by clicking on them.
Finally, a radar graph is presented with the distribution of failures by category.


 Home
Home


