Pandora RMM
What is RMM?
The name RMM comes from the acronym Remote Monitoring and Management.
It is a centralized system that allows to create and schedule tasks from Pandora FMS Web Console and that will be run locally by agents to later report to the server the information related to the executions carried out and their status. It is implemented from version 778 of Pandora FMS and the necessary components for its operation are distributed together with the server and agent.
It has 3 components:
- RMM agent:
It is in charge of connecting with the RMM server in search of new executions, carrying them out in case there are any and sending two types of files: keepalive and data. These files have JSON format and contain information such as the agent's name, the date the file was sent, the interval the agent is following, the execution status, etc.
- RMM server:
It hosts the scripts and the queued and scheduled executions to be carried out by RMM agents.
- RMM Tentacle service:
It enables connection between client and RMM server. In its configuration parameters are indicated for the password and certificates used for connection encryption, the type of files to read and the configuration of directories to make them only for upload or only for download. By default the rmm, res and queue folders are for download only, and the data and keepalive folders are for upload only.
The proper functioning of all 3 components is key to keep the RMM system functional.
Requirements and configuration
As it has been mentioned, RMM is implemented in Pandora FMS version 778 and the necessary components for its operation with the server and the software Agent are included. Pandora FMS server includes also Tentacle, so with a usual installation in 778 or upgrade to that version is enough to meet usage requirements. This includes the certificates for connection encryption through Tentacle between agent and RMM server, although you may use your own SSL certificates and change the connection password.
As for the configuration, it is a two-step process:
- Enabling the RMM server of PFMS server
To that end, the server configuration file must be modified. If you have remote configuration enabled, you must do it from the Web Console, otherwise from the terminal. Modify the line #rmmserver 1 and uncomment it.
There are also two additional parameters for RMM: rmmserver_threads and rmmdir. They allow to choose the number of threads for RMM server execution and to indicate the local directory of the machine to be used for data exchange with RMM agents, accordingly. This directory will be where the tentacle_rmm service will manage the files exchanged with the agents.
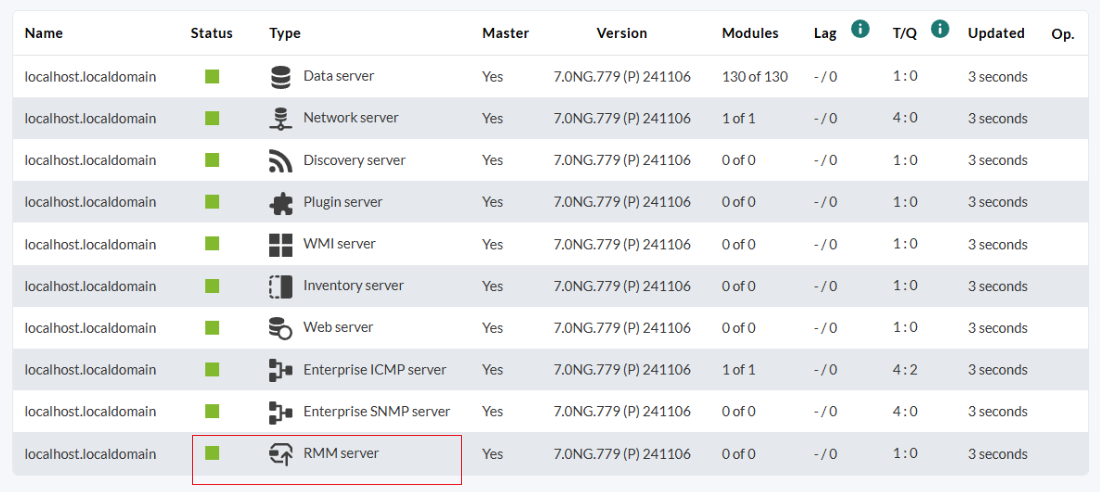
When saving the changes, it is possible to wait for its automatic application or manually restart PFMS server. From the web console view, in the server list, it will be possible to visually check whether the RMM server is active:
You may also check at terminal level that the Tentacle process for RMM is active. This process should be created automatically after enabling the RMM server.
- Enable RMM agent
To enable the RMM agent, the configuration file of each agent must also be modified. It should be noted that it works for both GNU/Linux® and MS Windows® agents. The value of the rmm_enabled line must be changed to 1. Other parameters:
rmm_interval: It determines how often the RMM agent checks whether there are queued executions for itself and runs them. By default it is set to 30 seconds. It also indicates how often it will send .keepalive files to report its connection status.
rmm_server: It indicates the IP address or DNS name of the RMM server. By default, this line is commented and uses the same DNS address or name that is specified in the server_ip parameter for the software agent. A different address or name may be specified here if the RMM server is located in a different machine than the PFMS server of the software agent.
rmm_port: It indicates the port to be used for Tentacle connections, and must be the same as the one used by PFMS server. The default one is 41123.
rmm_temp: It specifies the local directory for temporary files related to RMM executions. By default it will indicate /tmp on GNU/Linux® agents and C:\Program Files\pandora_agent\temp for MS/Windows® agents.
rmm_extra_opts: This parameter indicates the additional options to connect to the tentacle_rmm service, among others, it includes the password or key needed to establish the connection through Tentacle for RMM executions. It is configured by default, if necessary it can be found in the /etc/tentacle/tentacle_rmm.conf file of the server, in the password parameter.
rmm_debug: It indicates the local file where the log or debug entries will be stored, in case this mode is enabled. In GNU/Linux® agents it is /var/log/pandora/pandora_rmm.debug and in MS/Windows® agents it is C:\Program Files\pandora_agent\pandora_rmm.debug by default.
Once the changes have been saved, you may wait for the next agent interval or restart it manually. Once the changes take effect, the pandora_rmm_agent process can be seen in the device:
Communication between agent and RMM server
As mentioned, it is the agent that connects to the RMM server in search of executions to be performed and to report the appropriate statuses. All this is done through Tentacle by means of an encrypted connection thanks to the certificates included with the installation of Pandora FMS server. The files sent by the RMM agent are the .data and .keepalive.
.data files
The .data' files will be sent to the server only when script executions have been carried out in the previous time interval, where they will include, as well as in the .keepalive' files, the agent name (agent_name), the contact date, the RMM agent time interval, and the difference is the presence of data about the execution carried out. The execution ID, the step where the execution ended, the status in numerical format, the output message (STDOUT) and the error message (STDERR) will be indicated:
{
  "agent_name": "4a6d4f8f8d599d57ba3b5b7c1c0bf4450306e720c5c46d9de2ef31daf3984dca",
  "last_contact": "1731402567",
  "rmm_interval": "30",
  "script": [
    {
      "queue_id": "60",
      "step": "post",
      "status": 0,
      "output": "Execution completed successfully\n",
      "error": ""
    }
  ]
}
.keepalive files
The .keepalive files are sent at all RMM agent intervals and will indicate to the server that the RMM agent is available/connected. The contents of these files include the agent name (agent_name) to facilitate linking to the corresponding agent previously registered in the console, a timestamp indicating the exact date the file was sent to work as a last contact date, and the time interval it follows:
{
  "agent_name": "4a6d4f8f8d599d57ba3b5b7c1c0bf4450306e720c5c46d9de2ef31daf3984dca",
  "last_contact": "1731402285",
  "rmm_interval": "30"
}
Views and settings from the Web Console
At this point, communication between agent and RMM server should be working properly. It can be checked by accessing the RMM Agents list or Heatmap view in the Management → RMM section of the left side menu of the Web Console.
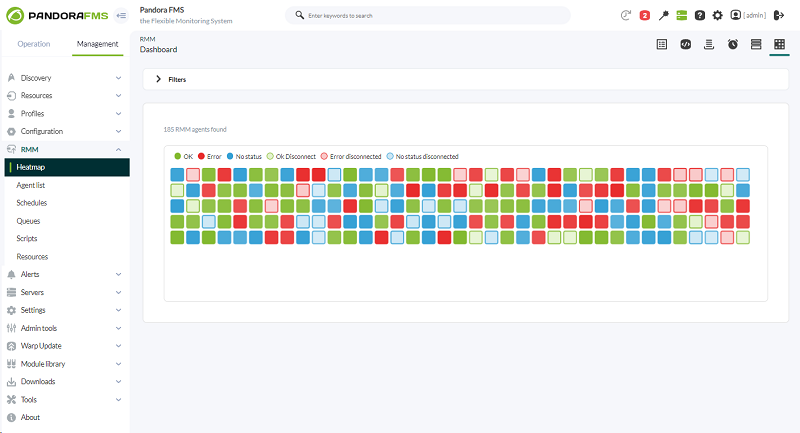
Heatmap
In case the connection is successful between agents and RMM server, a different box will be shown for each RMM agent in the Heatmap view, represented with a color or color scheme and a legend to interpret the status of the RMM agent based on those colors.
Agent list
From the Agent list view you will find the same color system for RMM agent statuses, besides having additional data such as the agent name, its IP address, its operating system and version and its description (if any).
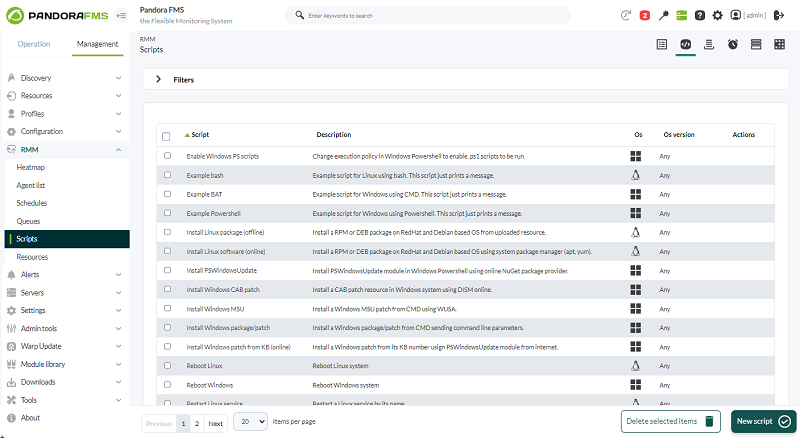
Scripts
In this view you may find all the scripts registered in the environment, as well as information about them and the possibility to create new scripts, edit existing ones or delete them.
The form to create scripts is the same as to edit them. If you click on New script or on the name of one of the existing scripts, they will be opened for creation or editing.
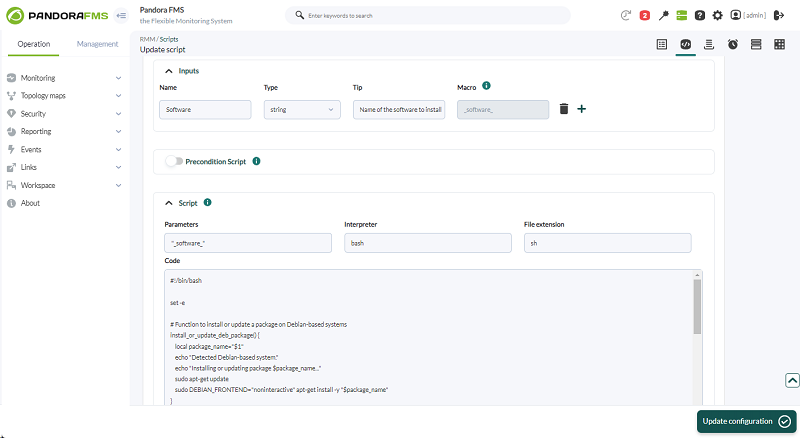
Each script can be given a name, a description, the operating system in which it will be used or will be supported by, as well as the version of that OS. This part is only organizational, as it has no limitation when assigning executions to RMM agents.
It is also necessary to indicate a group to which this script will belong, and next to it you will see an option called Notify before executing. If enabled, the agent will execute this script will report success status before the actual execution of the script. This is useful in cases where the RMM agent process would be stopped and it would be impossible to report correctly the execution data after the execution, for example when restarting the equipment. This correct status will be represented in the queue list, but in a different way than the correct status of a real finished execution, so that it can be easily identified. The status column will show a green box with white stripes or lines.
The following Inputs section will allow you to further customize the script when creating executions. By clicking on Add input, it will be possible to give a name, choose a type between string and resource, indicate a tip or help on this input, and the macro value that this input will have, which is automatically filled in.
The difference between string and resource types is that with an input of type string, when creating an execution, the value of this input can be indicated by hand and, as its name indicates, it would be a text or character string.
If a script that restarts a service makes use of string inputs, this script may be used for multiple services, just by indicating a different service for each execution. With resource inputs, it will be possible to choose the resource to be used by the script in each execution. To do this, you need to upload the resources beforehand, as we will see later on.
Inputs are not required for script creation.
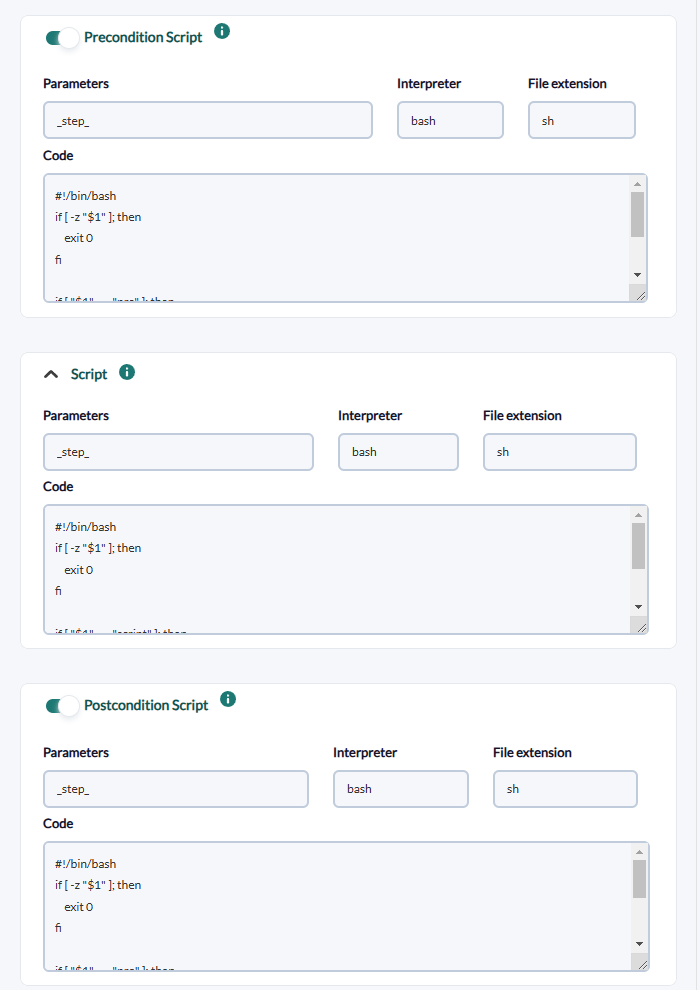
Once the inputs are configured, the next step is to configure the script itself. There are three types of scripts:
- Precondition script.
- Script.
- Post script.
Out of these three types, only script configuration, located in the middle, is required:
The configuration structure is the same for all three types. You may indicate which parameters each script will use in the Parameters field by indicating the macro name seen in the Inputs section. In the Interpreter section indicate which command interpreter will be used to run the script. You may use some such as Bash, Python, Perl… always taking into account that they must be installed and available in the agent environment.
In File extension, the extension of the script file will be indicated and finally the Code section, where the script code itself will be entered. The file extension is especially important in MS Windows® systems, since in case of not indicating the appropriate one, the scripts would not be executed correctly.
Once the script is configured, just click on Update configuration to update it if was edited or Save configuration if a new one was created.
Resources
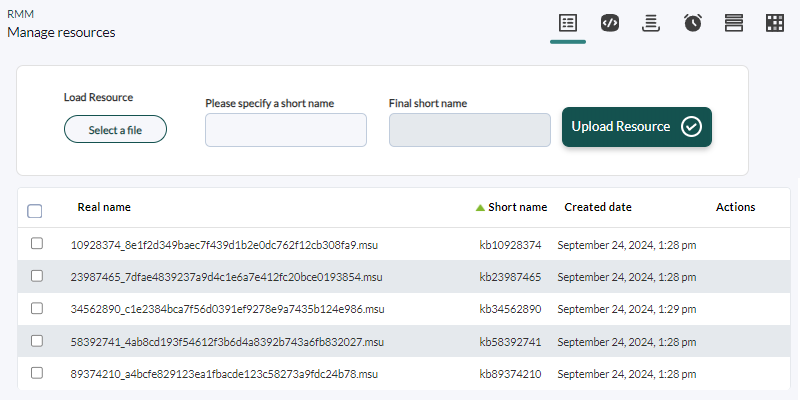
This view contains the uploaded resources that may later be used in executions. By default, this view will not show anything, but rather your own resources should be added.
The file must be selected from the explorer, clicking on Select a file and indicating a short name that will work as a unique identifier for the resource. When uploading a resource using a short name that already exists, you will be asked if you wish to update the previous resource.
These resources will be stored, as well as the keepalive and data folders, in the RMM directory indicated in the server configuration file under the name res.
In the Web Console, it will be displayed as follows:
There is also the option of deleting these resources individually or in bulk. These resources may be used as inputs in the scripts if the input type is set to Resource.
Agent details
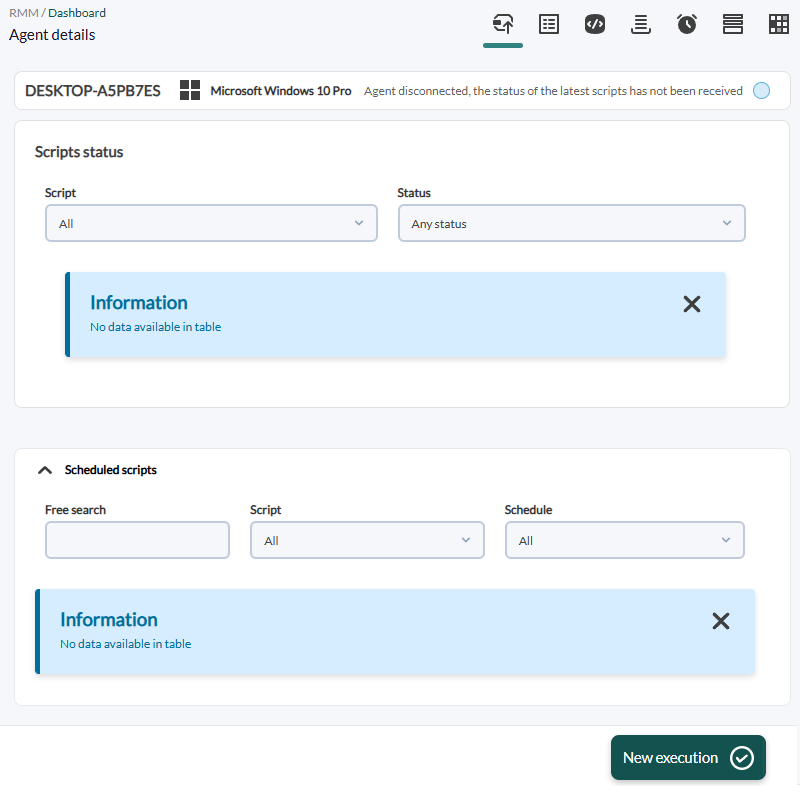
To be able to see the Queues and Schedules views in a correct way, it is necessary to add executions in some agent, otherwise no content will be displayed.
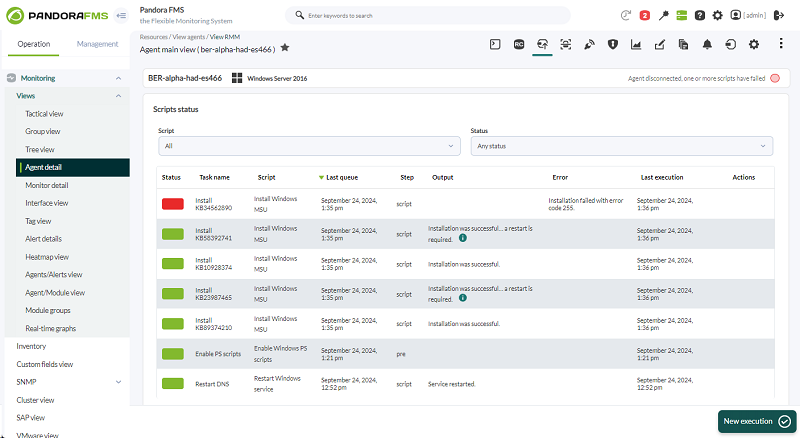
To do this, from Agent list or Heatmap you may access the Agent details view of the chosen agent by clicking on its name. Default view without any execution created:
To add executions to the agent, just click on New execution and the execution creation form will open.
Here you may use the first drop-down list to filter according to your operating system (organizational data). Then, with the Scripts drop down list you may choose which script will be used by the execution you are creating.
Afterwards, the name of the execution and its type of programming may be indicated:
- Only once: It will add the execution right away to the queue, so it will be executed immediately after its creation and as soon as the RMM agent reads the execution in the server. They will be visible in the Queues view.
- Schedule: It will show drop-downs to select, in cron format, when the execution will take place. Until the indicated time elapses, this type of executions will not appear in the Queues view but will always be visible and editable from the Schedules view.
Depending on the chosen script, its inputs, if any, will appear. String ones will let you fill in the text as needed, and resource ones will offer the list of RMM resources uploaded to the environment.
In addition, if the Tip field is filled in by configuring the inputs, it will display the help message:
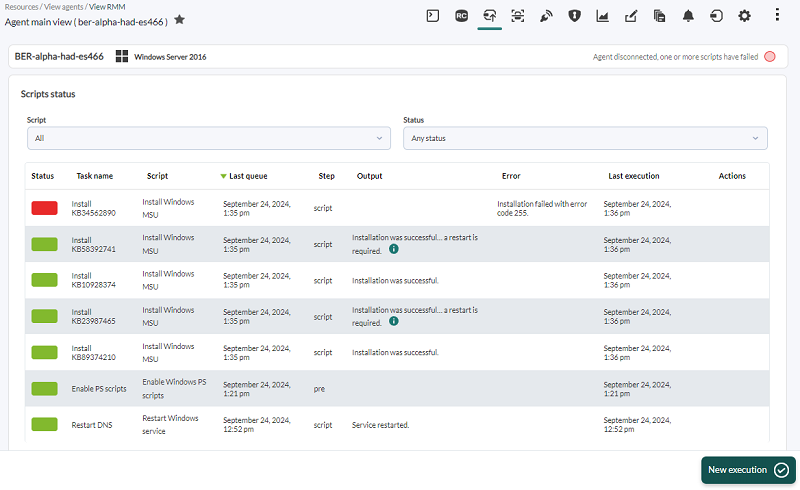
After finishing the configuration for execution, click Confirm to save. It will be listed in the Agent details view:
The executions will be automatically grouped by task name and script, so that if there are executions at different times that share name and script, their execution histories will be merged and will be visible by clicking on the Execution history button that appears in the Actions column of the table.
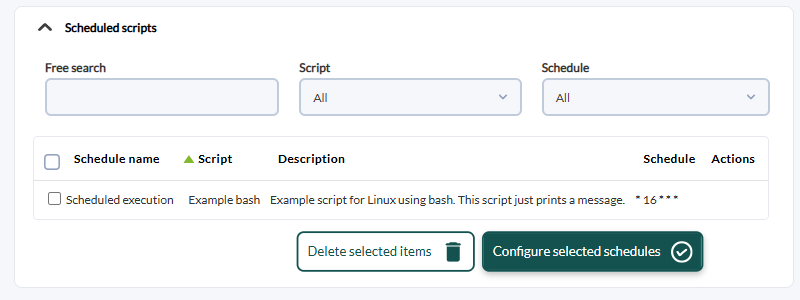
As for the scheduled runs, they will appear in the lower table and their consecutive runs will only appear when the time indicated in the Cron section goes by.
Queues
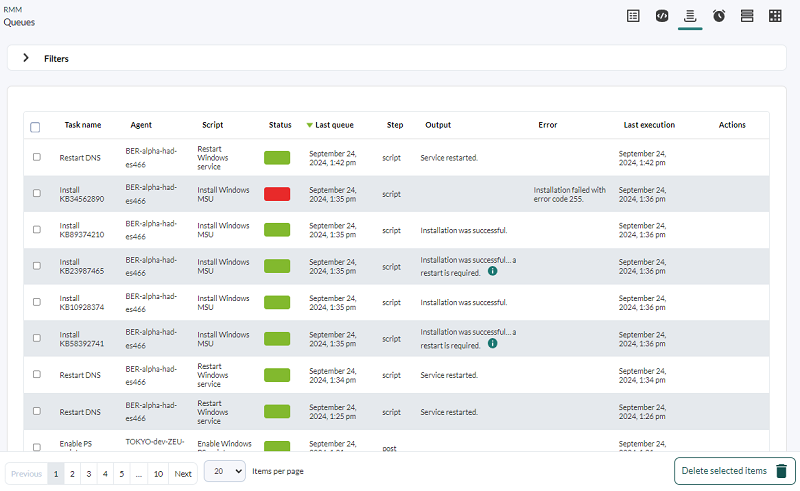
In this view you may find all the consecutive runs in the environment together with a series of data that will help to identify them.
A number of filters will help to limit the data displayed, such as Free search (will search in the columns Task name, agent, script, step, output, error) and filters by scripts, status, last queue, step.
In addition, there are actions in the table to open the execution detail or to delete it from the queue. If it was not executed yet, this will prevent its future execution If it was executed, it will just be deleted both from the list of RMM agent executions and from the queue view.
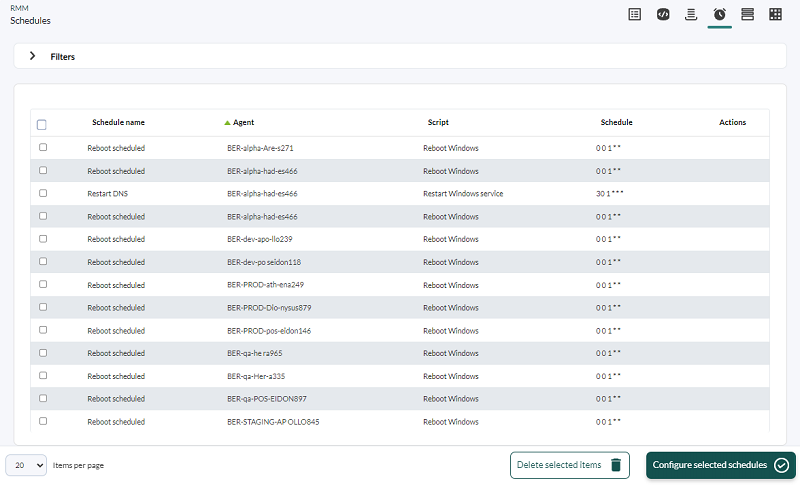
Schedules
To display the scheduled executions:
Filters may be used to search by agent, script or specified cron schedules. It is also possible to edit tasks or delete them.


 Home
Home

