Table of Contents
IPAM: IP Address Management
We are working on the translation of the Pandora FMS documentation. Sorry for any inconvenience.
Introduction
![]() With the IPAM extension (version 731 or later) you can manage the IP addresses of the networks in charge, discover the hosts in a subnet and detect their changes in availability (whether they respond to ping command or not) or host name (obtained by DNS). Additionally, it can detect your operating system.
With the IPAM extension (version 731 or later) you can manage the IP addresses of the networks in charge, discover the hosts in a subnet and detect their changes in availability (whether they respond to ping command or not) or host name (obtained by DNS). Additionally, it can detect your operating system.
IP address management is independent of whether or not you have Software Agents installed on those machines or a Agent with remote monitors about that IP. You can optionally “associate” an Agent to the IP address and manage that IP address, but it does not affect the monitoring you are performing on it.
IP address detection
You can configure a network (using a network and a netmask) to perform address recognition from time to time or only do it manually. This mechanism uses the Recon Server (NetScan), but manages it automatically.
- For correct operation it is important that you make sure you have the xprobe and fping packages installed; see the documentation on installing Pandora FMS for more details on this.
- Operating system detection is always approximate and based on xprobe. For greater accuracy in the results use nmap.
- Detection in virtual environments is difficult because the hypervisor used must forward the packets exactly and correctly to the hosted device (virtual machine).
- On Ubuntu server 22 this PFMS IPAM feature is still in the experimental phase.
IP addresses with Agents installed
After being created in the IPAM control panel, the first time the network is detected Pandora FMS will search for the IP addresses of that network. If it detects that the IP address is operational, it will manage it. If it does not respond to the ping command, it will leave it as unmanaged. Any managed IP address that changes state (stops responding to ping) will generate an event in the system. You can manually manage those IP addresses you want, editing them to give them an alias or hostname, a description or even force your operating system.
It requires special mention that when IPAM detects an IP address that has a Software Agent installed and has that IP address assigned, it allows it to be explicitly identified.
Views
Sites
Note that deleting a root site or subnode with another subnode(s) will break the entire related chain.
Management menu → Admin tools → IPAM → Sites tab.
It allows you to edit network sites (by clicking on name, Name column), delete with the corresponding trash icon and create new network sites with the Create button.
To create a new network location, type the name, by default the Parent field will be unselected, indicating that it is a root site. If it is a node, select either a root site or another node. Press the Create button again to save the new network site. The editing process is similar but uses the Update button.
If you repeat a name (case-insensitive) it will be duly indicated when saving or updating a record.
Network locations
Management menu → Admin tools → IPAM → Network locations tab.
Allows you to edit network locations (click on name, Name column), delete with the corresponding trash icon (or multiple delete by selecting each line and then pressing the Delete button) and create new network locations with the Create. button
To create a new network location, type the name and press the Create button again. The editing process is similar but uses the Update button.
- If you repeat a name (case-insensitive) it will be duly indicated when saving or updating a record.
- To know the identifier of each location, place the pointer over the name of the location and look at the last number of the link.
Operation view
Management menu → Admin tools → IPAM → Operation view tab.
Allows you to view the created networks, view their IP addresses, modify or delete them.arlas.
By clicking on each of the elements in the first Network column or on its corresponding icon in the Action column you will be able to enter the Addresses view (Address view); To delete click on the trash icon located in the same column.
You can search by text in the Search field (by name, CIDR network address or description) and/or by network location (Location ) and/or by network site (Site) and/or by network virtual (Vlan) and then press the Search button to refine the results.
Creating an IPAM network
- Operating system detection is always approximate and based on xprobe. For greater accuracy in the results use nmap.
- On Ubuntu server 22 this PFMS IPAM feature is still in the experimental phase.
- It is accessed through the menu Management → Admin tools → IPAM. To create a new network click on the Create button and fill in the following fields:
- Network: Network in IP address/mask (CIDR) format.
- Discovery server: Server in charge of this task.
If you need to assign this task to a Satellite server, select the value None.
- Lightweight mode: Much faster network exploration without performing hostname or operating system detection of the detected hosts.
- Group: Target group for monitoring agent.
- Scan interval: Time period (in days) for automatic checking. Set zero if you want to do it manually.
- Operator users: Network operator users. Only users of type superadmin or with Pandora Administrator (PM) rights can create or modify networks. See also ACL Enterprise.
- Press the Create button again to save the network.
Once you have created an IPAM network, using the Addresses view icon you will have access to the Edit view, Address view and Mass operations view.
Import via CSV file
Starting with version NG 758, this information can be imported from values files separated by commas ( .csv format). The order is as follows:
network,network name,description,location(ID),group(ID),monitoring(0 or 1),lightweight mode(0 or 1),scan interval(days),recon server(ID)
Address View
The operation and management of subnet addresses are separated into two types of views: editing view and icon view.
With this view you get information about the subnet, including statistics on the percentage and number of addresses used (marked as managed). You can also export the list to a comma-separated (CSV) format that you can open with any spreadsheet program for editing. The IP addresses will be displayed in the form of an icon, and you can choose between two sizes: small (by default) and large.
Each IP address has a link at the bottom right to edit it, if you have sufficient privileges. If you click on the main icon, a modal window will open with all the information of the IP address, including Agent and associated operating system, configuration, etc. and you can also ping that address.
The ping is done from the machine where the Pandora FMS Console is installed.
Edit View
If you have sufficient permissions you will be able to access the edit view, where the IP addresses will appear as a list. You can filter to show the desired addresses, make changes to them and update all at once.
Some fields are automatically populated by the recognition script, such as the hostname, the associated Pandora FMS Agent, and the operating system. You can define these fields as manual and edit them.
Fields marked as manual will not be updated by the recognition script.
Other fields that you can modify are:
- Activate events for an address: When the availability of these addresses changes (stops responding or responds again) or their name changes, an event will be generated. When an address is created the first time, it will always raise an event.
- Mark an address as managed: These addresses will be the ones that we recognize as assigned on our network. You can filter the IP addresses to only show those marked as managed.
- Disable: Disabled IP addresses will not be checked by the handshake script.
Bulk Operations View
Management menu → Admin tools → IPAM → Operation view tab → click on Addresses view of each item → Massive operations.
There is an option to manage IP addresses in bulk, helping the user to manage large groups of IP addresses.
Filters
In the Manage addresses and Addresses view views, Filter options option, you can sort by IP addresses, Hostname and by the last time they were checked.
It is also possible to filter by a free string which will search for substrings in the IP address, Hostname or Comments. Activating the checkbox next to the search box will perform an exact search by IP address.
- By default unresponsive hosts are not shown, but can be enabled.
- You can also display only IP addresses that you have marked as managed.
Subnet Calculator
IPAM includes a tool to calculate IPV4 and IPv6 subnets.
In this tool you can, from an IP address and the mask of the network to which it belongs, obtain information about said subnet:
- Network (Address/Bitmask).
- Netmask.
- The Wildcard mask.
- The network address.
- The Broadcast address.
- First valid IP address.
- Last valid IP address.
- Number of IP addresses on the network.
These fields are given in address format (decimal for IPv4 and hexadecimal for IPv6) and in binary format.
Creation of reconnaissance tasks and Discovery server
The IPAM module uses the Net Scan system of Discovery server. The IPAM type tasks that you see in the Discovery Task Lists are created by the IPAM handshake task and you should not manually create or delete IPAM handshake tasks.
For more information on how to run a reconnaissance, see the Discovery section.
IPAM VLAN
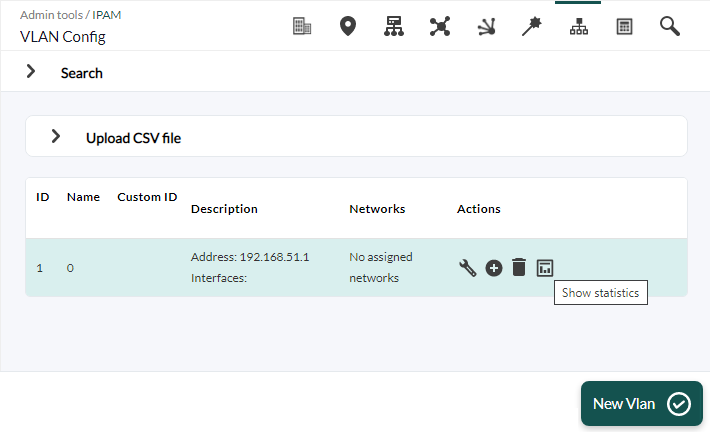
Management menu → Admin tools → IPAM → Vlan config tab → New Vlan.
To create a new VLAN, a unique name must be entered as a requirement and a description as an option.
For NG versions 758 to 760, this information can be imported from CSV files in this order:
VLAN network, VLAN description
From version NG 761 onwards:
VLAN network, VLAN description, VLAN custom ID
Once created, it can be consulted from the list of created VLANs, where the following information is shown:
- Name: VLAN name.
- Description: VLAN description.
- Networks: Networks assigned to VLAN: If no network is assigned, displays the message “Not assigned networks”.
Operations:
![]() Delete VLAN: If a VLAN is deleted, a confirmation message will be displayed.
Delete VLAN: If a VLAN is deleted, a confirmation message will be displayed.
![]() Statistics: Link to the VLAN statistics view.
Statistics: Link to the VLAN statistics view.
- If there are available networks: A selector like the one shown below will appear, where you can select one or more networks.
- If there are no available networks: An informational message will appear.
A network can only belong to one VLAN.
IPAM Vlan Statistics
To obtain information about a VLAN, there is a view that shows its statistics.
These statistics can be exported in CSV and XLS format.
Wizard IPAM Vlan
Management menu → Admin tools → IPAM → Vlan wizard tab.
This view allows you to create a VLAN over SNMP. In order to execute the SNMP query, it is mandatory to enter address, community and version. Once entered, a list will be displayed with all the VLANs available for that address. If the VLAN has not been created, a check box will appear to select it for subsequent creation, adding data such as description, address and its interfaces.
IPAM Supernet
Management menu → Admin tools → IPAM → Supernet config tab → New supernet.
- Supernet: This name field is required and must be unique.
- Address: Initial IP address. Obligatory field.
- Mask: Network mask. Obligatory field.
Starting with version NG 758, this information can be imported from CSV files in this order:
name, description, address, mask, subnetting mask
Once created, it can be consulted from the list of created supernets, operations:
- If there are available networks: A selector like the one shown below will appear, where you can select one or more networks.
- A new network can be created from the selector using the Next network option. If a subnet mask has been added, the next available network will be selected by default.
- If there are no available networks: An informational message will appear.
It is important to know that a network cannot belong to two different supernets.
IPAM Supernet Map
Management menu → Admin tools → IPAM → Supernet map tab.
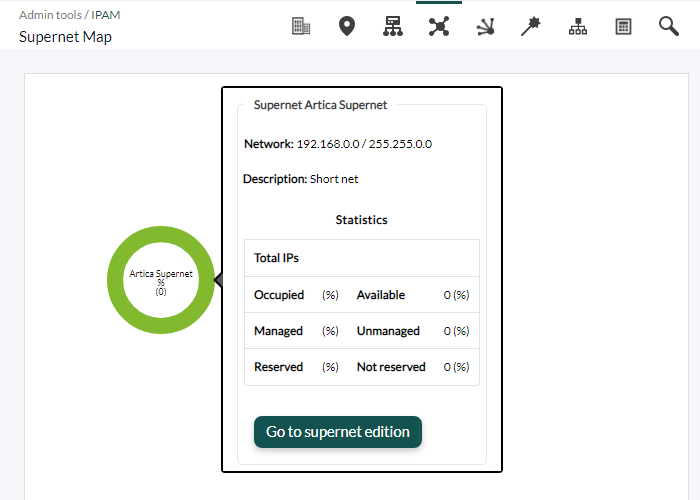
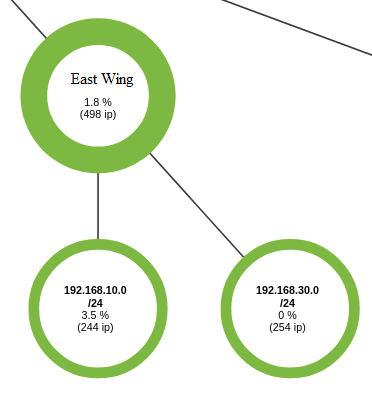
Networks and supernets will be represented as nodes. The difference between the two is that supernets have a thicker edge.
Interior of each node:
- Network or supernet name.
- Percentage of occupation.
- Number of available IP addresses.
In the Setup of Pandora FMS, in the Enterprise part, the critical and warning thresholds can be configured, showing the nodes in red for critical and orange for warning.
Supernet treeview
Management menu → Admin tools → IPAM → Supernet Treeview tab.
The Supernet tree view shows all the supernets created in a simplified graphical way, clicking on the respective icon will show a pop-up window with additional information and the possibility of modifying said element in another tab of the web browser.
IPAM network usage monitoring
The new IPAM system allows the creation of reports, graphs, generation of alerts, etc. To do this, it will be necessary for the network you want to monitor to have the Monitoring option activated, as well as the group assignment option.
This will create an agent in Pandora FMS whose name will be IPAM_<network name>, whose Modules will have the following information:
- Total number of available IP addresses.
- Total number of free IP addresses (unassigned).
- Total number of occupied IP addresses (assigned, reserved).
- Total number of reserved IP addresses.
- Percentage of free IP addresses (free/available).
IPAM for DHCP Server
The tool Pandora FMS IPAM DHCP provides DHCP Monitoring Modules for an MS Windows® DHCP server and complements the information displayed in the IPAM extension.
- A collection must be created in the Pandora FMS Console.
- The IPAM Agent tool is added to the collection and the collection is rebuilt.
- The collection is assigned to the Pandora FMS Agent of the Windows® DHCP server.
- The execution is recorded in the Add-ons tab in the Pandora FMS Agent administration:
%ProgramFiles%\pandora_agent\collections\ipam\ipam_agent_tool.exe
After a while, the file will be transferred to the Agent and run, providing the following modules:
- [network] DHCP usage.
- [network] DHCP IP addresses available.
- [network] DHCP free IP addresses.
- [network] DHCP assigned IP addresses.
- [network] DHCP reserved IP addresses.
The information provided in the IPAM extension is not overwritten if the destination IP addresses are in “managed” state.


