# Zendesk

# Introducción

Plugin para gestionar tickets en zendesk. Con este script se pueden crear, actualizar y eliminar tickets de este sistema, desde terminal o desde PandoraFMS.

# Matriz de compatibilidad

<table border="1" id="bkmrk-sistemas-donde-se-ha" style="border-collapse: collapse; width: 100%; height: 84px;"><tbody><tr style="height: 28px;"><td style="width: 50%; height: 28px;">**Sistemas donde se ha probado**</td><td style="width: 50%; height: 28px;">CentOS 7, Fedora

</td></tr><tr style="height: 28px;"><td style="width: 50%; height: 28px;">**Sistemas donde debería funcionar**</td><td style="width: 50%; height: 28px;">Cualquier sistema linux

</td></tr></tbody></table>

# Pre requisitos

Se requiere:

- Habilitar autenticación API
- **\*** Python3
- **\*** Librería requests

**\* En la versión binaria del plugin no son necesarias estas dependencias puesto que ya vienen incluidas en el.**

# Configuración

Se tiene que habilitar el acceso a la api con contraseña en zendesk o el de acceso con token. Estas opciones estarán en administrador &gt; API.

[![image-1641399760071.png](https://pandorafms.com/guides/public/uploads/images/gallery/2022-01/scaled-1680-/image-1641399760071.png)](https://pandorafms.com/guides/public/uploads/images/gallery/2022-01/image-1641399760071.png)

# Parámetros

**Parámetros**

<table border="1" id="bkmrk-method--m-get%2Cpost%2Cp"><tbody><tr><td>Method</td><td>-m</td><td>get,post,put o delete</td></tr><tr><td>host</td><td>-i, --ip</td><td>nombre de tu sitio zendesk</td></tr><tr><td>user</td><td>-us</td><td>nombre de tu usuario (email)</td></tr><tr><td>password</td><td>-p</td><td>password del usuario</td></tr><tr><td>token</td><td>-t </td><td>token de la API</td></tr><tr><td>ticket name</td><td>-tn</td><td>nombre del ticket</td></tr><tr><td>ticket comment</td><td>-tb</td><td>contenido (texto) del ticket</td></tr><tr><td>ticket id</td><td>-id</td><td>id del ticket</td></tr><tr><td>ticket status</td><td>-ts</td><td>new,open,hold, pending,solved o closed</td></tr><tr><td>ticket priority</td><td>-tp</td><td>urgent,high,normal o low</td></tr><tr><td>ticket type</td><td>-tt</td><td>problem, incident,question, task</td></tr></tbody></table>

**Métodos**

Get para listar, post para crear ticket, put para actualizar ticket y delete para borrar ticket .

# Crear ticket

**Parámetros**

<table border="1" id="bkmrk-method--m-get%2Cpost%2Cp" style="border-collapse: collapse; width: 100%; height: 290px;"><tbody><tr style="height: 29px;"><td style="width: 33.3333%; height: 29px;">Method</td><td style="width: 33.3333%; height: 29px;">-m</td><td style="width: 33.3333%; height: 29px;">get,post,put o delete</td></tr><tr style="height: 29px;"><td style="width: 33.3333%; height: 29px;">host</td><td style="width: 33.3333%; height: 29px;">-i, --ip</td><td style="width: 33.3333%; height: 29px;">nombre de tu sitio zendesk</td></tr><tr style="height: 29px;"><td style="width: 33.3333%; height: 29px;">user</td><td style="width: 33.3333%; height: 29px;">-us</td><td style="width: 33.3333%; height: 29px;">nombre de tu usuario (email)</td></tr><tr style="height: 29px;"><td style="width: 33.3333%; height: 29px;">password</td><td style="width: 33.3333%; height: 29px;">-p</td><td style="width: 33.3333%; height: 29px;">pass de la API</td></tr><tr><td style="width: 33.3333%;">token</td><td style="width: 33.3333%;">-t </td><td style="width: 33.3333%;">token de la API</td></tr><tr style="height: 29px;"><td style="width: 33.3333%; height: 29px;">ticket name</td><td style="width: 33.3333%; height: 29px;">-tn</td><td style="width: 33.3333%; height: 29px;">nombre del ticket</td></tr><tr style="height: 29px;"><td style="width: 33.3333%; height: 29px;">ticket comment</td><td style="width: 33.3333%; height: 29px;">-tb</td><td style="width: 33.3333%; height: 29px;">contenido (texto) del ticket</td></tr><tr style="height: 29px;"><td style="width: 33.3333%; height: 29px;">ticket id</td><td style="width: 33.3333%; height: 29px;">-id</td><td style="width: 33.3333%; height: 29px;">id del ticket</td></tr><tr style="height: 29px;"><td style="width: 33.3333%; height: 29px;">ticket status</td><td style="width: 33.3333%; height: 29px;">-ts</td><td style="width: 33.3333%; height: 29px;">new,open,hold, pending,solved o closed</td></tr><tr style="height: 29px;"><td style="width: 33.3333%; height: 29px;">ticket priority</td><td style="width: 33.3333%; height: 29px;">-tp</td><td style="width: 33.3333%; height: 29px;">urgent,high,normal o low</td></tr><tr style="height: 29px;"><td style="width: 33.3333%; height: 29px;">ticket type</td><td style="width: 33.3333%; height: 29px;">-tt</td><td style="width: 33.3333%; height: 29px;">problem, incident,question, task</td></tr></tbody></table>

Se podrá autenticar en la API con token o pass según lo tengas configurado en zendesk. Para ello introduce el argumento necesario.

Las opciones de creación de grupo son : nombre, comentario (cuerpo del mensaje), status, prioridad y tipo.

La id se le asigna al ticket automáticamente.

Ejemplo de creación de ticket con ejecución manual.

```
./pandora_zendesk -m post  -i pandoraplugin -us <email> -p <password> -tn "manual" -tb "esto es el contenido de la incidencia" -tp urgent -tt "question" -ts new
```

Ese comando creara el siguiente ticket :

[![image-1641400983333.png](https://pandorafms.com/guides/public/uploads/images/gallery/2022-01/scaled-1680-/image-1641400983333.png)](https://pandorafms.com/guides/public/uploads/images/gallery/2022-01/image-1641400983333.png)

[![image-1641401007730.png](https://pandorafms.com/guides/public/uploads/images/gallery/2022-01/scaled-1680-/image-1641401007730.png)](https://pandorafms.com/guides/public/uploads/images/gallery/2022-01/image-1641401007730.png)

# Actualizar ticket

**Parámetros**

<table border="1" id="bkmrk-method--m-get%2Cpost%2Cp" style="border-collapse: collapse; width: 100%; height: 319px;"><tbody><tr style="height: 29px;"><td style="width: 33.3333%; height: 29px;">Method</td><td style="width: 33.3333%; height: 29px;">-m</td><td style="width: 33.3333%; height: 29px;">get,post,put o delete</td></tr><tr style="height: 29px;"><td style="width: 33.3333%; height: 29px;">host</td><td style="width: 33.3333%; height: 29px;">-i, --ip</td><td style="width: 33.3333%; height: 29px;">nombre de tu sitio zendesk</td></tr><tr style="height: 29px;"><td style="width: 33.3333%; height: 29px;">user</td><td style="width: 33.3333%; height: 29px;">-us</td><td style="width: 33.3333%; height: 29px;">nombre de tu usuario (email)</td></tr><tr style="height: 29px;"><td style="width: 33.3333%; height: 29px;">password</td><td style="width: 33.3333%; height: 29px;">-p</td><td style="width: 33.3333%; height: 29px;">pass de la API</td></tr><tr style="height: 29px;"><td style="width: 33.3333%; height: 29px;">token</td><td style="width: 33.3333%; height: 29px;">-t</td><td style="width: 33.3333%; height: 29px;">token de la API</td></tr><tr style="height: 29px;"><td style="width: 33.3333%; height: 29px;">ticket name</td><td style="width: 33.3333%; height: 29px;">-tn</td><td style="width: 33.3333%; height: 29px;">nombre del ticket</td></tr><tr style="height: 29px;"><td style="width: 33.3333%; height: 29px;">ticket comment</td><td style="width: 33.3333%; height: 29px;">-tb</td><td style="width: 33.3333%; height: 29px;">contenido (texto) del ticket</td></tr><tr style="height: 29px;"><td style="width: 33.3333%; height: 29px;">ticket id</td><td style="width: 33.3333%; height: 29px;">-id</td><td style="width: 33.3333%; height: 29px;">id del ticket</td></tr><tr style="height: 29px;"><td style="width: 33.3333%; height: 29px;">ticket status</td><td style="width: 33.3333%; height: 29px;">-ts</td><td style="width: 33.3333%; height: 29px;">new,open,hold, pending,solved o closed</td></tr><tr style="height: 29px;"><td style="width: 33.3333%; height: 29px;">ticket priority</td><td style="width: 33.3333%; height: 29px;">-tp</td><td style="width: 33.3333%; height: 29px;">urgent,high,normal o low</td></tr><tr style="height: 29px;"><td style="width: 33.3333%; height: 29px;">ticket type</td><td style="width: 33.3333%; height: 29px;">-tt</td><td style="width: 33.3333%; height: 29px;">problem, incident,question, task</td></tr></tbody></table>

Ejemplo de actualización de ticket con ejecución manual.

```
./pandora_zendesk -m put  -i pandoraplugin -us <email> -p <password> -id 19 -tn "yea22h" -tb "Comg" -tp urgent -tt "question" -ts new
```

Ese comando actualizará el siguiente el siguiente ticket :

[![image-1641400694458.png](https://pandorafms.com/guides/public/uploads/images/gallery/2022-01/scaled-1680-/image-1641400694458.png)](https://pandorafms.com/guides/public/uploads/images/gallery/2022-01/image-1641400694458.png)

# Eliminar ticket

Se borrará un ticket buscando por su id.

Ejemplo con ejecución manual

```
./pandora_zendesk -m delete -i pandoraplugin -us <email> -p <password> -id 4
```

# Configuración en PandoraFMS

**Instalación manual**

Iremos a servidores &gt; plugins:

[![servers_plugins.png](https://pandorafms.com/guides/public/uploads/images/gallery/2025-07/scaled-1680-/servers-plugins.png)](https://pandorafms.com/guides/public/uploads/images/gallery/2025-07/servers-plugins.png)

Pinchamos en añadir plugin:

[![add_plugin.png](https://pandorafms.com/guides/public/uploads/images/gallery/2025-07/scaled-1680-/add-plugin.png)](https://pandorafms.com/guides/public/uploads/images/gallery/2025-07/add-plugin.png)

Le ponemos en nombre y la descripción que se prefiera

Metemos como comando la ejecución con la ruta del plugin:

```
/path pandora_zendesk
```

<p class="callout info align-center">Recuerda que la ruta recomendada para el uso de los plugins de servidor es: /usr/share/pandora\_server/util/plugin/</p>

Como parámetros configuraremos los campos "\_field\_" que son macros que definiremos abajo. Repasa las secciones "crear ticket", "editar ticket" y "borrar ticket" para configurar los parámetros según tus necesidades.

Una vez hecho esto, daremos a "crear".

**Configuración en agente**

Una vez hecho esto, solo queda llamarlo por lo que iremos a la vista de algún agente y crearemos un módulo de complementos:

[![Captura desde 2025-07-21 11-51-43.png](https://pandorafms.com/guides/public/uploads/images/gallery/2025-07/scaled-1680-/captura-desde-2025-07-21-11-51-43.png)](https://pandorafms.com/guides/public/uploads/images/gallery/2025-07/captura-desde-2025-07-21-11-51-43.png)
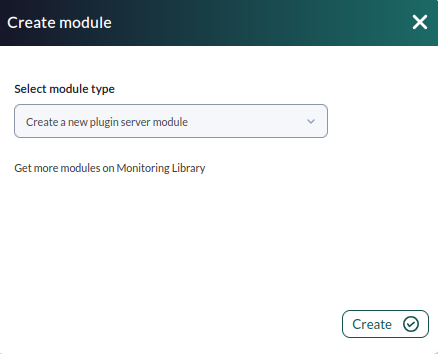
Le daremos un nombre y en el apartado "plugin" pondremos el que acabamos de configurar.

Una vez hecho esto, damos a crear.

Si el modulo se muestra con 1, quiere decir que se esta ejecutando correctamente