# Zendesk plugin

# Introduction

Plugin for managing tickets in Zendesk. With this script, you can create, update, and delete tickets from this system, either from the terminal or from PandoraFMS.

# Compatibility matrix

<table border="1" id="bkmrk-sistemas-donde-se-ha" style="width: 767px;"><tbody><tr><td style="width: 229px;">**Systems where it has been tested**</td><td style="width: 538px;">CentOS 7, Fedora

</td></tr><tr><td style="width: 229px;">**Systems where it should work**</td><td style="width: 538px;">Any linux system

</td></tr></tbody></table>

# Pre requisites

Required:

- Enable API authentication
- **\*** Python3
- **\*** Module requests

**\* In the binary version of the plugin it is not necessary to install these dependencies, since they are already included in the plugin.**

# Configuration

You have to enable password access to the api in zendesk or token access. These options can be found in administrator &gt; API.

[![image-1643040019199.png](https://pandorafms.com/guides/public/uploads/images/gallery/2022-01/scaled-1680-/image-1643040019199.png)](https://pandorafms.com/guides/public/uploads/images/gallery/2022-01/image-1643040019199.png)

# Parameters

**Parameters**

<table border="1" id="bkmrk-method--m-get%2Cpost%2Cp"><tbody><tr><td>Method</td><td>-m</td><td>get,post,put o delete</td></tr><tr><td>host</td><td>-i, --ip</td><td>name zendesk site</td></tr><tr><td>user</td><td>-us</td><td>name user (email)</td></tr><tr><td>password</td><td>-p</td><td>password</td></tr><tr><td>token</td><td>-t </td><td>token +API</td></tr><tr><td>ticket name</td><td>-tn</td><td>name ticket</td></tr><tr><td>ticket comment</td><td>-tb</td><td>content ticket</td></tr><tr><td>ticket id</td><td>-id</td><td>id ticket</td></tr><tr><td>ticket status</td><td>-ts</td><td>new,open,hold, pending,solved o closed</td></tr><tr><td>ticket priority</td><td>-tp</td><td>urgent,high,normal o low</td></tr><tr><td>ticket type</td><td>-tt</td><td>problem, incident,question, task</td></tr></tbody></table>

**Methods**

Get to list, post to create ticket, put to update ticket and delete to delete ticket.

# Create ticket

**Parameters**

<table border="1" id="bkmrk-method--m-get%2Cpost%2Cp" style="border-collapse: collapse; width: 100%; height: 319px;"><tbody><tr style="height: 29px;"><td style="width: 33.3333%; height: 29px;">Method</td><td style="width: 33.3333%; height: 29px;">-m</td><td style="width: 33.3333%; height: 29px;">get,post,put o delete</td></tr><tr style="height: 29px;"><td style="width: 33.3333%; height: 29px;">host</td><td style="width: 33.3333%; height: 29px;">-i, --ip</td><td style="width: 33.3333%; height: 29px;">name site zendesk</td></tr><tr style="height: 29px;"><td style="width: 33.3333%; height: 29px;">user</td><td style="width: 33.3333%; height: 29px;">-us</td><td style="width: 33.3333%; height: 29px;">name user (email)</td></tr><tr style="height: 29px;"><td style="width: 33.3333%; height: 29px;">password</td><td style="width: 33.3333%; height: 29px;">-p</td><td style="width: 33.3333%; height: 29px;">pass API</td></tr><tr style="height: 29px;"><td style="width: 33.3333%; height: 29px;">token</td><td style="width: 33.3333%; height: 29px;">-t </td><td style="width: 33.3333%; height: 29px;">token API</td></tr><tr style="height: 29px;"><td style="width: 33.3333%; height: 29px;">ticket name</td><td style="width: 33.3333%; height: 29px;">-tn</td><td style="width: 33.3333%; height: 29px;">name ticket</td></tr><tr style="height: 29px;"><td style="width: 33.3333%; height: 29px;">ticket comment</td><td style="width: 33.3333%; height: 29px;">-tb</td><td style="width: 33.3333%; height: 29px;">content ticket</td></tr><tr style="height: 29px;"><td style="width: 33.3333%; height: 29px;">ticket id</td><td style="width: 33.3333%; height: 29px;">-id</td><td style="width: 33.3333%; height: 29px;">id ticket</td></tr><tr style="height: 29px;"><td style="width: 33.3333%; height: 29px;">ticket status</td><td style="width: 33.3333%; height: 29px;">-ts</td><td style="width: 33.3333%; height: 29px;">new,open,hold, pending,solved o closed</td></tr><tr style="height: 29px;"><td style="width: 33.3333%; height: 29px;">ticket priority</td><td style="width: 33.3333%; height: 29px;">-tp</td><td style="width: 33.3333%; height: 29px;">urgent,high,normal o low</td></tr><tr style="height: 29px;"><td style="width: 33.3333%; height: 29px;">ticket type</td><td style="width: 33.3333%; height: 29px;">-tt</td><td style="width: 33.3333%; height: 29px;">problem, incident,question, task</td></tr></tbody></table>

You can authenticate in the API with token or pass as you have configured it in zendesk. To do so, enter the required argument.

The group creation options are: name, comment (message body), status, priority and type.

The id is automatically assigned to the ticket.

  
Example of ticket creation with manual execution.

```
./pandora_zendesk -m post  -i pandoraplugin -us <email> -p <password> -tn "manual" -tb "esto es el contenido de la incidencia" -tp urgent -tt "question" -ts new
```

That command will create the following ticket :

[![image-1641400983333.png](https://pandorafms.com/guides/public/uploads/images/gallery/2022-01/scaled-1680-/image-1641400983333.png)](https://pandorafms.com/guides/public/uploads/images/gallery/2022-01/image-1641400983333.png)

[![image-1641401007730.png](https://pandorafms.com/guides/public/uploads/images/gallery/2022-01/scaled-1680-/image-1641401007730.png)](https://pandorafms.com/guides/public/uploads/images/gallery/2022-01/image-1641401007730.png)

# Update ticket

**Parameters**

<table border="1" id="bkmrk-method--m-get%2Cpost%2Cp" style="border-collapse: collapse; width: 100%; height: 319px;"><tbody><tr style="height: 29px;"><td style="width: 33.3333%; height: 29px;">Method</td><td style="width: 33.3333%; height: 29px;">-m</td><td style="width: 33.3333%; height: 29px;">get,post,put o delete</td></tr><tr style="height: 29px;"><td style="width: 33.3333%; height: 29px;">host</td><td style="width: 33.3333%; height: 29px;">-i, --ip</td><td style="width: 33.3333%; height: 29px;">name site zendesk</td></tr><tr style="height: 29px;"><td style="width: 33.3333%; height: 29px;">user</td><td style="width: 33.3333%; height: 29px;">-us</td><td style="width: 33.3333%; height: 29px;">name user (email)</td></tr><tr style="height: 29px;"><td style="width: 33.3333%; height: 29px;">password</td><td style="width: 33.3333%; height: 29px;">-p</td><td style="width: 33.3333%; height: 29px;">pass API</td></tr><tr style="height: 29px;"><td style="width: 33.3333%; height: 29px;">token</td><td style="width: 33.3333%; height: 29px;">-t</td><td style="width: 33.3333%; height: 29px;">token API</td></tr><tr style="height: 29px;"><td style="width: 33.3333%; height: 29px;">ticket name</td><td style="width: 33.3333%; height: 29px;">-tn</td><td style="width: 33.3333%; height: 29px;">name ticket</td></tr><tr style="height: 29px;"><td style="width: 33.3333%; height: 29px;">ticket comment</td><td style="width: 33.3333%; height: 29px;">-tb</td><td style="width: 33.3333%; height: 29px;">content ticket</td></tr><tr style="height: 29px;"><td style="width: 33.3333%; height: 29px;">ticket id</td><td style="width: 33.3333%; height: 29px;">-id</td><td style="width: 33.3333%; height: 29px;">id ticket</td></tr><tr style="height: 29px;"><td style="width: 33.3333%; height: 29px;">ticket status</td><td style="width: 33.3333%; height: 29px;">-ts</td><td style="width: 33.3333%; height: 29px;">new,open,hold, pending,solved o closed</td></tr><tr style="height: 29px;"><td style="width: 33.3333%; height: 29px;">ticket priority</td><td style="width: 33.3333%; height: 29px;">-tp</td><td style="width: 33.3333%; height: 29px;">urgent,high,normal o low</td></tr><tr style="height: 29px;"><td style="width: 33.3333%; height: 29px;">ticket type</td><td style="width: 33.3333%; height: 29px;">-tt</td><td style="width: 33.3333%; height: 29px;">problem, incident,question, task</td></tr></tbody></table>

Example of a ticket update with manual execution.

```
./pandora_zendesk -m put  -i pandoraplugin -us <email> -p <password> -id 19 -tn "yea22h" -tb "Comg" -tp urgent -tt "question" -ts new
```

This command will update the following ticket :

[![image-1641400694458.png](https://pandorafms.com/guides/public/uploads/images/gallery/2022-01/scaled-1680-/image-1641400694458.png)](https://pandorafms.com/guides/public/uploads/images/gallery/2022-01/image-1641400694458.png)

# Delete ticket

A ticket will be deleted by searching for its id.

Example with manual execution

```
./pandora_zendesk -m delete -i pandoraplugin -us <email> -p <password> -id 4
```

# Configuration in PandoraFMS

**Manual installation**

Go to servers &gt; plugins:

[![servers_plugins.png](https://pandorafms.com/guides/public/uploads/images/gallery/2025-07/scaled-1680-/servers-plugins.png)](https://pandorafms.com/guides/public/uploads/images/gallery/2025-07/servers-plugins.png)

Click on add plugin:

[![add_plugin.png](https://pandorafms.com/guides/public/uploads/images/gallery/2025-07/scaled-1680-/add-plugin.png)](https://pandorafms.com/guides/public/uploads/images/gallery/2025-07/add-plugin.png)

We put in name and the description that you prefer.

We put as command the execution with the path of the plugin:

```
/path pandora_zendesk
```

<p class="callout info align-center">Remember that the recommended path for the use of the server plugins is: /usr/share/pandora\_server/util/plugin/</p>

We enter the path to the plugin as a command, and as parameters we will configure the “\_field\_” fields, which are macros that we will define below. Review the “create ticket,” “edit ticket,” and “delete ticket” sections to configure the parameters according to your needs.

Once this is done, click on “create”.

**Agent configuration**

Once this is done, the only thing left to do is to call it, so we will go to some agent's view and create an add-on module:

[![Captura desde 2025-07-21 11-51-43.png](https://pandorafms.com/guides/public/uploads/images/gallery/2025-07/scaled-1680-/captura-desde-2025-07-21-11-51-43.png)](https://pandorafms.com/guides/public/uploads/images/gallery/2025-07/captura-desde-2025-07-21-11-51-43.png)
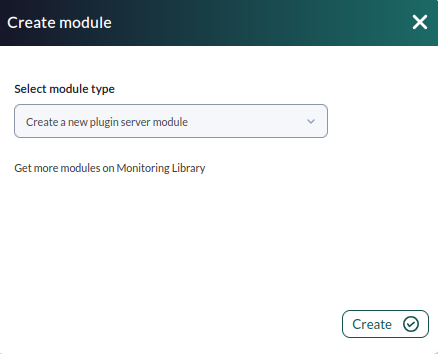
We will give it a name and in the section “plugin” we will put the one we have just configured.

Once this is done, click on create.

If the module is shown with 1, it means that it is running correctly.