SNMP remote
The purpose of this document is to describe the basic monitoring of windows and linux computers via snmp remotely using a server plugin.
and linux computers through snmp remotely using a server plugin.
This plugin shows us the information of % RAM memory in use, % of disk or filesystem in use,
status of a process / service, % total CPU.
Through the SNMP OIDs we can get the free size in bytes of RAM or % on disk, but with this plugin we can get the % of CPU total.
with this plugin we can get the % remotely.
- Introduction
- Requisites
- Compatibility matrix
- Software module generated by the plugin
- Execution
- Crontab configuration
Introduction
This document aims to describe the basic monitoring of windows and linux computers by snmp remotely using a server plugin.
This plugin shows us the information of % RAM memory in use, % disk or filesystem in use, status of a process / service, % total CPU.
Through the SNMP OIDs we can get the free size in bytes of RAM or % on disk, but with this plugin we can get the % remotely.
Requisites
The plugin has as requirements to be able to work:
-Have remote snmp enabled with access from the Pandora server.
-netsnmp (Essential for the Pandora server).
Compatibility matrix
The agent compatibility matrix is as follows:
| Systems where tested | Linux (SUSE,Fedora, Ubuntu...) con netsnmp |
| Systems where it should work | Any system |
Software module generated by the plugin
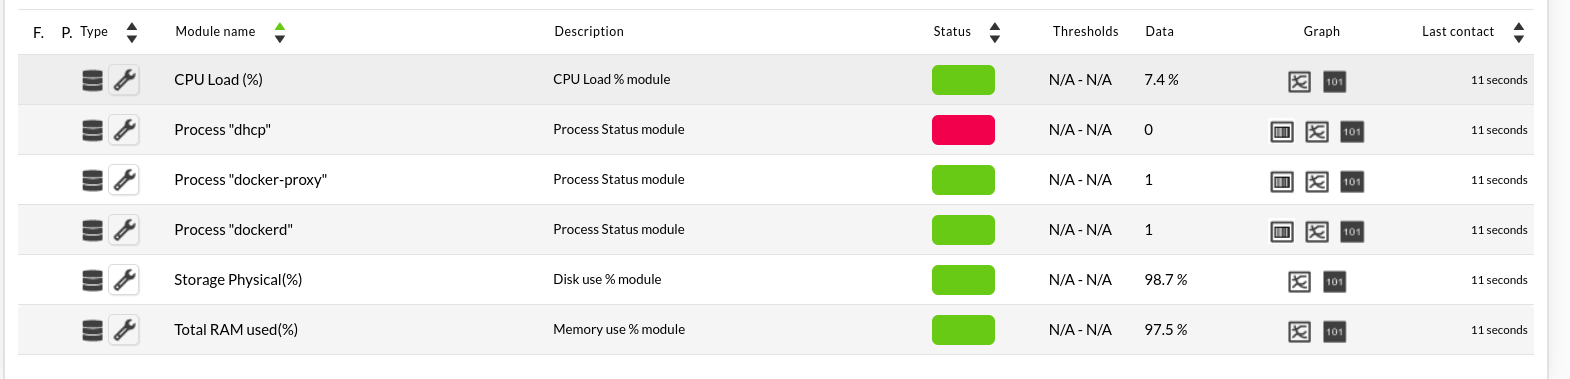
The Plugin will create an agent with 3 possible modules in its execution.
- % Mem Usage
- % CPU Usage
- % Disk use
And one module for each monitored process, defined in the conf.
Execution
Example of a conf file:
# name for the agent
agent_name=snmp_remote
# configuration (1 for activate modules)
memuse=1
diskuse=1
cpuload=1
process=1
# number of proces to monitoring, each one create a module
numberprocess=3
# name for each process
process1=dhcp
process2=dockerd
process3=docker-proxy
# transfer configuration
mode=tentacle
tentacle_ip=172.42.42.101
tentacle_port=41121
#define
as_server_plugin=1
In agent_name you specify the name for the agent, in the next 4 options you configure which modules want to be activated with 1 and the ones that are activated will create a module in the agent.
For the processes you have to specify the number of processes that are going to be monitored and below specify the name of each process in each process option, in this one by default I have put 3 but you can put as many as you want.
In transfer configuration the tentacle options.
Example of what this conf would create in pandora:
Execution

Pandorafms view

Crontab configuration
To configure the plugin, it will be necessary to create a crontab that makes an execution of the plugin every certain time.
With the crontab command we can automate tasks, as in this case, automate the execution of this script, to run every X time, configured by the user.
crontab -l → List all scheduled crontabs
crontab -r → Delete crontab
crontab -e → Create a crontab
Cron jobs follow a certain syntax, they have 5 asterisks followed by the command to run.
* * * * * command to execute.The 5 asterisks
From left to right, the asterisks represent:
1. minutes: from 0 to 59.
2. Hours: from 0 to 23.
3. Day of the month: from 1 to 31.
4. Month: from 1 to 12.
5. Day of the week: from 0 to 6, with 0 being Sunday.
If an asterisk is left, it means "every" minute, hour, day of the month, month or day of the week.
Reserved words: can be used to facilitate the use of the program.
●@monthly: run once a month.
●@weekly: once a week.
●@daily/@midnight: once a day.
●@hourly: every hour.
Therefore it will be necessary to create a crontab that executes the script when we indicate it.
* * * * * </recon_task plugin path with the necessary parameters, as in manual execution>Example of an hourly execution:
@hourly /<path snmp remote plugin> <path snmp conf> -H <host> -v 3 -u <user> -l <auth level> -a <auth method> -A <auth pass> -x <privacy method> -X <privacy pass>* Remember to define well in the conf all the parameters, the agent name, the tentacle ip to be able to send the agents of pandora...