Online Installation tool
If you have access to the Internet it is recommended to make use of this tool for online installation.
- Pandora FMS Monolith Environment (server/console/database)
- Requirements for the Use of the Online Installation Tool
- First Steps
- Enterprise License Activation
- Starting the Enterprise Server
Pandora FMS Monolith Environment (server/console/database)
This installation method is particularly useful when the environment is hosted by cloud providers, although it is not exclusive to these types of environments.
The term "Cloud provider" (or just "Cloud") is used to describe virtual machine hosting, either exclusively or shared, in specialized providers with hardware, hypervisors and customer support web systems for configuration and administration.
For any of them you can install Pandora FMS Community version. Red Hat (RHEL) 8.x is recommended as operating system although it also officially supports Rocky Linux 8.x, AlmaLinux 8.x and Ubuntu server 22.04.
The minimum hardware requirements for this installation are: 1 core, 2 gigabytes of RAM and 20 gigabytes of free disk space, preferably Solid State Drive (SSD).
These requirements are the minimum installation requirements, to properly size the monitoring environment we recommend going to the minimum hardware requirements section.
Requirements for the Use of the Online Installation Tool
- Have access to the Internet. Specific web addresses:
- For the Open version (ICMP):
- firefly.pandoafms.com
- support.pandorafms.com
- For the Open version (HTTPS):
- https://pandorafms.com
- https://firefly.pandorafms.com/pandorafms/
- https://dl.fedoraproject.org/pub/epel/epel-release-latest-8.noarch.rpm
- https://rpms.remirepo.net
- https://repo.percona.com
- http//mirror.ghettoforge.org
- https://download.oracle.com
- https://packages.microsoft.com
- https://github.com/pandorafms/
- For the Enterprise version (HTTPS):
- For the Open version (ICMP):
- In addition to these URLs, it is necessary to have access to the official repositories of the distribution used (RHEL / Rocky Linux / Ubuntu).
- Having curl installed (it comes by default in most distributions).
- Meeting the minimum hardware requirements.
- Be root admin user.
- Have a supported SO.
- In case of using RHEL 8, it will be necessary to previously activate it with a license and subscribe it to the standard repositories.
To use the online installation tool, just access the command line of your Cloud provider, and by means of the root user, run:
In you use RHEL 8.x and Rocky Linux 8.x:
curl -sSL https://pfms.me/deploy-pandora-el8 | bashIn you use Ubuntu server 22.04:
curl -SsL https://pfms.me/deploy-pandora-ubuntu | bashThere is a similar online installation tool for Pandora FMS Enterprise version that you may request if you are a user of this version through the support portal or through this link get a free trial (demo). In addition, for Satellite server installation, there is an online installation tool too.
By means of this execution, the whole stack necessary for Pandora FMS will be installed, rendering an instance fully funtional to start monitoring.
You may get more information in our video tutorial «Cloud installers (agents, server)».
Custom installation using the online installation tool
Although the previous execution performs a full environment installation, it is possible to define different modifications through the environment variables to customize the installation.
These modifiers are:
- TZ: Define the time zone (time zone) of the machine, by default it is
Europe/Madrid. - DBHOST: The database host, by default
DBHOST=127.0.0.1. - DBNAME: The database name to be created, by default
DBNAME=pandora. - DBUSER: The database user will be created, by default
DBUSER=pandora. - DBPASS: The user password that will be created, by default
DBPASS=pandora. - DBPORT: Port number of the database to be connected, by default
DBPORT=3306. - DBROOTPASS: Database root user password, by default
DBROOTPASS=pandora. - SKIP_PRECHECK: Skip the check of whether there is an prior Pandora FMS installation, useful for creating a new database and pointing the installation to that one; by default
SKIP_PRECHECK=0. - SKIP_DATABASE_INSTALL: Skip the database installation, useful for having a database installed, whether local or remote and using its credentials for creating Pandora FMS database; by default
SKIP_DATABASE_INSTALL=0. - SKIP_KERNEL_OPTIMIZATIONS: Skip the recommended kernel optimization, only for advanced users. By default
SKIP_KERNEL_OPTIMIZATIONS=0. - MYVER: Define the MySQL version to be installed, if 80 is defined MySQL 8 will be installed. By default
MYVER=57(deploy MySQL 5.7). - PHPVER: Define PHP version to be installed, if 8 is defined, PHP 8 will be installed. By default
PHPVER=7(deploy PHP 7). - PANDORA_SERVER_PACKAGE: Define the URL of the RPM package of the Pandora FMS server you wish to install. By default, the last available version is defined.
- PANDORA_CONSOLE_PACKAGE: Define the URL of the RPM package of the Pandora FMS Web console you wish to install. The latest version available is defined by default.
- PANDORA_AGENT_PACKAGE: Define the URL of the RPM package of the Pandora FMS EndPoint you wish to install. The latest version available is defined by default.
- PANDORA_BETA: If defined to
1, the packages from the latest beta version available will be installed (only for test environments). By defaultPANDORA_BETA=0(if specific packages are defined, ignore this option).
for the use of this environment variables, just define them before running the installation script, for example, in a RHEL 8 installation with defined variables run the block:
env TZ='Europe/Madrid' \
 DBHOST='127.0.0.1' \
 DBNAME='pandora' \
 DBUSER='pandora' \
 DBPASS='pandora' \
 DBPORT='3306' \
 DBROOTPASS='pandora' \
 MYVER=57 \
 PHPVER=7 \
 SKIP_PRECHECK=0 \
 SKIP_DATABASE_INSTALL=0 \
 SKIP_KERNEL_OPTIMIZATIONS=0 \
 PANDORA_SERVER_PACKAGE="https://firefly.pandorafms.com/pandorafms/latest/RHEL_CentOS/pandorafms_server-7.0NG.noarch.rpm" \
 PANDORA_CONSOLE_PACKAGE="https://firefly.pandorafms.com/pandorafms/latest/RHEL_CentOS/pandorafms_console-7.0NG.noarch.rpm" \
 PANDORA_AGENT_PACKAGE="https://firefly.pandorafms.com/pandorafms/latest/RHEL_CentOS/pandorafms_agent_linux-7.0NG.noarch.rpm" \
 PANDORA_BETA=0 \
 sh -c "$(curl -fsSL https://pfms.me/deploy-pandora-el8)"
First Steps
Once installed, the system should boot up and, after a few seconds, display the terminal to log in. The first step should be to know the IP address that the system has assigned, to be able to connect to the server from outside. To do this, type the following command in the terminal:
ifconfig
You may also use the command ip address show .
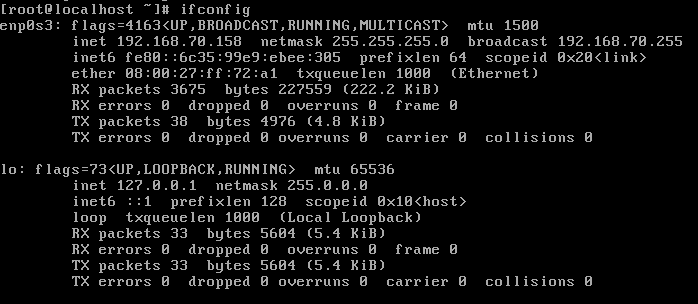
In the case of this screenshot, the IP address of the system is 192.168.70.158.
Once you know Pandora FMS system IP address, you may access it from outside the virtual machine, which is always the most convenient. It can be done via SSH or HTTP. Use the root password (superuser) that you established in the installation configuration (DBROOTPASS).
Open a web browser (Google Chrome® and Mozilla Firefox® are recommended) and type in the following address in the address bar, consisting of the IP address (x.x.x.x.x) you obtained from the server:
http://x.x.x.x/pandora_console
In the previous example, it would be
http://192.168.70.158/pandora_console
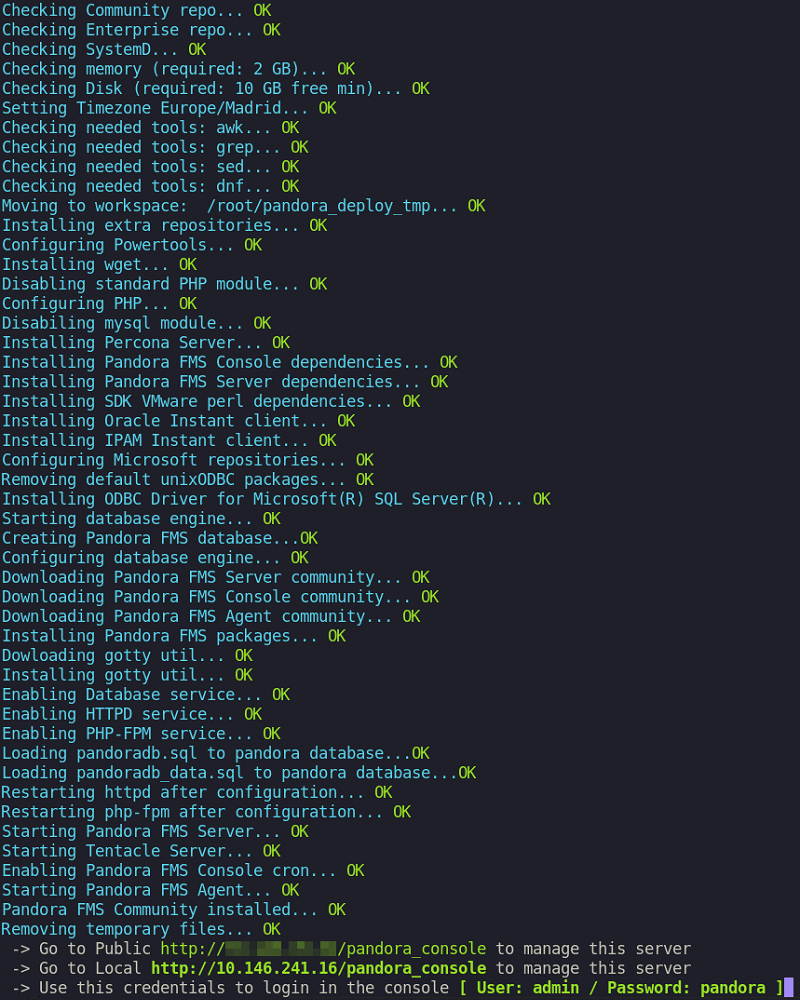
If everything is correct, access the welcome screen of Pandora FMS Console, similar to this one:


Use the default credentials: user admin and password pandora/Pandor4! .
Once here, you have a full Pandora FMS installation ready to be used.
Enterprise License Activation
This section is only for Enterprise version users. If you wish to request a demo, please contact us.
If you have a Metaconsole license, you may skip this step, since this type of license automatically activates each associated node.
It is important not to start the daemon pandora_server with the Enterprise version installed if the Console Enterprise version has not been previously activated, as that may be the cause for errors.
You may also get more information in the video tutorial "How to renew Pandora FMS License" or "offline". Once you have accessed Pandora FMS through the browser, you will be asked to enter a valid license. Click on Request new license and proceed to the next step. In this step you should fill in the contact information and the Auth key that the commercial department sent you.
Proceed to the next step by clicking on Online validation:
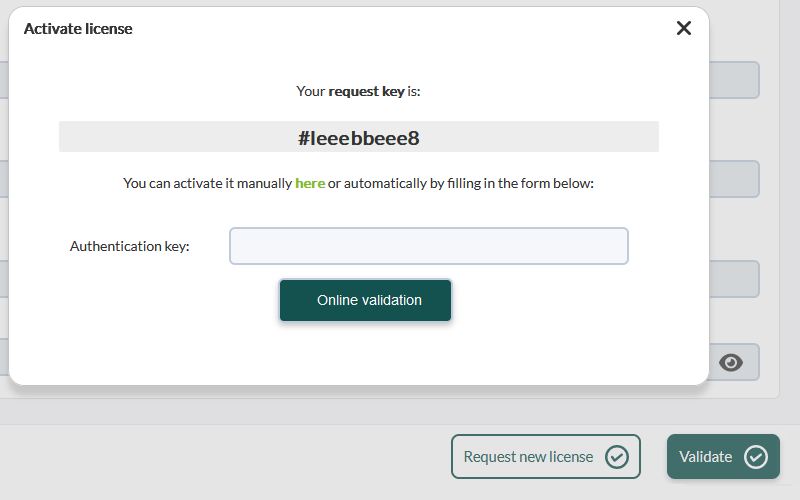
Once finished, a license will be ready to be validated.
Finish all steps, the console is ready for use.
Starting the Enterprise Server
This section is for Enterprise version users only. If you wish to evaluate a demo, please contact us.
After activating the license, the Enterprise server must be started. You may connect to Pandora FMS server through a command terminal (local or remote) or through the QuickShell feature if you access the Agent that monitors the server itself.
sudo /etc/init.d/pandora_server start
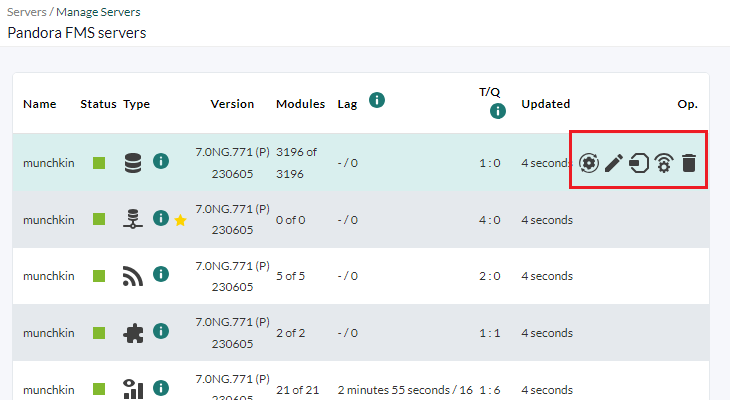
From version NG 754 onwards, you have additional options for manual start and stop of High Availability Environments (HA).
To verify its correct operation, access Pandora FMS through the browser, go to the left side menu, click on Management → Servers → Manage servers. You should see something like the following: