# MQTT
# Introduction
**The purpose of this plugin is to be able to receive messages from an MQTT topic**, having the possibility to apply filters such as words or the text format of the expected messages.
The plugin performs all these actions through a client with which it connects.
# Compatibility matrix
| **Systems where tested** | Rocky linux, Fedora 34 |
| **Systems where it works** | Any linux system
|
# Prerrequisites
- Connectivity to the host and topic from which messages are to be received is required.
# Parameters
**Connectivity parameters**
| -i, --host
| MQTT' server address |
| -p, --port
| MQTT' port address |
**Parameters for posting message in topic**
| -m, --message
| MQTT message to be sent |
| -s, --publish\_topic
| MQTT publication topic |
**Parameters for receiving messages and filtering**
| -r, --suscribe\_topic
| MQTT subscription topic |
| -t, --time
| Duration of run time in seconds |
| -f, --filter
| Filter (word) to apply. Only messages containing the word will be received.
|
| -k, --format
| Text format of the expected messages to be received
|
| -l, --limit
| Message limit |
**Pandora configuration parameters**
| --agent\_name
| Name of the agent to be created or in which the module is to be created
|
| --interval | Agent monitoring interval |
| --temporal | PandoraFMS temporary directory |
| --data\_dir
| PandoraFMS Data Directory |
| --group
| PandoraFMS Target Group |
| --transfer\_mode
| Data transfer mode, local or tentacle |
| --tentacle\_client
| Tentacle client path, by default "tentacle\_client". |
| --tentacle\_opts
| Tentacle extra options
|
| --tentacle\_port
| Tentacle port
|
| --tentacle\_address
| Tentacle IP
|
**Extra parameters**
| --log\_file
| Path where the log file will be generated |
# Manual execution
The plugin execution format is as follows:
```
./pandora_mqtt --agent_name < agent name > --host < host > --port < port > \
[ --message < message > ] [ --publish_topic < publish_topic > ] \
[ --subscribe_topic < subscribe_topic > ] [ --time < time > ] \
[ --filter < filter > ] [ --format < format > ] [ --limit < limit > ] \
[ --transfer_mode < local o tentacle > ] [ --tentacle_port < tentacle_port > ] \
[ --tentacle_address < tentacle_address > ] [ --tentacle_client < tentacle client path ] \
[ --tentacle_opts < tentacle extra options ][ -g < group > ] [ --data_dir < data dir > ] \
[ --temporal < temporary directory path > ] [ --interval < interval agent monitorings in seconds > ] \
[ --logfile < logfile path > ]
```
# Configuration in Pandora
To configure the plugin in PandoraFMS, the following steps must be followed:
**1.Upload the plugin to PandoraFMS, for example in the following path:**
```
/etc/pandora/plugin
```
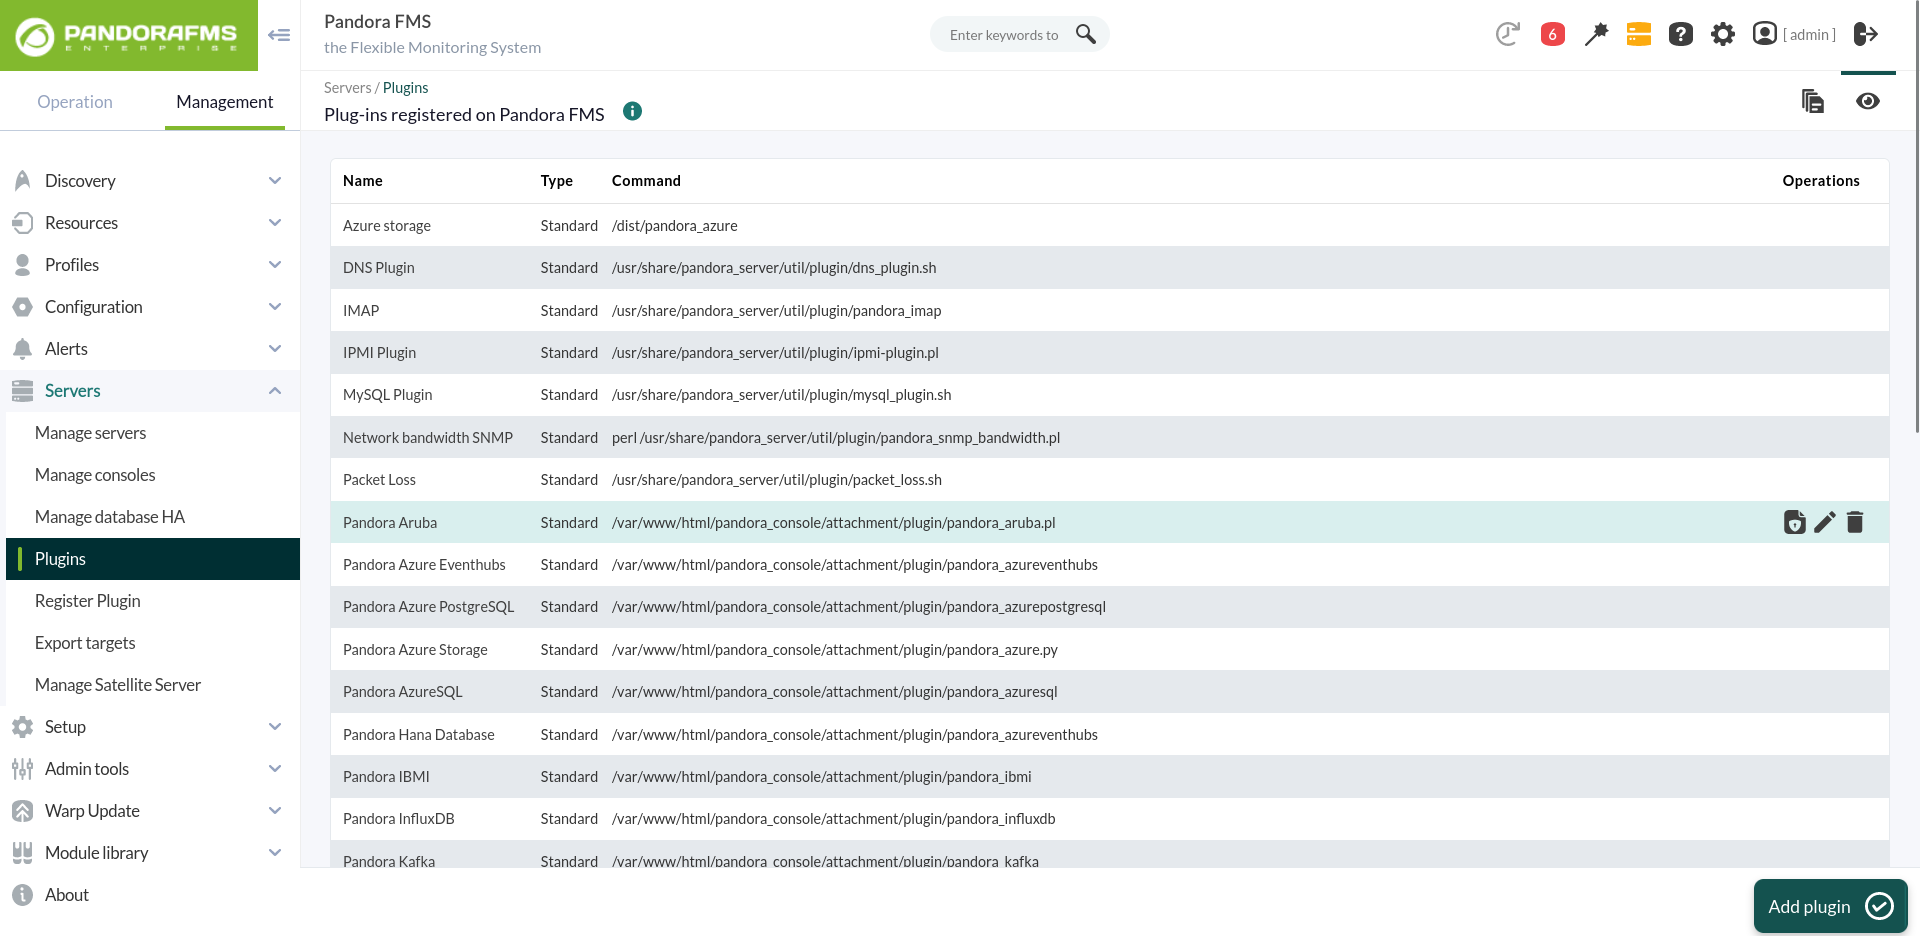
**2. Go to the plugins section and create a new one:**
[](https://pandorafms.com/guides/public/uploads/images/gallery/2024-01/VNOimagen.png)
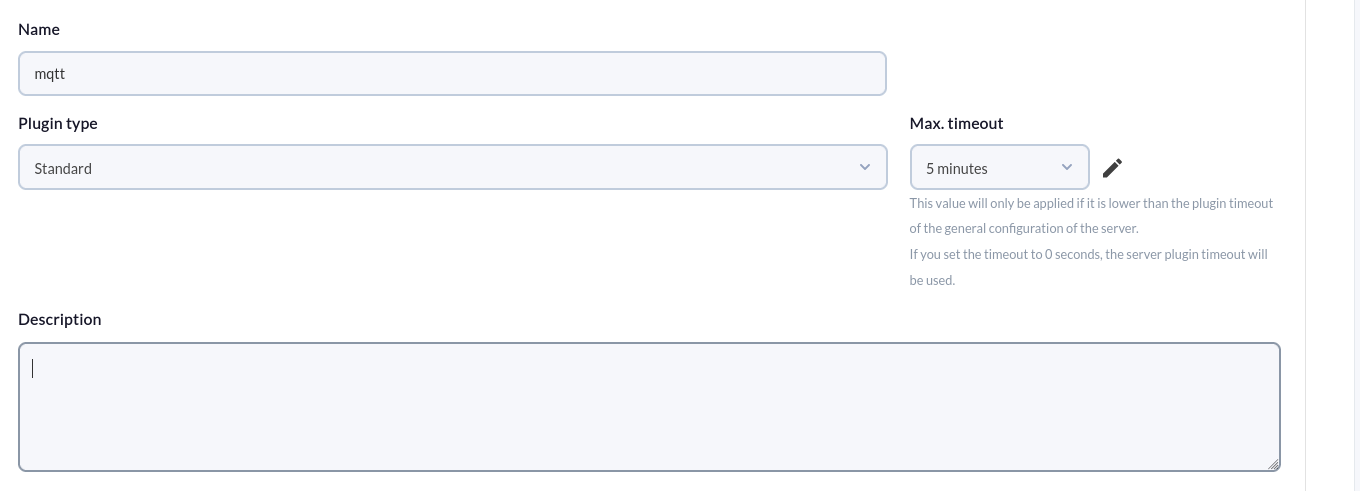
**3. Name, description and timeout are added:**
[](https://pandorafms.com/guides/public/uploads/images/gallery/2024-01/ERUimagen.png)
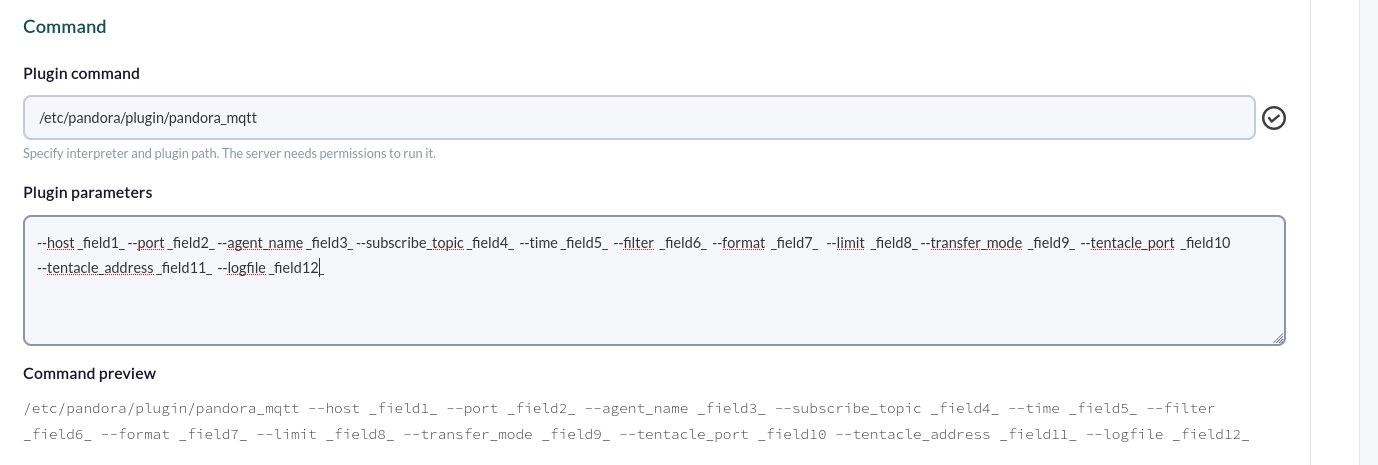
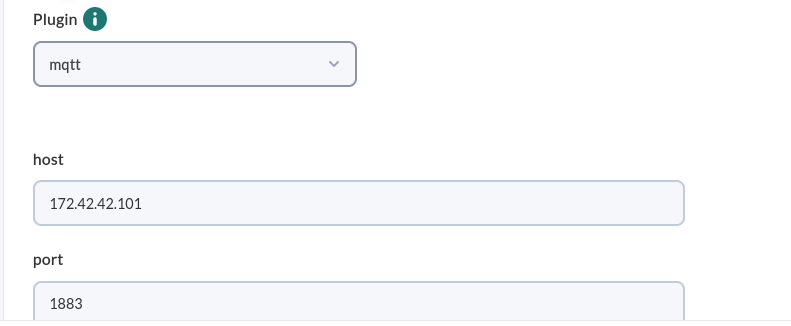
**4. The path to the plugin is added to the command and the necessary parameters for the execution of the plugin are added.**
For each parameter a macro must be configured, being the syntax of this macro the following : \_fieldx\_, where x is the positional number of the parameter, for example in the following image we see the parameters that are necessary to use to subscribe to a topic and receive messages.
[](https://pandorafms.com/guides/public/uploads/images/gallery/2024-01/HPnimagen.png)
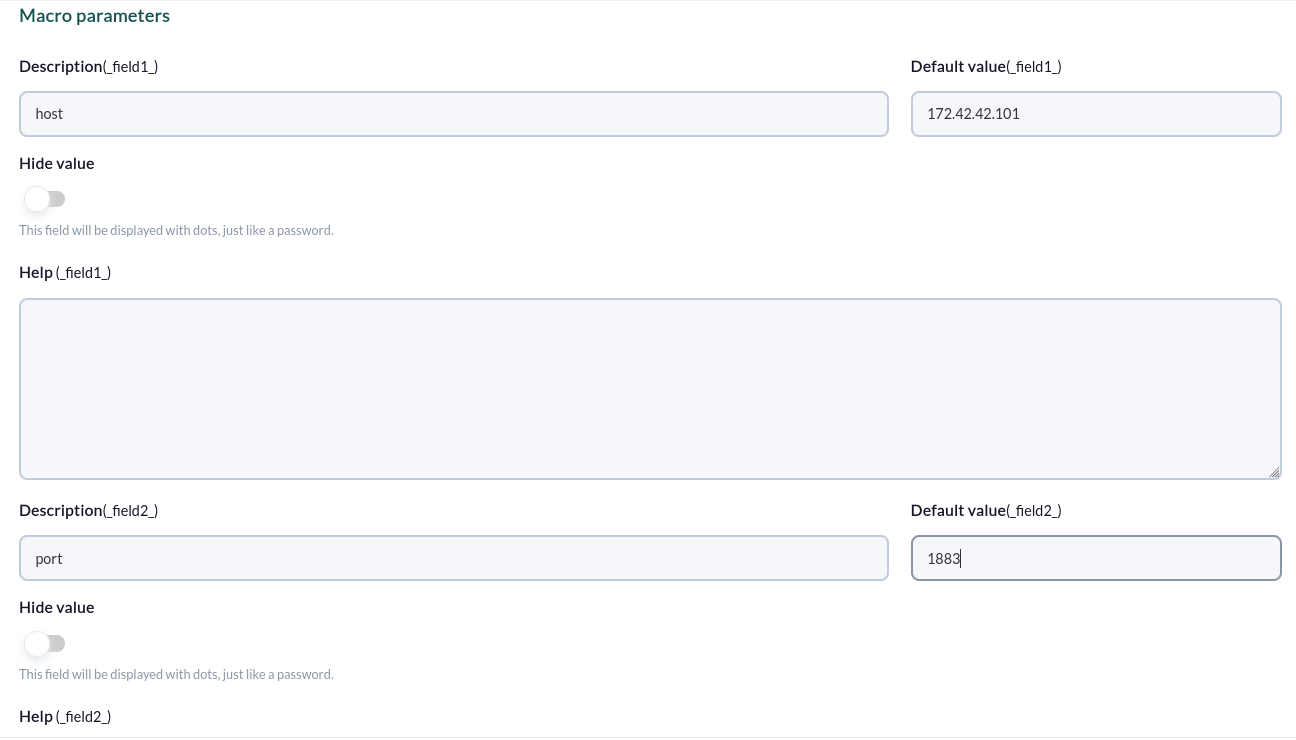
**5. Configure the above macros, adding in each one the value of the parameter:**
[](https://pandorafms.com/guides/public/uploads/images/gallery/2024-01/sDmimagen.png)
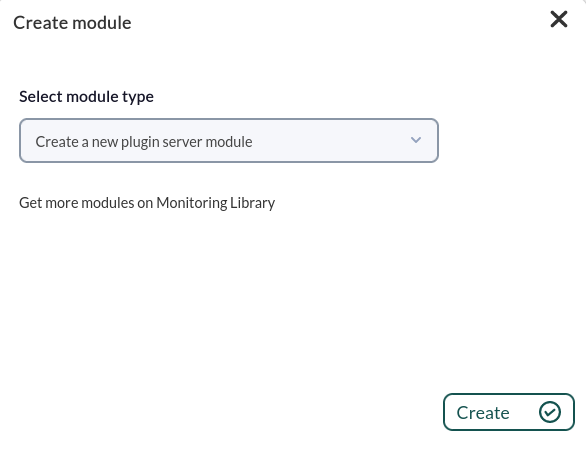
**6.** **Once configured, you should create a module in an agent that executes the plugin. In the modules menu of an agent we create a new plugin type module:**
[](https://pandorafms.com/guides/public/uploads/images/gallery/2024-01/503imagen.png)
**7.In the module configuration menu, give it a name, select the previously configured plugin and click on "create".**
[](https://pandorafms.com/guides/public/uploads/images/gallery/2024-01/kZHimagen.png)
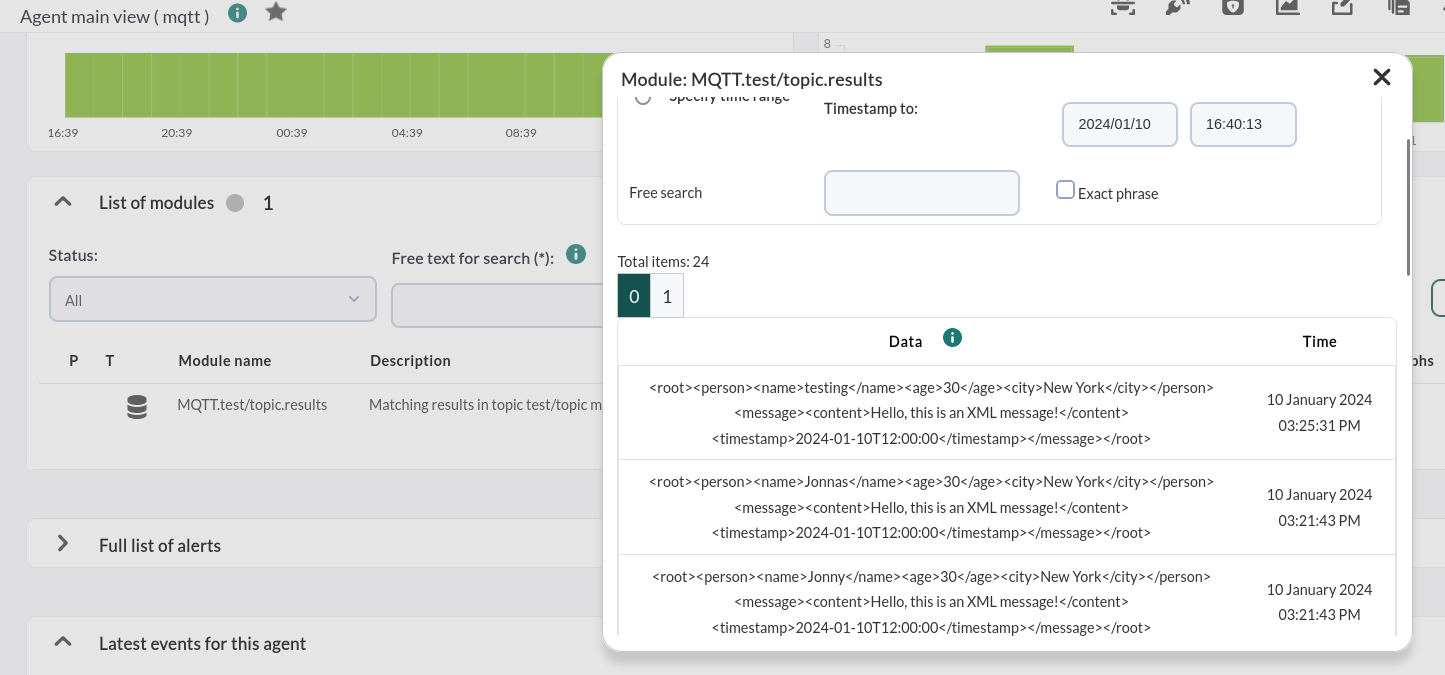
**8.In the agent selected with the --agent\_name parameter, a new module of list format will be created, which will contain the messages received by the plugin execution.**
[](https://pandorafms.com/guides/public/uploads/images/gallery/2024-01/3G0imagen.png)
# Agent and modules generated by the plugin
- The plugin will create an agent with the selected name with the --agent\_name parameter. Or in its defect it will insert the module in an agent that already exists with this name.
- The plugin will create a module:
| MQTT.<suscribe topic>.results
| Results obtained in list format, i.e. the messages received that have passed the filters used. |