# Informix remoto

# Introducción

**Ver**. 09-01-2023

Plugin para sacar datos de métricas de informix de manera remota.

<div id="bkmrk-tipo%3A-plug-in-de-ser"><div>**Tipo**: Plug-in de servidor</div></div>

# Matriz de compatibilidad

<table border="1" id="bkmrk-sistemas-donde-se-ha" style="height: 70px;"><tbody><tr style="height: 35px;"><td style="width: 233.976px; height: 35px;">**Sistemas donde se ha probado**</td><td style="width: 330.99px; height: 35px;">CentOS 7, Fedora, rocky linux

</td></tr><tr style="height: 35px;"><td style="width: 233.976px; height: 35px;">**Sistemas donde debería funcionar**</td><td style="width: 330.99px; height: 35px;">Cualquier sistema linux

</td></tr></tbody></table>

# Pre requisitos

- Tener el **Data Server** de Pandora FMS habilitado
- Tener el **Plugin Server** de Pandora FMS habilitado
- Tener instalado python3
- tener instalada la librería ibm\_db
- Tener configurado y habilitado el puerto DRDA que es el que usara el plugin para conectarse.

# Habilitar puerto DRDA para la conexión

**<span style="box-sizing: border-box; vertical-align: inherit;">1. </span>**<span style="box-sizing: border-box; color: #2a3143; font-family: 'Source Sans Pro'; font-size: 16px; font-style: normal; font-variant-ligatures: normal; font-variant-caps: normal; font-weight: 400; letter-spacing: normal; orphans: 2; text-align: left; text-indent: 0px; text-transform: none; white-space: normal; widows: 2; word-spacing: 0px; -webkit-text-stroke-width: 0px; background-color: #ffffff; text-decoration-thickness: initial; text-decoration-style: initial; text-decoration-color: initial; vertical-align: inherit;"><span style="box-sizing: border-box; vertical-align: inherit;"> Edite el archivo sqlhosts especificado en la variable de entorno $INFORMIXSQLHOSTS (o $SQLHOSTS), por ejemplo </span></span>**<span style="box-sizing: border-box; vertical-align: inherit;">/opt/informix/etc/sqlhosts</span>**<span style="box-sizing: border-box; color: #2a3143; font-family: 'Source Sans Pro'; font-size: 16px; font-style: normal; font-variant-ligatures: normal; font-variant-caps: normal; font-weight: 400; letter-spacing: normal; orphans: 2; text-align: left; text-indent: 0px; text-transform: none; white-space: normal; widows: 2; word-spacing: 0px; -webkit-text-stroke-width: 0px; background-color: #ffffff; text-decoration-thickness: initial; text-decoration-style: initial; text-decoration-color: initial; vertical-align: inherit;"><span style="box-sizing: border-box; vertical-align: inherit;"> , y agregue una línea para DRDA (drsoctcp):</span></span>

```
#dbservername    nettype       hostname      servicename      options
informixfullgx   onsoctcp   172.16.0.205   informix
informix_drda    drsoctcp   172.16.0.205   informix_drda
```

**<span style="box-sizing: border-box; vertical-align: inherit;">2.</span>**<span style="box-sizing: border-box; color: #2a3143; font-family: 'Source Sans Pro'; font-size: 16px; font-style: normal; font-variant-ligatures: normal; font-variant-caps: normal; font-weight: 400; letter-spacing: normal; orphans: 2; text-align: left; text-indent: 0px; text-transform: none; white-space: normal; widows: 2; word-spacing: 0px; -webkit-text-stroke-width: 0px; background-color: #ffffff; text-decoration-thickness: initial; text-decoration-style: initial; text-decoration-color: initial; vertical-align: inherit;"><span style="box-sizing: border-box; vertical-align: inherit;"> Edite el archivo de configuración del servidor Informix ubicado en el directorio etc para incluir la nueva definición de la base de datos como un alias. </span><span style="box-sizing: border-box; vertical-align: inherit;">Puede usar la variable de entorno $ONCONFIG para acceder a este archivo, es decir, $INFORMIXDIR/etc/$ONCONFIG por ejemplo </span></span>**<span style="box-sizing: border-box; vertical-align: inherit;">/opt/informix/etc/onconfig</span>**<span style="box-sizing: border-box; color: #2a3143; font-family: 'Source Sans Pro'; font-size: 16px; font-style: normal; font-variant-ligatures: normal; font-variant-caps: normal; font-weight: 400; letter-spacing: normal; orphans: 2; text-align: left; text-indent: 0px; text-transform: none; white-space: normal; widows: 2; word-spacing: 0px; -webkit-text-stroke-width: 0px; background-color: #ffffff; text-decoration-thickness: initial; text-decoration-style: initial; text-decoration-color: initial; vertical-align: inherit;"><span style="box-sizing: border-box; vertical-align: inherit;"> :</span></span>

```
DBSERVERNAME    informixfullgx
DBSERVERALIASES informix_drda
```

<span style="box-sizing: border-box; color: #2a3143; font-family: 'Source Sans Pro'; font-size: 16px; font-style: normal; font-variant-ligatures: normal; font-variant-caps: normal; font-weight: 400; letter-spacing: normal; orphans: 2; text-align: left; text-indent: 0px; text-transform: none; white-space: normal; widows: 2; word-spacing: 0px; -webkit-text-stroke-width: 0px; background-color: #ffffff; text-decoration-thickness: initial; text-decoration-style: initial; text-decoration-color: initial; vertical-align: inherit;">**<span style="box-sizing: border-box; vertical-align: inherit;">3.</span>**<span style="box-sizing: border-box; vertical-align: inherit;"> Edite </span>**<span style="box-sizing: border-box; vertical-align: inherit;">/etc/services</span>**<span style="box-sizing: border-box; vertical-align: inherit;"> y especifique el puerto:</span></span>

```
informix        9088/tcp # Informix server
informix_drda   9094/tcp # Informix server drda
```

**<span style="box-sizing: border-box; vertical-align: inherit;">4.</span>**<span style="box-sizing: border-box; vertical-align: inherit;"> Reinicie Informix Server para que estos cambios surtan efecto. Y establezca la propiedad </span>[<span style="box-sizing: border-box; vertical-align: inherit;">Puerto TCP/IP del servidor</span>](https://wiki.genexus.com/commwiki/servlet/wiki?9382,Server+TCP%2FIP+Port+Property)<span style="box-sizing: border-box; vertical-align: inherit;"> en DataStore con el valor 9094.</span>

<p class="callout warning">**Nota:** Si la aplicación arroja el error: ERROR 08001 IBM SQL30081N Se ha detectado un error de comunicación. Protocolo de comunicación utilizado: "TCP/IP". API de comunicación que se está utilizando: "SOCKETS". Ubicación donde se detectó el error: "172.16.0.205". Función de comunicación que detecta el error: "conectar". Códigos de error específicos del protocolo: "10060", "\*", "\*". SQLSTATE=08001 Asegúrese de que el firewall en Linux permita el puerto utilizado por DRDA. En el ejemplo 9094.</p>

<span style="box-sizing: border-box; vertical-align: inherit;"><span style="color: #2a3143; font-family: 'Source Sans Pro'; font-size: 16px; font-style: normal; font-variant-ligatures: normal; font-variant-caps: normal; font-weight: 400; letter-spacing: normal; orphans: 2; text-align: left; text-indent: 0px; text-transform: none; white-space: normal; widows: 2; word-spacing: 0px; -webkit-text-stroke-width: 0px; background-color: #ffffff; text-decoration-thickness: initial; text-decoration-style: initial; text-decoration-color: initial; display: inline !important; float: none;">Ejemplo de configuración del firewall para permitir el puerto 9094:</span></span>

```
root@fullgxinformix12 ~# firewall-cmd --list-ports
9088/tcp
root@fullgxinformix12 ~# firewall-cmd --add-port 9094/tcp
success
root@fullgxinformix12 ~# firewall-cmd --list-ports
9088/tcp 9094/tcp
root@fullgxinformix12 ~# firewall-cmd --permanent --add-port 9088/tcp
Warning: ALREADY_ENABLED: 9088:tcp
success
root@fullgxinformix12 ~# systemctl stop firewalld
root@fullgxinformix12 ~# systemctl start firewalld
root@fullgxinformix12 ~# firewall-cmd --list-ports
9088/tcp 9094/tcp
```

# Parámetros

**Parámetros**

<table border="1" id="bkmrk-%C2%A0-%C2%A0-%C2%A0-%C2%A0-%C2%A0-%C2%A0-%C2%A0-%C2%A0-%C2%A0-%C2%A0-" style="height: 232px; width: 921px;"><tbody><tr style="height: 29px;"><td style="height: 29px; width: 158px;">--database</td><td style="height: 29px; width: 763px;">Nombre de la base de datos.</td></tr><tr style="height: 29px;"><td style="height: 29px; width: 158px;">--hostname</td><td style="height: 29px; width: 763px;">Ip del host.</td></tr><tr style="height: 29px;"><td style="width: 158px; height: 29px;">--agent\_name</td><td style="width: 763px; height: 29px;">Nombre del agente.</td></tr><tr style="height: 29px;"><td style="height: 29px; width: 158px;">--agent\_alias</td><td style="height: 29px; width: 763px;">Alias del agente</td></tr><tr style="height: 29px;"><td style="width: 158px; height: 29px;">--use\_alias\_as\_name</td><td style="width: 763px; height: 29px;">Usar el alias del agente como nombre</td></tr><tr style="height: 29px;"><td style="width: 158px; height: 29px;">--module\_prefix</td><td style="width: 763px; height: 29px;">Se utiliza para ponerle un prefijo a los módulos</td></tr><tr style="height: 29px;"><td style="height: 29px; width: 158px;">--port</td><td style="height: 29px; width: 763px;">Por defecto 9089</td></tr><tr><td style="width: 158px;">--uid</td><td style="width: 763px;">Nombre de usuario</td></tr><tr><td style="width: 158px;">--password</td><td style="width: 763px;">Password</td></tr><tr style="height: 29px;"><td style="height: 29px; width: 158px;">--database</td><td style="height: 29px; width: 763px;">Nombre de la base de datos</td></tr></tbody></table>

**Parámetros configuración pandora**

<table border="1" id="bkmrk-par%C3%A1metro-descripci%C3%B3"><tbody><tr><td style="width: 161.997px;">--tentacle\_port</td><td style="width: 643.993px;">Puerto de tentacle.Por defecto 41121(opcional)</td></tr><tr><td style="width: 161.997px;">--tentacle\_address</td><td style="width: 643.993px;">Ip del servidor tentacle al que mandar los datos(opcional)</td></tr><tr><td style="width: 161.997px;">-g,--group</td><td style="width: 643.993px;">Grupo de destino de Pandora FMS (opcional)</td></tr><tr><td style="width: 161.997px;">--data\_dir</td><td style="width: 643.993px;">Directorio de datos de Pandora FMS. **Por defecto** es /var/spool/pandora/data\_in/ (opcional)</td></tr><tr><td style="width: 161.997px;">--as\_agent\_plugin</td><td style="width: 643.993px;">Es opcional, si quieres que el plugin sea de agente y te meta los módulos en el agente de pandora, ejecuta esto con un 1 (opcional)</td></tr></tbody></table>

# Ejecución manual

```
python3 pandora_informix.py --hostname <host> --port <port> --uid <user> --database <database> --password <password> --as_agent_plugin 1
```

# Configuración en PandoraFMS

**Como plugin de servidor**

**Instalación manual**

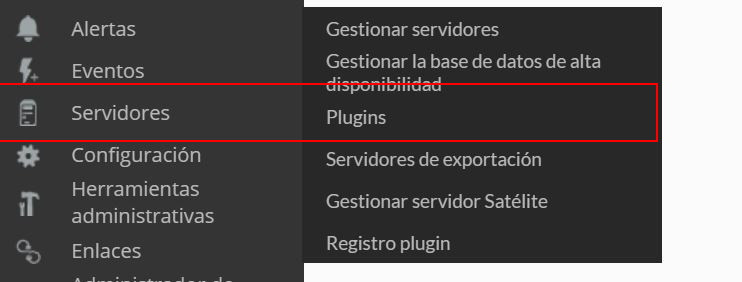
Iremos a servidores &gt; plugins:

[![image-1629974405286.png](https://pandorafms.com/guides/public/uploads/images/gallery/2021-08/scaled-1680-/image-1629974405286.png)](https://pandorafms.com/guides/public/uploads/images/gallery/2021-08/image-1629974405286.png)

Pinchamos en añadir:

[![image-1629974430627.png](https://pandorafms.com/guides/public/uploads/images/gallery/2021-08/scaled-1680-/image-1629974430627.png)](https://pandorafms.com/guides/public/uploads/images/gallery/2021-08/image-1629974430627.png)

Le ponemos en nombre y la descripción que se prefiera.

Metemos como comando la ejecución con la ruta del plugin:

```
/path_pandora_informix.py
```

<p class="callout info align-center">Recuerda que la ruta recomendada para el uso de los plugins de servidor es: /usr/share/pandora\_server/util/plugin/</p>

Y en parámetros del plugin introduciremos estos seguidos de la macro "\_field&lt;N&gt;\_", son obligatorios los parámetros de conexion, --hostname, --uid, --database y --password. El puerto por defecto es 9089 pero se puede cambiar.

<p class="callout warning">Recuerda que puedes ponerle un nombre personalizado a los agentes con el parámetro --agent\_name</p>

Una vez hecho esto, daremos a "crear".

Una vez hecho esto, solo queda llamarlo por lo que iremos a la vista de algún agente y crearemos un módulo de complementos:

[![image-1646741530197.png](https://pandorafms.com/guides/public/uploads/images/gallery/2022-03/scaled-1680-/image-1646741530197.png)](https://pandorafms.com/guides/public/uploads/images/gallery/2022-03/image-1646741530197.png)
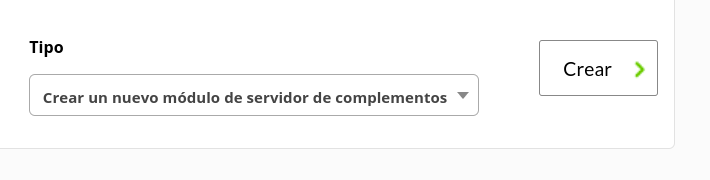
Le daremos un nombre y en el apartado "plugin" pondremos el que acabamos de configurar.

Una vez hecho esto, damos a crear.

Si el modulo se muestra con 1, quiere decir que se esta ejecutando correctamente.

# Módulos generados por el plugin

El plugin creara un agente, con el nombre personalizado y los siguientes módulos:

<div id="bkmrk-dbspace-i%2Fo"><div>**<span style="color: #6a9955;">Dbspace I/O</span>**</div></div><div id="bkmrk-"></div><div id="bkmrk-fname-dreads-dwrites"><table border="1" style="border-collapse: collapse; width: 100%;"><tbody><tr><td style="width: 100%;">fname</td></tr><tr><td style="width: 100%;">dreads</td></tr><tr><td style="width: 100%;">dwrites</td></tr></tbody></table>

</div><div id="bkmrk--0"></div><div id="bkmrk-dbspace-usage"><div><div><span style="color: #6a9955;">Dbspace usage</span></div></div></div><div id="bkmrk--1"></div><div id="bkmrk-nchunks-total-used-p"><table border="1" style="border-collapse: collapse; width: 100%; height: 116px;"><tbody><tr style="height: 29px;"><td style="width: 100%; height: 29px;">nchunks</td></tr><tr style="height: 29px;"><td style="width: 100%; height: 29px;">total</td></tr><tr style="height: 29px;"><td style="width: 100%; height: 29px;">used</td></tr><tr style="height: 29px;"><td style="width: 100%; height: 29px;">pct\_used</td></tr></tbody></table>

</div><div id="bkmrk--2"></div><div id="bkmrk-checking-tables-i%2Fo"><div><div><span style="color: #6a9955;">Checking tables I/O</span></div></div></div><div id="bkmrk--3"></div><div id="bkmrk-tabnames-diskreads-d"><table border="1" style="border-collapse: collapse; width: 100%;"><tbody><tr><td style="width: 100%;">tabnames</td></tr><tr><td style="width: 100%;">diskreads</td></tr><tr><td style="width: 100%;">diskwrites</td></tr></tbody></table>

</div><div id="bkmrk--4"></div><div id="bkmrk-session-statistics"><div><div><span style="color: #6a9955;">Session statistics</span></div></div></div><div id="bkmrk--5"></div><div id="bkmrk-hostname-logint_time"><table border="1" style="border-collapse: collapse; width: 100%;"><tbody><tr><td style="width: 100%;">hostname</td></tr><tr><td style="width: 100%;">logint\_time</td></tr><tr><td style="width: 100%;">s\_state</td></tr></tbody></table>

</div><div id="bkmrk--6"></div><div id="bkmrk-session-profile"><div><div><span style="color: #6a9955;">Session profile</span></div></div></div><div id="bkmrk--7"></div><div id="bkmrk-access-locksheld-seq"><table border="1" style="border-collapse: collapse; width: 100%; height: 145px;"><tbody><tr style="height: 29px;"><td style="width: 100%; height: 29px;">access</td></tr><tr style="height: 29px;"><td style="width: 100%; height: 29px;"><div><div><span style="color: #000000;">locksheld</span></div></div></td></tr><tr style="height: 29px;"><td style="width: 100%; height: 29px;">seqscans</td></tr><tr style="height: 29px;"><td style="width: 100%; height: 29px;">total\_sorts</td></tr><tr style="height: 29px;"><td style="width: 100%; height: 29px;">dsksorts</td></tr></tbody></table>

</div>